A clay sand preparation line isn't just a collection of machines. It's a sequence of stations where each one's output quality directly affects the next station's performance and your final mold accuracy. I've commissioned over 60 preparation lines across four continents, and the most expensive mistakes happen when buyers treat this as a shopping list instead of an integrated system.
When a muller delivers inconsistent moisture distribution, your molds crack during compaction. When a cooler can't hold temperature within ±3°C, your sand properties drift across the shift. When a screen mesh is undersized for your throughput, you're sending lumps into the molding line that cause surface defects. Each station has a job, and if it can't do that job at your production rate, every casting downstream pays the price.
This guide walks through each station in process order, explains what specs actually matter for mold quality, and shows you what to verify when comparing supplier quotations.
What a Clay Sand Preparation Line Does (and Why Component Selection Matters)
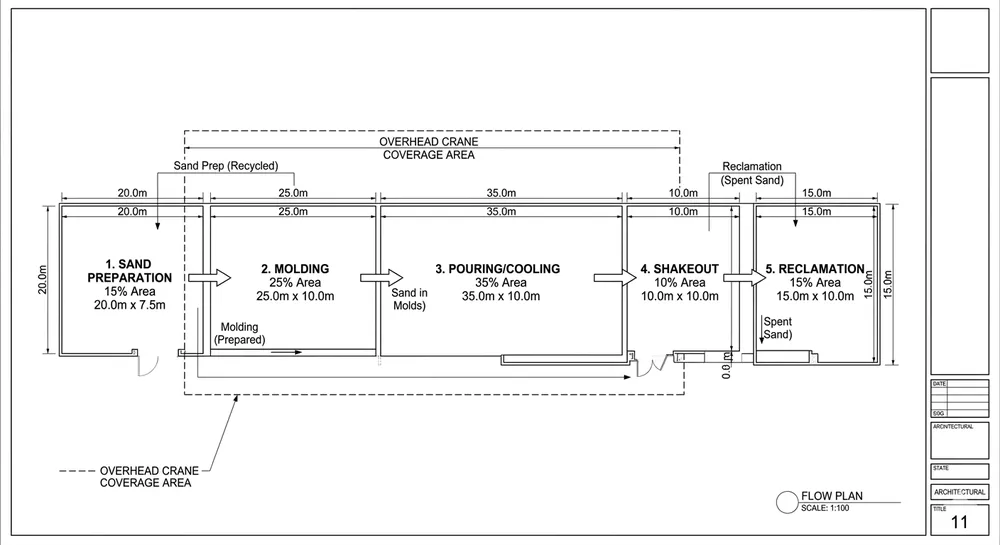
A clay sand preparation line takes reclaimed sand from your shakeout system and conditions it back to molding-ready specifications. That means removing metal contamination, breaking up lumps, cooling the sand to working temperature, adding fresh bentonite and water in precise ratios, mixing it to uniform consistency, and aerating it to the right compactability.
The line runs continuously while your molding equipment operates. If your molding line produces 80 molds per hour, your preparation line needs to process roughly 4-6 tons of sand per hour (depending on mold size). The preparation line's throughput capacity, temperature control precision, and mixing consistency determine whether your molding line can hold dimensional tolerance across an 8-hour shift.
We've seen buyers spec a preparation line based only on tonnage capacity, then discover their mold hardness varies by 15% between the first hour and the sixth hour of production. That's usually a cooler that can't maintain delta-T under load, or a muller that can't hold mixing time when batch size increases. The stations need to work as a system, not just meet individual capacity numbers.
Station-by-Station Walkthrough: Process Order and Function
Here's how sand moves through a typical preparation line, with the specs that affect mold quality at each stage.
1. Sand Hopper (Reclaimed Sand Storage)
The hopper receives hot reclaimed sand from your shakeout system. Capacity should be 1.5-2x your hourly throughput to buffer production surges. If your line processes 5 tons/hour, spec a 7.5-10 ton hopper.
The hopper needs vibrating discharge gates to prevent bridging. Hot sand clumps, and if the discharge gate stalls, your entire line stops. We use pneumatic vibrators on the hopper walls — they run continuously during discharge to keep material flowing.
What to check: Hopper volume in tons, discharge gate width (should be 3x your largest lump size), vibrator power rating. Ask if the hopper includes level sensors that signal the PLC when sand volume drops below minimum batch size.
2. Belt Conveyor (Material Transport)
The belt moves sand from the hopper to the magnetic separator. Belt speed should match your line throughput — typically 0.5-0.8 m/s for 4-6 ton/hour systems. Belt width depends on sand volume: 400-500mm belts handle most foundry applications.
The conveyor needs adjustable speed control tied to the PLC. When the downstream muller signals it's ready for the next batch, the conveyor starts. When the batch weight is reached, it stops. Fixed-speed conveyors cause either material waste (overfilling) or batch inconsistency (underfilling).
What to check: Belt width, speed range, motor power, and whether speed control integrates with the PLC. Ask about belt material — rubber belts work for sand temperatures up to 80°C, but if your reclaimed sand runs hotter, you need heat-resistant fabric belts.
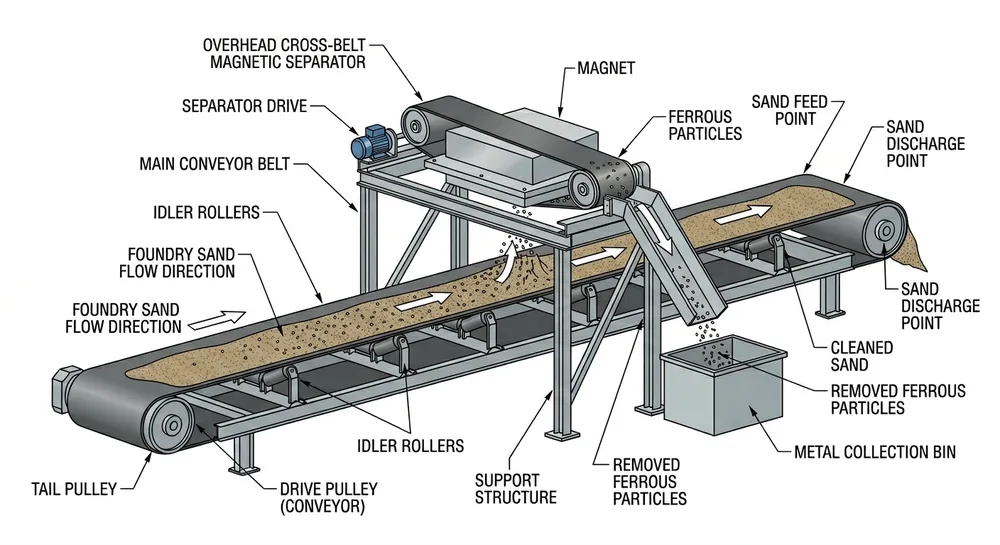
3. Magnetic Separator (Metal Contamination Removal)
The separator pulls ferrous metal particles out of the sand stream. Magnetic field strength matters: 1200-1500 Gauss removes most casting debris (gates, risers, flash). Weaker magnets miss fine metal particles that damage your molding equipment's hydraulic seals and cause surface defects in castings.
We mount the separator directly above the belt conveyor so metal particles drop into a collection bin. Self-cleaning separators use a rotating drum that automatically discharges collected metal — manual-clean separators require shutdown every 2-4 hours to clear the magnet surface.
What to check: Magnetic field strength in Gauss, separator width (should match belt width), and whether it's self-cleaning or manual. For high-volume lines (8+ tons/hour), self-cleaning is non-negotiable. Ask about the collection bin capacity — it should hold at least one shift's worth of metal debris.

4. Lump Breaker (Aggregate Reduction)
The lump breaker crushes sand clumps down to 5-10mm before screening. Reclaimed sand contains hardened lumps from spilled metal, overheated molds, and compacted fines. If these lumps reach your muller, they don't mix properly and create weak spots in the mold.
Roller-type breakers work best for clay sand — they use two counter-rotating rollers with adjustable gap spacing. Set the gap to 8-10mm for standard green sand applications. Hammer mills are faster but generate more dust and break down bentonite particles, which reduces binding strength.
What to check: Breaker type (roller vs hammer), throughput capacity, gap adjustment range, and motor power. Ask about roller surface material — hardened steel rollers last 18-24 months under continuous use, while standard steel rollers wear out in 6-8 months and start passing oversized lumps.
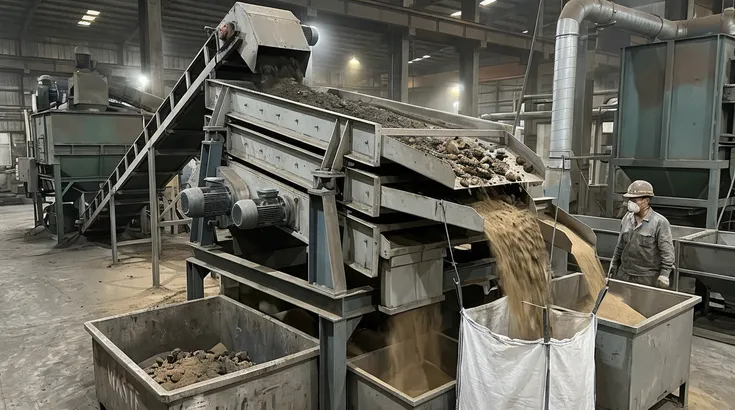
5. Vibrating Screen (Size Classification)
The screen separates properly sized sand (passing through the mesh) from oversized lumps and debris (rejected as oversize). Mesh size depends on your molding application: 10-mesh (2mm aperture) for general casting work, 14-mesh (1.4mm aperture) for precision molds.
Screen area matters more than you'd think. A 1.2m x 2.4m screen handles 4-5 tons/hour at 10-mesh. If you try to push 6 tons/hour through that same screen, efficiency drops and you start passing oversized particles. We size screens at 80% of rated capacity to maintain separation quality across the shift.
The screen needs dual-deck configuration: top deck removes oversize, bottom deck catches undersize fines. Oversize goes back to the lump breaker for re-crushing. Undersize (dust and broken bentonite) gets discarded or sent to a separate reclamation system. Only the middle fraction — properly sized sand — continues to the cooler.
What to check: Screen dimensions, mesh size options, vibration frequency (typically 1400-1600 RPM), motor power, and whether it's single-deck or dual-deck. Ask about screen cloth material — woven wire mesh lasts longer than perforated plate and handles moisture better. For more details on screen specifications and maintenance, see our Clay Sand Vibrating Screen page.

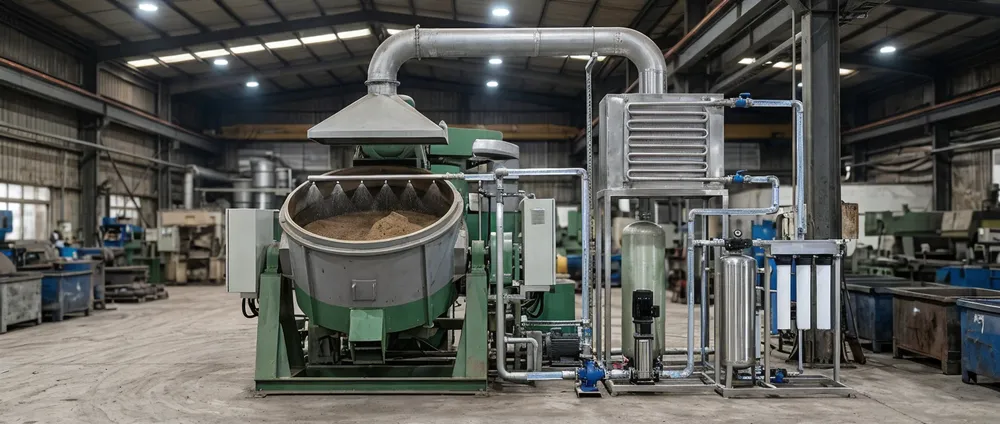
6. Sand Cooler (Temperature Control)
The cooler drops sand temperature from 60-80°C (post-shakeout) down to 35-40°C (molding temperature). Temperature control is critical: sand above 45°C causes premature moisture evaporation during mixing, which throws off your water-to-bentonite ratio. Sand below 30°C doesn't activate bentonite properly, reducing mold strength.
Fluidized bed coolers work best for continuous lines. They blow ambient air up through a perforated plate while sand flows across the bed. Cooling capacity depends on airflow rate and bed residence time. A 5 ton/hour cooler needs roughly 3000-4000 m³/hour airflow to achieve 25-30°C delta-T.
We've commissioned lines where the cooler was undersized by 20% — it worked fine at startup when ambient temperature was 20°C, but failed to hold spec when summer temperatures hit 35°C. Always verify cooling capacity at your worst-case ambient temperature, not lab conditions.
What to check: Cooling capacity in tons/hour, airflow rate in m³/hour, achievable delta-T at your ambient temperature, and whether the cooler includes temperature sensors that feed back to the PLC. Ask about dust collection — coolers generate airborne fines that need to be captured before exhaust.
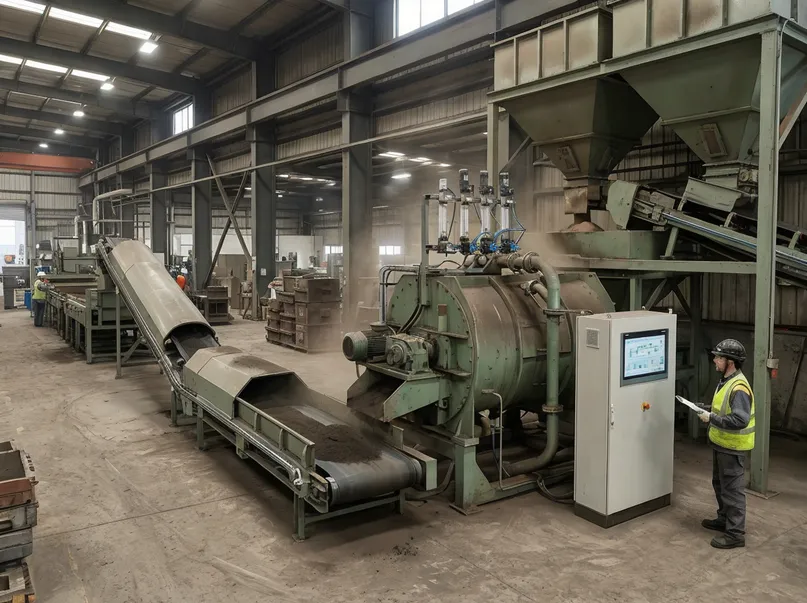
7. Sand Muller/Mixer (Bentonite and Water Addition)
The muller is the heart of the preparation line. It adds fresh bentonite clay and water to the cooled sand, then mixes everything to uniform consistency. Mixing quality determines mold strength, compactability, and dimensional stability.
Muller capacity is rated in batch size (typically 200-500 kg per batch) and cycle time (3-5 minutes per batch). A 300 kg muller with 4-minute cycle time processes 4.5 tons/hour. The muller needs variable-speed plows and adjustable mixing time — different casting alloys require different sand properties, and you adjust those properties by changing mixing intensity and duration.
Bentonite and water addition must be automated and PLC-controlled. Manual addition causes batch-to-batch variation that shows up as inconsistent mold hardness. We use screw feeders for bentonite (accuracy ±2%) and flow meters for water (accuracy ±1%). The PLC calculates addition rates based on sand moisture content measured by an inline sensor.
What to check: Batch size, cycle time, motor power, plow design (roller plows vs paddle plows), and whether bentonite/water addition is automated. Ask about the mixing chamber lining material — wear-resistant alloy liners last 12-18 months, while standard steel liners wear through in 4-6 months and contaminate your sand with iron particles.
For complete system configurations and capacity planning, see our Clay Sand Preparation Line product page.

8. Moisture Control System (Inline Measurement and Adjustment)
The moisture control system measures sand moisture content after the muller and adjusts water addition for the next batch. Target moisture content for green sand is typically 3.0-3.5% by weight. Moisture below 2.8% causes mold cracking during compaction. Moisture above 3.8% causes mold collapse and gas defects in castings.
Capacitance-type moisture sensors work best for continuous monitoring. They measure dielectric properties of the sand stream and convert that to moisture percentage. Sensor accuracy should be ±0.1% — anything less precise and you're chasing moisture drift instead of preventing it.
The PLC uses moisture sensor feedback to adjust water flow rate to the muller. If measured moisture is 3.2% and target is 3.4%, the PLC increases water addition by the calculated amount for the next batch. This closed-loop control keeps moisture within ±0.2% across the entire shift.
What to check: Sensor type, accuracy specification, response time, and whether the sensor integrates with the PLC for automatic adjustment. Ask about sensor calibration frequency — capacitance sensors drift over time and need recalibration every 3-6 months using lab-tested sand samples.
9. Aerator (Sand Conditioning and Cooling)
The aerator fluffs the mixed sand and brings it to final working temperature. It uses a rotating drum with internal flights that lift and drop the sand while blowing air through it. This breaks up any remaining clumps, evaporates excess surface moisture, and cools the sand by another 2-3°C.
Aerator residence time is typically 2-3 minutes. Drum diameter and length determine throughput capacity — a 1.2m diameter x 3.0m long aerator handles 4-5 tons/hour. The drum rotates at 8-12 RPM with airflow of 1500-2000 m³/hour.
The aerator's real job is making the sand "fluffy" — increasing bulk density and improving flowability. Sand that's been through the aerator fills the mold cavity more uniformly and compacts more consistently. We've measured 8-10% improvement in mold hardness uniformity just by adding a properly sized aerator to a line that didn't have one.
What to check: Drum dimensions, rotation speed, airflow rate, motor power, and whether the aerator includes a dust collection system. Ask about flight design — angled flights provide better lifting action than straight flights and reduce sand carryover into the exhaust system.
10. Distribution Hopper (Molding Line Feed)
The distribution hopper stores conditioned sand and feeds it to your molding line. Capacity should be 30-45 minutes of molding line consumption to buffer any preparation line stoppages. If your molding line uses 5 tons/hour, spec a 2.5-3.5 ton distribution hopper.
The hopper needs level sensors (high and low) that communicate with both the preparation line PLC and the molding line PLC. When sand level drops to the low setpoint, the preparation line starts another batch. When level reaches the high setpoint, the preparation line pauses. This prevents overfilling and ensures the molding line never runs out of sand.
What to check: Hopper volume, discharge gate design, level sensor type, and whether the hopper integrates with both PLCs. Ask about hopper geometry — conical bottom hoppers with 60° slope prevent bridging better than flat-bottom hoppers with vibrating discharge.
Key Specs That Affect Mold Quality (What to Compare When Evaluating Quotations)
When you're comparing preparation line quotations from different suppliers, these are the specs that actually matter for mold quality:
Throughput capacity: Must be 20-30% higher than your molding line consumption rate to handle production surges and allow for maintenance downtime. If your molding line uses 5 tons/hour, spec a 6-6.5 ton/hour preparation line.
Cooler delta-T: Should achieve 25-30°C temperature drop at your worst-case ambient temperature. Verify this with the supplier — don't accept "typical" cooling performance.
Muller mixing time: Should be adjustable from 2-6 minutes to accommodate different sand formulations. Fixed mixing time limits your process flexibility.
Moisture control accuracy: ±0.2% or better. Anything less precise and you'll see mold hardness variation across the shift.
Screen mesh options: Should offer 8-mesh, 10-mesh, and 14-mesh screens as interchangeable options. Different casting applications need different sand grain sizes.
PLC integration: All stations should connect to a central PLC with touchscreen HMI. Manual control of individual stations causes operator error and batch inconsistency.
For a complete overview of clay sand processing systems and how preparation lines integrate with molding and reclamation equipment, visit our Clay Sand Processing Line category page.
What Happens When Stations Underperform (Failure Modes and Casting Defects)
Here's what goes wrong when specific stations can't do their job:
Undersized magnetic separator: Fine metal particles reach the molding line, damage hydraulic seals, and cause surface defects (metal inclusions) in castings. We've seen this shut down a molding line for 3 days while seals were replaced across 8 hydraulic cylinders.
Weak lump breaker: Oversized lumps pass through to the muller, don't mix properly, and create weak spots in molds. These weak spots cause mold cracking during compaction or mold collapse during metal pouring. Scrap rate goes up by 5-8%.
Undersized screen: Overloaded screen passes oversized particles that cause surface roughness on castings. You'll see this as "sand burn" defects — rough patches on the casting surface that require extra grinding and finishing work.
Inadequate cooler: Hot sand causes premature moisture evaporation during mixing, throwing off your water-to-bentonite ratio. Molds become too dry, crack during compaction, and produce castings with sand inclusion defects. We've measured 12-15% scrap rate increases when sand temperature drifts above 45°C.
Inconsistent muller: Batch-to-batch variation in mixing quality shows up as inconsistent mold hardness. Early-shift molds might compact to 85 Shore hardness while late-shift molds only reach 75 Shore. This causes dimensional variation in castings — parts from the same mold pattern measure differently depending on when they were cast.
No moisture control: Without closed-loop moisture adjustment, you're chasing moisture drift all shift. Operators add water manually based on "feel," which introduces 0.5-0.8% moisture variation. That's enough to cause mold cracking (too dry) or gas defects (too wet) in the same production run.
Missing aerator: Sand doesn't fluff properly, fills the mold cavity unevenly, and compacts inconsistently. You'll see density variation across the mold — some areas compact to 1.65 g/cm³ while others only reach 1.55 g/cm³. This causes dimensional distortion in castings.
PLC Integration: How Control Systems Tie the Stations Together
A preparation line without integrated PLC control is just a collection of machines. The PLC coordinates station operation, adjusts process parameters based on sensor feedback, and logs production data for quality tracking.
We use Siemens or Mitsubishi PLCs (buyer's choice) with touchscreen HMI in English, Spanish, or Arabic. The control system handles:
Batch sequencing: Starts the belt conveyor when the muller signals it's ready, stops the conveyor when batch weight is reached, triggers the muller mixing cycle, and opens the discharge gate when mixing is complete.
Moisture control: Reads the inline moisture sensor, compares measured moisture to target setpoint, calculates water addition adjustment, and updates the water flow rate for the next batch.
Temperature monitoring: Tracks sand temperature at the cooler inlet and outlet, adjusts airflow if outlet temperature drifts above setpoint, and alerts the operator if cooling capacity is insufficient.
Production logging: Records batch count, total tonnage processed, moisture content per batch, sand temperature, and station runtime. This data helps you track process stability and troubleshoot quality issues.
Remote diagnostics: 4G module lets your maintenance team (or our engineers) pull error logs, view real-time sensor data, and adjust parameters without being on-site. We've diagnosed and fixed control issues remotely for customers in 14 countries.
The PLC integration is what makes a preparation line reliable enough for continuous production. Manual control requires constant operator attention and introduces human error. Automated control runs the line at consistent quality for 8-12 hour shifts with minimal supervision.
Our preparation lines ship with the PLC pre-programmed and all stations pre-wired. You connect power, run the startup sequence, and the line is operational. No on-site programming required.
Supplier Evaluation Checklist: Questions to Ask When Comparing Quotations
When you're evaluating preparation line quotations, ask these questions to separate real manufacturing capability from sales promises:
1. What's the throughput capacity at my ambient temperature? Don't accept "typical" or "rated" capacity. Get the number for your actual operating conditions.
2. Is the cooler sized for my worst-case ambient temperature? A cooler that works at 20°C ambient might fail at 35°C. Verify cooling capacity at your summer peak temperature.
3. What's the moisture control accuracy, and how is it achieved? ±0.5% accuracy isn't good enough. You need ±0.2% or better with closed-loop PLC control.
4. Are bentonite and water addition automated or manual? Manual addition causes batch variation. Automated addition with PLC control is non-negotiable for consistent mold quality.
5. What PLC brand do you use, and is remote diagnostics included? Siemens and Mitsubishi are industry-standard. Remote diagnostics via 4G module saves you from flying engineers to the site for every control issue.
6. How are the stations connected — individual controls or integrated PLC? Individual station controls require manual coordination and cause operator error. Integrated PLC control is the only way to run a reliable line.
7. What's included in the commissioning data package? You should receive test data from your specific equipment showing actual throughput, cooling performance, mixing quality, and moisture control accuracy measured during factory testing.
8. How is the equipment packaged for shipping? Modular design that fits 40HQ containers reduces freight cost and simplifies installation. Ask how many containers the complete line requires.
9. What spare parts are included, and what's the lead time for reorders? First-year consumables (screen cloth, mixer liners, hydraulic seals, sensors) should ship with the equipment. Ask about spare parts availability and shipping time for future orders.
10. What installation support do you provide? Remote commissioning via video call works if your team can read hydraulic schematics and wire control panels. On-site commissioning costs more but reduces startup risk.
For project-specific equipment recommendations and factory pricing, request a quote with your production requirements.
FAQ: Clay Sand Preparation Line Component Selection
What's the minimum preparation line configuration for a small foundry?
For a small operation (2-3 tons/hour, 40-60 molds/hour), you can run a simplified line: hopper → belt conveyor → magnetic separator → lump breaker → single-deck screen → muller with manual bentonite/water addition → distribution hopper. This cuts equipment cost by 30-40% but requires more operator attention and produces less consistent sand quality. You'll see 0.3-0.5% moisture variation across batches instead of the ±0.2% you'd get with automated moisture control. For precision casting work or high-volume production, the full line with cooler, automated moisture control, and aerator is worth the investment.
How do I know if my cooler is undersized?
Monitor sand temperature at the muller inlet across a full shift. If temperature starts at 38°C in hour one and drifts to 46°C by hour six, your cooler can't keep up with heat load. This happens when ambient temperature rises, when your shakeout system sends hotter sand than expected, or when the cooler's airflow is restricted by dust buildup on the perforated plate. Clean the cooler bed weekly and verify airflow rate matches the design spec. If temperature still drifts, the cooler is undersized for your actual operating conditions.
Can I add stations to an existing preparation line later?
Yes, but it's easier if the line was designed with expansion in mind. Adding a cooler or aerator to an existing line requires space for the equipment, modifications to the belt conveyor routing, and PLC programming updates. We've retrofitted dozens of lines this way — typical project takes 2-3 weeks including equipment fabrication, shipping, and installation. The bigger challenge is integrating the new station's control system with your existing PLC. If your current line uses manual controls, you might need to upgrade to PLC control before adding automated stations.
What causes sand moisture to drift during production even with a moisture control system?
Three common causes: (1) Moisture sensor calibration drift — capacitance sensors need recalibration every 3-6 months using lab-tested samples. (2) Inconsistent bentonite addition — if the screw feeder is worn or the bentonite supply has moisture variation, your water-to-bentonite ratio changes even if water addition is accurate. (3) Ambient humidity changes — if your facility humidity swings from 40% to 70% across the shift, sand picks up or loses moisture between the muller and the molding line. The solution is more frequent sensor calibration, regular bentonite quality checks, and climate control in the sand handling area.
Why do some suppliers quote preparation lines without aerators?
Cost reduction. An aerator adds 8-12% to the line cost, and some buyers see it as optional. We include aerators on all our lines above 4 tons/hour capacity because the mold quality improvement justifies the cost. Sand that's been through the aerator has 8-10% better compaction uniformity, which translates to tighter dimensional tolerance on castings. For low-volume operations (under 3 tons/hour) or non-precision casting work, you can skip the aerator and save the cost. For anything else, it's a false economy — you'll spend more on scrap and rework than you saved on equipment.
How often do preparation line components need maintenance?
Screen cloth: replace every 6-9 months depending on sand abrasiveness. Muller mixing chamber liners: 12-18 months for wear-resistant alloy, 4-6 months for standard steel. Magnetic separator: clean weekly if manual, self-cleaning types run 3-6 months between maintenance. Belt conveyor: inspect belt tension monthly, replace belt every 18-24 months. Cooler: clean perforated bed plate weekly to maintain airflow. Moisture sensor: recalibrate every 3-6 months. Hydraulic seals and pneumatic components: inspect quarterly, replace as needed. The PLC logs runtime hours for each station, which helps you schedule preventive maintenance before failures happen.
For detailed specifications on complete preparation line systems and how they integrate with Clay Sand Molding Line equipment, contact our engineering team with your production requirements.

Baocun Zhu is the Senior Clay Sand Process Engineer at TZFoundry in Qingdao. With over 14 years commissioning clay sand molding, reclamation, and preparation lines for export foundries, he turns floor-space constraints and throughput targets into working production systems. His...