Post-processing eats 15-30% of your casting margin. Grinding, shot blasting, and machining turn a $12 as-cast part into a $16 finished part, and that gap comes straight out of your profit. Worse, it adds 2-3 days to your lead time and creates a bottleneck when order volume spikes.
The real problem isn't that sand castings have rough surfaces. It's that most production lines aren't configured to control the variables that determine surface finish in the first place. You're fixing at the grinding station what should have been prevented at the molding machine.
We've commissioned sand casting lines where buyers hit Ra 6.3-12.5 μm on gray iron without touching a grinder. The difference isn't exotic sand or special coatings — it's tuning five production-line parameters that most foundries leave at factory default settings.
Why Surface Finish Degrades on the Production Line
Surface roughness comes from three mechanisms, and all three happen before the metal hits the mold.
Sand grain penetration — When compaction pressure is too low or sand grain size is inconsistent, molten metal pushes into the gaps between sand particles. You get a rough, grainy surface with Ra values above 25 μm. This is the most common failure mode we see on lines running reclaimed sand without proper screening.
Gas porosity at the mold-metal interface — Moisture in the sand or incomplete coating coverage creates steam pockets during pouring. The casting surface ends up with pinholes and rough patches. Ductile iron is especially sensitive because the higher pouring temperature (1380-1420°C versus 1260-1320°C for gray iron) generates more gas.
Mold erosion during pouring — If your pouring temperature is 50°C above the minimum required for fluidity, the metal stream erodes the mold cavity surface and picks up sand particles. You'll see embedded sand grains on the casting surface, and Ra values jump to 20-30 μm even with fine-grain sand.
The cost breakdown: grinding a 5 kg gray iron casting from Ra 25 μm down to Ra 6.3 μm takes 8-12 minutes of labor plus consumables. At 200 castings per shift, that's 26-40 hours of grinding time. If you're paying $15/hour for grinding labor, you're spending $390-600 per shift on a problem that starts at the sand reclamation system.
The Five Production-Line Variables That Control Surface Finish
Surface finish is a function of equipment configuration, not luck. These five parameters determine whether you're grinding every part or shipping as-cast.
1. Sand Grain Fineness Number (GFN)
GFN measures the average grain size of your molding sand. Higher GFN means finer grains and smoother mold surfaces.
For gray iron castings targeting Ra 6.3-12.5 μm, you need GFN 55-70. For aluminum (which shows surface defects more visibly), push to GFN 65-80. Ductile iron sits in between at GFN 60-75.
The problem: reclaimed sand loses fines during thermal cycling. After 15-20 cycles, your GFN drops from 65 to 50 even if you started with properly graded new sand. Most foundries don't measure GFN weekly, so they don't catch the drift until surface finish complaints start coming in.
How to control it on the line: Your clay sand reclamation line needs a multi-deck vibrating screen with 40-mesh, 70-mesh, and 140-mesh screens. The 40-mesh removes oversize particles, the 70-mesh and 140-mesh separate the fines. You're targeting a grain distribution where 85-90% of particles fall between 40 and 140 mesh.
We run GFN tests on reclaimed sand every Monday morning. If GFN drops below 60, we blend in 10-15% new sand to bring the average back up. The new sand cost ($40-60 per ton) is cheaper than the grinding labor you'd spend fixing rough castings.
2. Compaction Pressure and Mold Hardness
Compaction pressure determines how tightly sand grains pack together. Higher pressure gives you a denser mold surface with smaller gaps between grains, so molten metal can't penetrate.
Target mold hardness: 85-92 on the B-scale hardness tester for gray iron, 90-95 for ductile iron and aluminum. Below 85, you'll see metal penetration and rough surfaces. Above 95, the mold becomes brittle and cracks during handling.
How to tune it: Modern molding machines use PLC-controlled hydraulic rams with adjustable compaction pressure. We set gray iron lines to 0.8-1.0 MPa squeeze pressure, ductile iron to 0.9-1.1 MPa, aluminum to 1.0-1.2 MPa.
The catch: compaction pressure needs to match your sand's clay content and moisture level. If you're running 8% bentonite clay with 3.5% moisture, 0.8 MPa gives you 88-90 hardness. Drop the moisture to 3.0%, and the same pressure only gets you 82-84 hardness. You need to re-tune compaction when you adjust sand conditioning.
We've seen lines where the operator changed the sand mixer moisture setpoint from 3.5% to 3.0% (trying to reduce mold drying time) without telling anyone. Mold hardness dropped from 90 to 80, surface finish went from Ra 10 μm to Ra 22 μm, and the buyer spent two weeks grinding parts before they figured out the root cause.
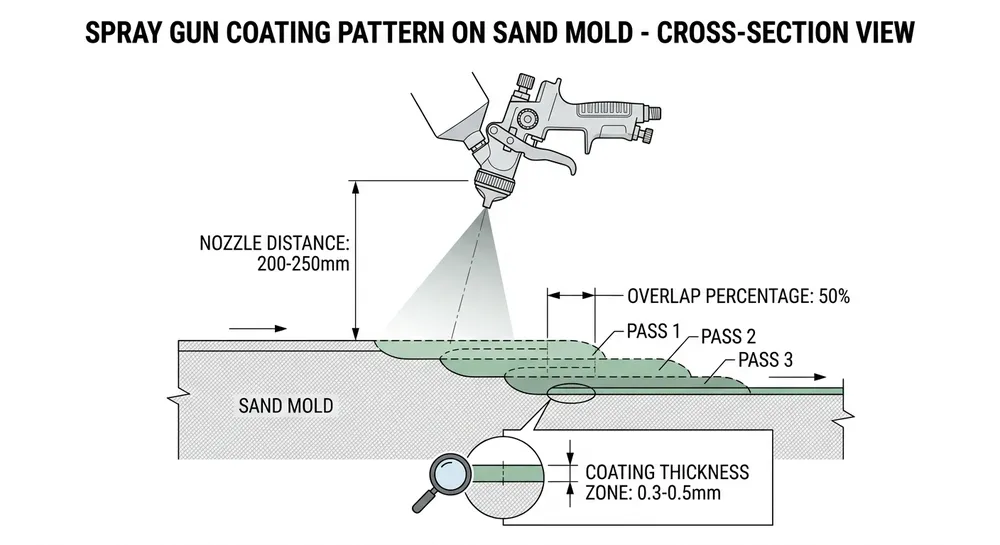
3. Mold Coating Thickness and Coverage
Mold coating creates a barrier between sand and metal. It fills the micro-gaps between sand grains and provides a smooth surface for the casting.
For gray iron, you need 0.3-0.5 mm coating thickness. Ductile iron requires 0.4-0.6 mm because the higher pouring temperature increases mold-metal reaction. Aluminum needs 0.2-0.4 mm — thicker coatings can crack and flake off during pouring.
Application method matters: Spray coating gives better coverage than brush or dip coating, but only if your spray pressure and nozzle distance are correct. We run spray guns at 0.3-0.4 MPa air pressure, 200-250 mm from the mold surface, with 50% overlap between passes.
Uneven coating is worse than no coating. If one section of the mold has 0.6 mm coating and another has 0.2 mm, the thin section will have rough finish while the thick section might trap gas and create porosity. You need consistent application, which means either automated spray stations or well-trained operators with process discipline.

4. Pouring Temperature Control
Every alloy has a minimum pouring temperature for complete mold filling. Pour 30-50°C above that minimum, and you get good fluidity without excessive mold erosion. Pour 80-100°C above minimum, and the metal stream starts eating into the mold surface.
Gray iron (class 30): 1280-1320°C Ductile iron: 1380-1420°C Aluminum A356: 720-750°C
The problem: most foundries measure pouring temperature with a handheld pyrometer at the ladle, but temperature drops 20-40°C between the ladle and the mold cavity (depending on pouring time and ladle design). If you're targeting 1300°C at the ladle for gray iron, you might be pouring at 1260°C into the mold — right at the edge of cold shut risk. Operators compensate by increasing ladle temperature to 1340-1360°C, which gives good filling but erodes the mold surface.
Better approach: Measure temperature at the pouring basin, not the ladle. Install a continuous temperature monitoring system on your Sand Casting Production Line that logs every pour. You'll see the actual mold-entry temperature and can tune your ladle temperature to hit the target without overshooting.
We switched a buyer's gray iron line from ladle measurement to basin measurement and dropped their average pouring temperature from 1350°C to 1310°C. Surface finish improved from Ra 18 μm to Ra 9 μm, and they stopped seeing embedded sand grains on the casting surface.
5. Shakeout Timing and Cooling Rate
Shakeout timing affects how the casting separates from the mold. Shake out too early (while the casting is still above 400°C for gray iron), and thermal shock can crack the mold surface, leaving sand particles stuck to the casting. Shake out too late, and the sand sinters onto the casting surface.
Gray iron: 15-25 minutes after pouring Ductile iron: 20-30 minutes Aluminum: 8-12 minutes
The timing depends on casting section thickness. A 10 mm wall section cools faster than a 40 mm section, so you can't use the same shakeout time for all parts. Automated lines with PLC control can adjust shakeout conveyor speed based on part geometry, but manual lines need operator judgment.
Detection method: If you're seeing sand particles sintered onto the casting surface (especially in thick sections), you're shaking out too late. If you're seeing mold cracking and sand embedment in thin sections, you're shaking out too early. The fix is to measure actual casting surface temperature with an infrared thermometer at shakeout and adjust timing until you're consistently in the 350-450°C range for gray iron.
Step-by-Step: Tuning Your Sand Reclamation System for Surface Finish
Most surface finish problems start at the sand reclamation system, not the molding machine. Here's how to tune your reclamation line to maintain consistent GFN.
Step 1: Baseline your current sand quality
Pull three sand samples from different locations in your sand storage hopper. Run GFN tests on all three. If the spread is more than 5 GFN points (e.g., 58, 62, 67), your sand mixing isn't uniform and you'll get inconsistent surface finish across different molds.
Also run a clay content test (methylene blue method) and moisture test. Target 8-10% active clay content and 3.0-3.5% moisture for green sand systems.
Step 2: Check your vibrating screen mesh condition
Worn screen mesh lets oversize particles through and loses fines. Inspect the 70-mesh and 140-mesh screens — if you see holes or stretched areas, replace them. Screen mesh costs $80-150 per deck, but worn screens cost you 10-15 GFN points and turn into grinding labor downstream.
We replace vibrating screen mesh every 6 months on lines running 2 shifts per day. High-volume lines (3 shifts, 7 days) need replacement every 3-4 months.
Step 3: Adjust your fines return ratio
The clay sand vibrating screen separates sand into three streams: oversize (rejected), mid-size (returned to the system), and fines (either returned or partially rejected depending on your setup).
If your GFN is dropping over time, you're losing too many fines. Increase the fines return ratio from 80% to 90-95%. If your GFN is climbing and you're seeing excessive dust, you're returning too many fines — drop the return ratio to 70-80%.
The adjustment is usually a gate valve or adjustable chute at the fines discharge point. Small changes (10-15% adjustment) make a big difference in GFN.
Step 4: Blend in new sand when GFN drops below target
Even with optimized screening, reclaimed sand gradually loses fines. When your GFN drops 5 points below target, blend in 10-15% new sand. Mix it thoroughly in your sand mixer before sending it to the molding line.
New sand cost: $40-60 per ton. If you're molding 50 tons of sand per day and adding 10% new sand weekly, that's $140-210 per week. Compare that to grinding labor: 200 castings per shift × 10 minutes per casting × $15/hour = $500 per shift. The new sand pays for itself in one day.

Step-by-Step: Optimizing Molding Machine Compaction for Target Ra Values
Once your sand quality is consistent, you can tune compaction parameters to hit specific surface finish targets.
Step 1: Measure your current mold hardness
Use a B-scale mold hardness tester. Take readings at 5 locations on the mold surface: center, four corners. Average the readings. If the spread is more than 5 points (e.g., 82, 87, 91, 85, 89), your compaction pressure distribution is uneven.
Uneven compaction usually means worn squeeze plates or misaligned hydraulic rams. Check the squeeze plate surface for wear patterns and measure ram alignment with a dial indicator.
Step 2: Set target compaction pressure based on alloy
Gray iron: 0.8-1.0 MPa Ductile iron: 0.9-1.1 MPa Aluminum: 1.0-1.2 MPa
Start at the low end of the range and increase in 0.05 MPa increments until you hit your target mold hardness (85-92 for gray iron, 90-95 for ductile iron and aluminum).
Step 3: Run test castings and measure surface finish
Pour 10 test castings at your new compaction setting. Measure Ra values at 3 locations on each casting using a portable surface roughness tester. Average the results.
Expected Ra values with optimized compaction and GFN 60-70:
- Gray iron: 8-12 μm
- Ductile iron: 10-14 μm
- Aluminum: 6-10 μm
If you're not hitting these targets, check your mold coating thickness and pouring temperature before adjusting compaction further. Over-compaction (mold hardness above 95) causes mold cracking and doesn't improve surface finish.
Step 4: Lock in the parameters and train operators
Once you've found the compaction pressure that delivers target Ra values, lock the PLC setpoint and document it in your process control plan. Train all operators on the target mold hardness range and how to check it with the B-scale tester.
We've seen lines where one operator ran at 0.9 MPa (hitting Ra 9 μm) and another ran at 0.7 MPa (getting Ra 18 μm) because nobody documented the correct setting. Process discipline matters as much as equipment capability.
Common Mistakes That Destroy Surface Finish
These four mistakes show up on almost every line we commission. They're easy to fix once you know what to look for.
Mistake 1: Over-reclaimed sand with degraded clay
Reclaimed sand loses active clay content through thermal degradation. After 20-30 cycles, your clay content drops from 9% to 6-7%, and the remaining clay has reduced bonding strength. The sand won't compact properly even at high squeeze pressure.
How to detect it: Run a methylene blue test on your reclaimed sand. If active clay content is below 7%, you need to add new bentonite. Target 8-10% active clay for consistent compaction.
The fix: Add 1-2% fresh bentonite clay to your sand mixer. Mix thoroughly for 3-5 minutes before sending sand to the molding line. Bentonite costs $200-300 per ton, but you only need 10-20 kg per ton of sand.
Mistake 2: Inconsistent mold coating thickness
Manual spray coating produces 0.2-0.7 mm thickness variation depending on operator technique. The thin spots give you rough surface finish, the thick spots trap gas and create porosity.
How to detect it: Cut a coated mold in half and measure coating thickness at 10 locations with a micrometer. If the range is more than 0.2 mm (e.g., 0.3-0.6 mm), your application process needs work.
The fix: Install an automated coating station with PLC-controlled spray guns, or train operators to use a consistent spray pattern (50% overlap, 200-250 mm distance, 3-4 passes). Check coating thickness weekly until you see consistent results.
Mistake 3: Wrong sand-to-binder ratio
Too much binder (clay + water) makes the sand sticky and hard to compact evenly. Too little binder gives you weak molds that erode during pouring.
How to detect it: Your sand should feel slightly damp and hold its shape when squeezed, but crumble easily when poked. If it's sticky or muddy, you have too much moisture. If it's dry and won't hold shape, you need more moisture or clay.
The fix: Run a moisture test (oven drying method) and adjust your sand mixer water addition. Target 3.0-3.5% moisture for green sand. If moisture is correct but the sand still won't compact, check clay content — you might need to add bentonite.
Mistake 4: Pouring temperature 80-100°C above minimum
Operators often pour hot to avoid cold shuts and misruns, but excessive temperature erodes the mold surface and embeds sand grains in the casting.
How to detect it: If you're seeing embedded sand grains on the casting surface (especially near the gate and riser), your pouring temperature is too high. Measure temperature at the pouring basin, not the ladle.
The fix: Drop pouring temperature in 20°C increments until you're 30-50°C above the minimum for complete filling. Run test castings at each temperature and check for cold shuts. Once you find the minimum safe temperature, lock it in and train operators to hit that target consistently.
Surface Finish by Alloy Type: What's Achievable at the Line Level
Different alloys behave differently in sand molds. Here's what you can realistically achieve with optimized line parameters versus typical unoptimized results.
| Alloy Type | Unoptimized Ra (μm) | Optimized Ra (μm) | Key Variables |
|---|---|---|---|
| Gray Iron (Class 30) | 20-30 | 8-12 | GFN 60-70, compaction 0.8-1.0 MPa, coating 0.3-0.5 mm |
| Ductile Iron | 25-35 | 10-14 | GFN 65-75, compaction 0.9-1.1 MPa, coating 0.4-0.6 mm |
| Aluminum A356 | 15-25 | 6-10 | GFN 70-80, compaction 1.0-1.2 MPa, coating 0.2-0.4 mm |
| Carbon Steel | 30-40 | 12-18 | GFN 60-70, compaction 0.9-1.1 MPa, coating 0.5-0.7 mm |
Why the differences: Aluminum has lower pouring temperature (720-750°C versus 1280-1320°C for gray iron), so there's less mold-metal reaction and less gas generation. You can achieve smoother finish with the same sand quality.
Ductile iron is harder to control because the high pouring temperature (1380-1420°C) increases mold erosion risk and gas generation. You need finer sand (higher GFN) and thicker coating to compensate.
Carbon steel is the most challenging — high pouring temperature (1540-1580°C) plus high reactivity with sand means you'll always have rougher surface finish than gray iron or aluminum. Even with optimized parameters, Ra 12-18 μm is about the best you can do without post-processing.
How TZFoundry Production Lines Address Surface Finish Variables
When we configure a Sand Casting Production Line, surface finish control is built into the equipment specification, not added later as an afterthought.
Sand reclamation system: Multi-deck vibrating screens with 40-mesh, 70-mesh, and 140-mesh decks maintain GFN 55-75 depending on your target alloy. Adjustable fines return gates let you tune the grain distribution without changing screen mesh. Magnetic separators remove tramp iron that would damage molding machine patterns.
PLC-controlled compaction: Hydraulic molding machines with closed-loop pressure control hold ±0.02 MPa squeeze pressure across the entire production run. You set the target pressure based on alloy type (0.8-1.2 MPa range), and the PLC adjusts ram position to compensate for sand density variation. Mold hardness stays within ±2 points instead of the ±5-8 point variation you get with manual pressure control.
Automated coating stations: Optional spray coating systems apply 0.3-0.6 mm uniform coating thickness with ±0.05 mm variation. Six-axis spray arms cover complex mold geometries that manual operators can't reach consistently. Coating thickness is adjustable through the HMI — you can switch from 0.4 mm (gray iron) to 0.6 mm (ductile iron) without retraining operators.
Temperature monitoring: Continuous pyrometer systems log pouring temperature for every mold. Data exports to your quality management system so you can correlate surface finish defects with temperature excursions. If an operator pours at 1360°C instead of the target 1310°C, you'll see it in the log and can pull those castings for inspection before they ship.
The modular design means you can add surface-finish upgrades without replacing the entire line. If you're currently running basic reclamation without fine screening, we can add a 140-mesh deck and fines return system to your existing equipment. If you're doing manual coating, we can retrofit an automated spray station. You're not locked into your initial configuration.
When Post-Processing Is Still Justified
Line-level improvements don't eliminate post-processing for every application. Here's when grinding and machining still make economic sense.
Machined surfaces and tight tolerances: If your casting has machined bearing surfaces or bolt holes with ±0.05 mm tolerance, you're machining those features anyway. The as-cast surface finish on non-machined areas matters, but the machined areas will be cut to final dimension regardless of starting Ra value.
High-value castings with complex geometry: A $200 casting with internal passages and thin-wall sections might need shot blasting to remove sand from hard-to-reach areas even if the external surface finish is acceptable. The post-processing cost is 5-8% of part value, which is tolerable for high-margin products.
Cosmetic applications: If your casting gets powder coated or painted and the customer spec calls for Ra 3.2 μm or better, you'll need to grind even an optimized as-cast surface (Ra 8-12 μm). The line-level improvements reduce grinding time from 12 minutes to 4-5 minutes per part, but you're still grinding.
When line-level improvement is the better investment: If you're casting 500-2000 parts per day with similar geometry and alloy type, and 80%+ of the surface area is non-machined, optimizing your production line parameters will cut post-processing cost by 60-80%. The payback period is typically 3-6 months.
A buyer running gray iron valve bodies (1200 parts/day, 70% non-machined surface area) was spending $450/shift on grinding labor to hit Ra 12.5 μm. We tuned their sand reclamation system (added 140-mesh screen, adjusted fines return), increased molding compaction from 0.75 MPa to 0.95 MPa, and installed automated coating. As-cast Ra dropped from 24 μm to 10 μm. They still grind the machined surfaces, but the non-machined areas ship as-cast. Grinding labor dropped to $120/shift, saving $330/day. The equipment upgrades cost $45,000 and paid back in 4.5 months.

What to Do Next
Surface finish problems don't fix themselves. If you're grinding 30-50% of your casting surface area to meet customer specs, you're paying for a production line problem with post-processing labor.
Start with sand quality. Pull samples from your reclamation system and run GFN tests. If you're below 55 GFN for gray iron or below 65 for aluminum, your sand system needs attention before you touch anything else. Check your vibrating screen mesh condition and fines return ratio.
Then measure mold hardness at your molding machine. If you're below 85 on the B-scale for gray iron, increase compaction pressure in 0.05 MPa increments until you hit 88-92 hardness. Run test castings and measure Ra values to confirm improvement.
If you're already hitting GFN 60-70 and mold hardness 88-92 but still seeing rough surface finish, check your mold coating thickness and pouring temperature. Inconsistent coating or excessive pouring temperature will destroy surface finish even with perfect sand and compaction.
For line configuration questions — whether to add fine screening to your existing reclamation system, upgrade to PLC-controlled compaction, or install automated coating — send your current casting specs and target Ra values to our engineering team. We'll recommend the specific equipment changes that address your surface finish variables and calculate payback based on your production volume. Request a quote with your alloy type, current Ra values, target Ra values, and daily production rate.

Zhang Peng leads lost foam casting systems at TZFoundry, where he has spent over 12 years engineering vacuum casting lines, coating systems, and foam pattern equipment for export foundries. He specializes in defect prevention and yield optimization across cast iron...