A foundry in Texas ordered a furan resin sand line from us in 2019. Three months after commissioning, they were burning through 18% more resin than their production rate should require. The castings looked fine, but their binder cost per ton was killing the job margin. We flew an engineer out. The problem wasn't the mixer — it was the raw sand. Moisture content was running 0.8-1.2% instead of the 0.2% maximum their resin system needed. The excess water was reacting with the catalyst before the sand even hit the mold, forcing them to overdose resin to compensate.
They'd skipped the moisture test at intake because "the supplier said it was dry." That assumption cost them $47,000 in wasted resin over three months.
Sand quality testing isn't about paperwork. It's about knowing whether you're mixing resin into sand that can actually hold it, and whether the sand coming back from reclamation is clean enough to reuse without wrecking your next batch. Skip the wrong test at the wrong stage, and you either waste binder or scrap castings. Both eat your margin.
Why Sand Quality Changes at Every Stage
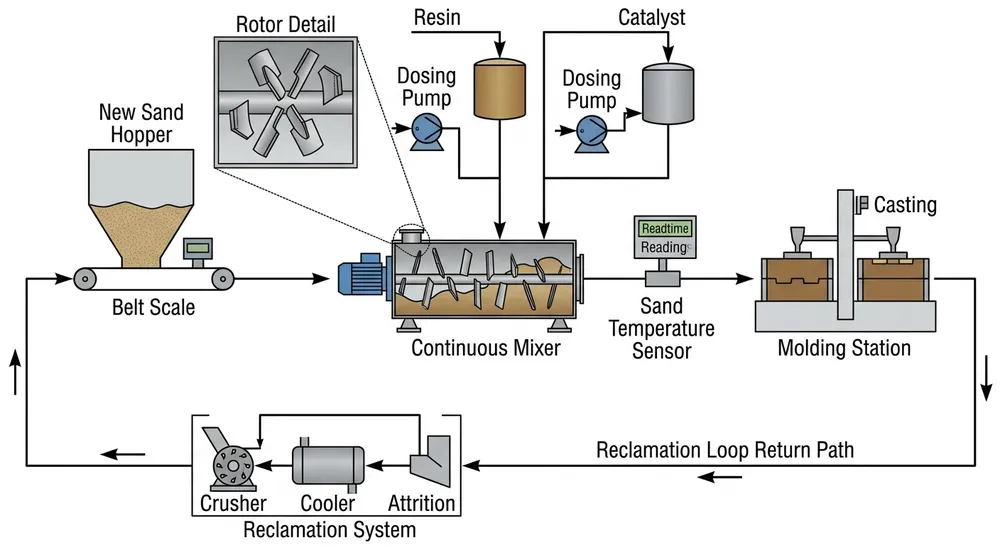
A Resin Sand Preparation Production Line moves sand through five distinct states: raw intake, screened and classified, resin-coated, cured in the mold, and thermally reclaimed. Each stage introduces contamination risk or property drift.
Raw sand arrives with clay fines, moisture, and sometimes residual organics from storage or transport. Screening removes oversize particles but doesn't touch moisture or acid demand. Mixing adds resin and catalyst — if the sand's moisture or temperature is wrong, the binder won't coat evenly. Curing locks in the bond, but it also starts the thermal breakdown clock. Reclamation burns off the resin, but it leaves carbon residue (measured as LOI) and can fracture grains if the temperature runs too high.
Testing catches these problems before they compound. A 0.5% moisture error at intake becomes a 12% resin waste at mixing. A 2.5% LOI in reclaimed sand becomes porosity defects in your next casting run. The tests are cheap. The failures are not.
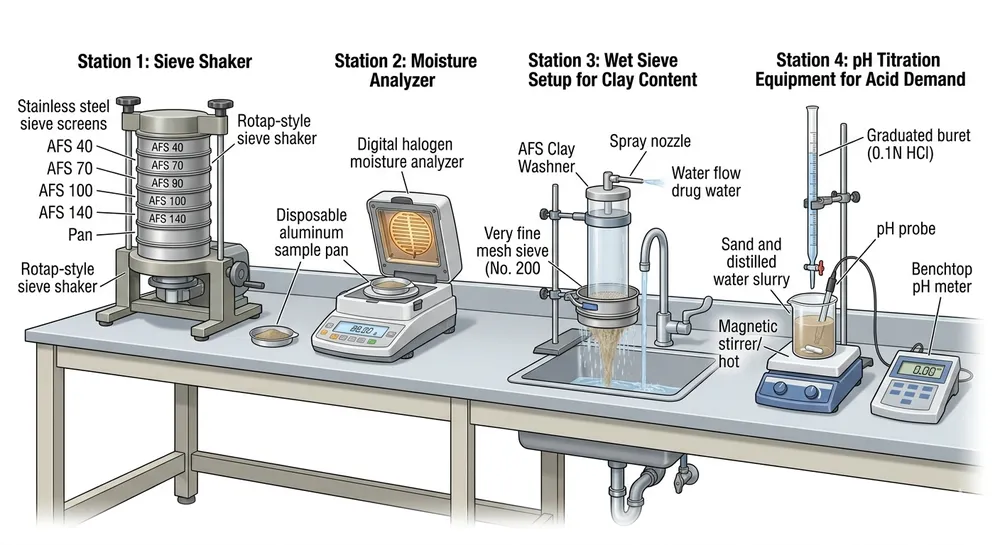
Stage 1: Raw Sand Intake Testing
Test raw sand before it enters your system. We run four checks in our commissioning lab, and we recommend the same protocol for any foundry running a Resin Sand Production Line above 5 tons per hour.
Grain Fineness Number (AFS GFN) — This tells you whether the sand matches your mold design. Run a sieve analysis using the standard AFS 12-sieve set (6 through 270 mesh). Weigh the retained sand on each screen, calculate the fineness number. For furan and phenolic resin systems, most iron and steel casting foundries spec 50-70 GFN. Aluminum foundries often run finer, 60-80 GFN, because the casting detail requires it.
If your GFN drifts more than ±3 points from spec, your permeability and surface finish will shift. We've seen foundries accept "close enough" sand at 45 GFN when their process was designed for 55 GFN — the molds stripped fine, but gas defects went up 8% because the coarser sand changed the permeability.
Moisture Content — Weigh a 50-gram sample, dry it at 105-110°C for two hours, reweigh. Calculate moisture as a percentage. Maximum acceptable moisture for most resin sand systems: 0.2%. Above that, you're paying for water to react with your catalyst instead of sand to bond with your resin.
Furan systems are especially sensitive. Furfuryl alcohol resin cures through an acid-catalyzed reaction, and moisture interferes with the catalyst. If your moisture runs 0.5%, you'll need to increase catalyst dosage by 10-15% to hit the same strip time — and that extra catalyst costs more than the test equipment.
(We learned this the hard way in 2016. A batch of "dry" sand from a coastal supplier tested at 0.9% moisture. The mixer operator kept adding resin because the working time was too short. Took us two days to figure out the sand was the problem, not the resin ratio.)
Clay Content and Fines Percentage — Wash a 50-gram sample through a 325-mesh (45-micron) sieve using the wet sieve method. Dry and weigh what passed through. This is your clay and silt fraction. For resin sand systems, keep this below 1.0%. Clay particles coat the sand grains and prevent resin adhesion. You'll see it as weak tensile strength even when your resin dosage is correct.
Acid Demand Value (ADV) — This test measures how much acid the sand consumes before reaching a target pH. It's critical for sodium silicate (waterglass) binder systems and useful for furan systems if you're sourcing sand from multiple suppliers. High acid demand means the sand contains carbonate minerals or other alkaline contaminants that neutralize your catalyst.
Run the methylene blue or pH titration test per AFS standards. Acceptable ADV for resin sand: below 5 mL. Above that, you'll burn through catalyst trying to overcome the sand's buffering capacity.

Stage 2: Post-Screening and Classification Checks
After your sand passes through vibrating screens and air classifiers, verify that the equipment is actually removing what it's supposed to remove. We've commissioned lines where the screen mesh was worn through in one corner — the sand looked clean, but 3% oversize particles were getting through and jamming the Resin Sand Mixer discharge gate.
Sieve Distribution Verification — Pull a sample from the screened sand outlet once per shift. Run a quick 3-sieve check: one screen above your target range, one at your median GFN, one below. You're not recalculating the full GFN — you're just confirming that oversize and undersize fractions are being removed.
Acceptable result: less than 2% retained on the oversize screen, less than 5% passing the undersize screen. If you're outside that range, your screen mesh is either clogged or damaged.
Dust Extraction Validation — If your preparation line includes a dust collection system (and it should — resin sand mixing generates fines), check that it's pulling the right fraction. Weigh the dust collector discharge over a 1-hour run. Compare it to your sand throughput. You should be removing 0.5-1.5% of total sand weight as dust, depending on your raw sand quality.
If dust removal drops below 0.3%, your collector filters are clogged or your airflow is too weak. If it's above 2%, you're pulling good sand into the dust bin and wasting material.
Stage 3: After Mixing — Resin-Coated Sand Testing
This is where most foundries focus their testing effort, and for good reason. The sand leaving your mixer determines whether your molds will strip cleanly, hold dimensional tolerance, and resist metal penetration. We run three tests here, and we recommend inline sampling every 30 minutes during production.
Resin-to-Sand Ratio Verification — The mixer's dosing system should deliver your target resin percentage (typically 1.0-1.8% for furan, 1.2-2.0% for phenolic). But dosing pumps drift, flow meters read wrong, and batch weights vary. Verify the actual resin content using loss on ignition (LOI) on fresh mixed sand.
Weigh a 50-gram sample of resin-coated sand, burn it in a muffle furnace at 650°C for 30 minutes, reweigh. The weight loss is your resin content. Compare it to your target dosage. Acceptable tolerance: ±0.15% of target. If you're targeting 1.5% resin and measuring 1.3%, you're either underdosing or your sand moisture is higher than you think.
(This test also catches mixer calibration errors. We've seen foundries run for weeks at 1.2% resin when their process spec called for 1.5%, simply because no one verified the dosing pump output after a maintenance event.)
Tensile Strength at Set Intervals — Resin sand gains strength as it cures. Measure tensile strength at three points: 1 hour, 3 hours, and 24 hours after mixing. Use a standard dog-bone specimen (AFS standard) and a tensile testing machine.
Typical acceptable ranges for furan resin sand:
- 1 hour: 150-250 psi (1.0-1.7 MPa)
- 3 hours: 250-350 psi (1.7-2.4 MPa)
- 24 hours: 300-450 psi (2.1-3.1 MPa)
If your 1-hour strength is below 150 psi, your working time is fine but your strip time will be too long. If 24-hour strength is below 300 psi, you have a resin dosage problem, a catalyst problem, or a sand contamination problem. Check your moisture and clay content first — those are the usual culprits.
Working Time and Strip Time Measurement — Working time is how long the sand remains flowable after mixing. Strip time is how long before the mold is strong enough to remove the pattern. Both depend on resin type, catalyst level, and ambient temperature.
Measure working time with a simple flow test: pack mixed sand into a standard AFS specimen tube, invert it, and time how long before it stops flowing. Furan systems typically give 8-15 minutes working time at 20-25°C. Phenolic systems run longer, 15-25 minutes.
Measure strip time by making a test core, waiting, and checking when it reaches your minimum handling strength (usually 100-120 psi tensile). For furan, strip time is typically 20-40 minutes. For phenolic, 30-60 minutes.
If working time is too short, your operators can't close the mold before the sand sets. If strip time is too long, your production rate drops. Both are adjustable through catalyst dosage, but only if you're measuring them.

Stage 4: Cured Mold and Core Testing
Once the sand has cured in the mold or core box, run these checks to confirm that your process is delivering the properties your casting needs.
Scratch Hardness — This is a quick field test. Drag a standard hardness pick (or even a pocket knife) across the mold surface at a consistent angle and pressure. The mold should resist scratching without crumbling. If the surface powders or flakes, your resin dosage is too low or your cure time was too short.
We don't rely on scratch hardness for specification compliance — it's too subjective — but it's a fast go/no-go check that catches obvious problems before you pour metal.
Permeability — Permeability measures how easily gas can escape through the sand mold during metal pouring. Too low, and you get gas porosity defects. Too high, and you lose dimensional accuracy because the metal penetrates the mold surface.
Use a standard permeability meter (AFS or equivalent). Acceptable range depends on your casting alloy and section thickness, but for general iron and steel work, target 150-250 permeability units. Aluminum castings often run higher, 200-300 units, because the lower pouring temperature generates less gas.
If permeability is out of range, check your sand GFN first. Finer sand = lower permeability. Coarser sand = higher permeability. If GFN is correct, check your resin dosage — excess resin clogs the pore structure and drops permeability.
Loss on Ignition (LOI) Baseline — Before you send the mold to reclamation, establish a baseline LOI. This is the resin content that went into the mold. After reclamation, you'll measure LOI again to see how much resin residue remains. The difference tells you how effective your reclamation process is.
Burn a sample at 650°C for 30 minutes, same procedure as the post-mixing LOI test. Typical baseline LOI for a cured furan mold: 1.5-2.0% (slightly higher than the fresh mixed sand because some moisture has evaporated during cure).
Stage 5: Reclaimed Sand Testing
Sand coming out of your Resin Sand Reclamation Plant is not the same as virgin sand. Thermal reclamation burns off most of the resin, but it leaves carbon residue, changes the grain shape, and can shift the pH. Test reclaimed sand before you blend it back into your mixing system.
LOI After Thermal Reclamation — This is the most critical test for reclaimed sand. LOI measures the carbon residue left on the grain surface after burning off the resin. High LOI means incomplete combustion, and that residue will interfere with resin adhesion in your next batch.
Acceptable LOI for reclaimed sand: below 0.5% for furan systems, below 0.3% for phenolic systems. Phenolic resin leaves more char, so the reclamation temperature needs to run higher (typically 650-750°C vs. 550-650°C for furan).
If your reclaimed sand LOI is above 0.5%, your reclamation furnace temperature is too low, your residence time is too short, or your airflow is insufficient. We've seen foundries try to "save energy" by dropping the furnace setpoint from 650°C to 580°C — their LOI went from 0.4% to 1.2%, and their next batch of molds had 15% lower tensile strength because the resin couldn't bond to the carbon-coated grains.
Grain Shape Analysis — Thermal reclamation fractures sand grains. The longer you recycle the same sand, the more angular and fractured it becomes. Excessive grain fracturing increases surface area, which increases resin demand and lowers permeability.
Run a microscopic grain shape analysis every 500 tons of reclaimed sand throughput (or monthly, whichever comes first). Compare the grain shape to your virgin sand baseline. If you're seeing more than 20% increase in angular grains, your reclamation temperature is too high or your mechanical handling (conveyors, bucket elevators) is too aggressive.
Some grain fracturing is inevitable. The question is whether it's drifting your process out of control. If your resin dosage has crept up 0.2% over six months and your permeability has dropped 30 units, grain fracturing is the likely cause. At that point, you need to either lower your reclamation temperature or bleed off a percentage of reclaimed sand and replace it with virgin material.
pH and Acid Demand for Reuse Suitability — Thermal reclamation can shift sand pH, especially if your casting alloy contains elements that form alkaline oxides (magnesium, calcium). Measure pH using a slurry method: mix 10 grams of reclaimed sand with 25 mL of distilled water, let it sit for 10 minutes, measure with a pH meter.
Acceptable pH range: 6.5-7.5. If pH drifts above 8.0, your reclaimed sand is consuming catalyst and you'll need to increase dosage to compensate. If pH drops below 6.0, you may have acidic contamination from core wash or mold coatings.
Re-run the acid demand test (same procedure as raw sand intake). Acceptable ADV for reclaimed sand: below 7 mL. Slightly higher than virgin sand is normal — the thermal cycle can expose new mineral surfaces — but if ADV exceeds 10 mL, the sand is no longer economical to reuse. You're spending more on extra catalyst than you're saving by recycling the sand.

Common Testing Mistakes That Cost Money
Skipping moisture checks in humid climates — Foundries in the Gulf Coast, Southeast Asia, and coastal regions often assume their sand is "dry enough" because it's stored indoors. We've commissioned lines in Houston, Jeddah, and Jakarta where the raw sand moisture was running 0.6-1.0% even in climate-controlled warehouses. The humidity gets into the sand during transport and storage. Test it anyway.
Using outdated AFS sieve sets — Sieve mesh wears out. The openings get larger, and your GFN calculation drifts. We've seen foundries run the same sieve set for 5+ years without calibration. Their "55 GFN" sand was actually 52 GFN, and they couldn't figure out why their permeability kept dropping. Replace your sieves every 2 years or 500 tests, whichever comes first.
Testing tensile strength at the wrong cure time — If your process spec says "minimum 200 psi at 1 hour" and you're testing at 90 minutes, you're not measuring what you think you're measuring. Resin sand strength increases with time, so a late test will pass even if your mixing is wrong. Set a timer. Test at the specified interval.
Ignoring temperature effects on working time — Resin cure rate doubles for every 10°C increase in temperature. If you calibrate your catalyst dosage in January (15°C ambient) and don't recheck it in July (30°C ambient), your working time will drop from 12 minutes to 6 minutes and your operators will be fighting the sand. We recommend seasonal recalibration — check your working time and strip time whenever ambient temperature shifts more than 10°C.
Mixing reclaimed sand back in without testing LOI — This is the most expensive mistake. A foundry in Mexico was recycling sand at 1.8% LOI (nearly four times the acceptable limit) because they'd never tested it. They assumed the reclamation furnace was "working fine" because it was running. Their resin consumption was 40% higher than it should have been, and they were getting porosity defects in 12% of castings. We tested the reclaimed sand, found the LOI problem, adjusted the furnace temperature and residence time, and their resin cost dropped $8,000 per month.
Setting Up an Inline QC Protocol with PLC-Integrated Checkpoints
Manual sampling and lab testing catch problems, but they're reactive. By the time you get the test result, you've already mixed 2 tons of bad sand. Inline quality checkpoints built into your preparation line's PLC control system catch problems in real time.
We integrate three types of inline sensors on TZFoundry preparation lines for buyers who want automated QC:
Moisture sensors at raw sand intake — Capacitance or microwave moisture sensors mounted in the sand feed hopper. The sensor reads moisture content continuously and sends the data to the PLC. If moisture exceeds your setpoint (typically 0.2%), the PLC triggers an alarm and optionally diverts the sand to a drying system before it reaches the mixer.
Cost to add this during line commissioning: approximately $3,500-5,000 per sensor. Payback period: 2-4 months if you're running more than 10 tons per hour, because it prevents the resin overdosing that happens when wet sand hits the mixer.
Resin flow meters on mixer dosing pumps — Magnetic or Coriolis flow meters measure actual resin flow rate in real time. The PLC compares measured flow to target flow and adjusts the pump speed to maintain your setpoint. This eliminates the manual resin ratio verification test — the system is self-correcting.
We've shipped lines with closed-loop resin dosing control to buyers in Germany and South Korea where labor cost makes manual testing uneconomical. The flow meter adds $4,000-6,000 to the mixer cost, but it cuts resin waste by 3-5% and eliminates the need for a technician to run LOI tests every 30 minutes.
Temperature sensors in reclamation furnace zones — Multi-zone temperature monitoring with PLC feedback control. The system maintains each furnace zone at the target temperature (typically 3-5 zones ranging from 400°C preheat to 700°C combustion to 300°C cooling). If any zone drifts more than ±20°C from setpoint, the PLC adjusts burner output or airflow to correct it.
This prevents the LOI drift that happens when furnace temperature sags during high-throughput periods. We include multi-zone temperature control as standard on our reclamation plants above 5 tons per hour capacity.
Automated sampling alerts — Even with inline sensors, you still need periodic lab verification. Program your PLC to trigger a sampling reminder every X tons of throughput or Y hours of runtime. The HMI screen displays "Sample Due — Raw Sand Intake" or "Sample Due — Reclaimed Sand LOI" and logs whether the operator acknowledged it. This creates an audit trail and prevents the "we forgot to test" problem.
Equipment and Instrumentation Checklist for a Foundry Sand Testing Lab
If you're setting up sand testing capability in-house (and you should — sending samples to an outside lab adds 2-3 days to your feedback loop), here's the minimum equipment list:
For raw sand and reclaimed sand testing:
- AFS standard sieve set (12 sieves, 6 through 270 mesh) with mechanical sieve shaker — $2,500-4,000
- Moisture analyzer or drying oven (105-110°C) with analytical balance (0.01g resolution) — $1,500-3,000
- Muffle furnace (650°C minimum) for LOI testing — $2,000-4,500
- pH meter with calibration solutions — $300-800
- Wet sieve setup (325 mesh) for clay content testing — $400-700
For resin-coated sand testing:
- Tensile strength testing machine (dog-bone specimen, 0-500 psi range) — $8,000-15,000
- AFS standard specimen tubes and rammers — $500-1,000
- Permeability meter (AFS standard) — $3,000-6,000
- Timer and temperature/humidity monitor for working time tests — $200-400
Total investment for a basic in-house sand testing lab: $18,000-32,000. This pays for itself in 6-12 months if you're running a preparation line above 3 tons per hour, because it eliminates the resin waste and scrap castings that come from untested sand.
(We run this exact equipment set in our commissioning lab. Every preparation line we ship gets tested with sand samples the buyer provides, and we send them the full test report before the equipment leaves our facility. If you're buying a line from us, you'll see these numbers on your commissioning documentation.)
What to Do Next
Sand quality testing is not optional if you want your resin sand preparation line to run at target efficiency. The tests are straightforward, the equipment is affordable, and the payback is immediate — you stop wasting resin on bad sand and stop scrapping castings because of contamination you didn't catch.
If you're specifying a new preparation line or upgrading an existing system, send us your sand specifications: grain size range, resin type (furan/phenolic/sodium silicate), target tensile strength, and production rate. Our engineering team will recommend the preparation line configuration with the right inline testing checkpoints and tell you which tests you can automate and which ones need manual sampling. We'll also send you the commissioning test data from your specific equipment before it ships, so you know exactly what performance to expect when it arrives at your facility.
For foundries already running a preparation line, start with the five-stage testing protocol in this article. Test raw sand at intake, verify screening performance, check resin dosage and tensile strength after mixing, measure LOI on reclaimed sand, and adjust your process when the numbers drift. The testing takes 30-45 minutes per shift. The resin savings and scrap reduction will show up in your cost reports within the first month.

Liu Haoran is the Resin Sand Production Line Technical Manager at TZFoundry. Over 11 years of hands-on work with furan, phenolic, and coated sand systems, he has commissioned 40+ resin sand lines for export buyers and developed binder dosing protocols...