TZFoundry Preview

DNOOO blank theme is active for local preview.

Resin Sand Preparation Production Line Process Flow – From Raw Sand to Mold-Ready Mix

A mold that cracks 20 minutes into pouring costs you the casting, the metal, and the production slot. The usual suspect? Inconsistent resin distribution during sand preparation. Most buyers focus on mixer capacity when evaluating a Resin Sand Preparation Production Line, but the real cost control happens upstream — in how raw sand moves through screening, temperature conditioning, and dosing before it ever reaches the mixer bowl.

A resin sand preparation production line is an integrated system that converts raw silica sand (or reclaimed sand) into mold-ready resin-coated sand through controlled material handling, precise binder dosing, and continuous mixing. The process flow determines your binder consumption rate, mold strength consistency, and how much reclaimed sand you can reintroduce without quality loss. Get the sequence wrong and you'll see it in your scrap rate within the first week.

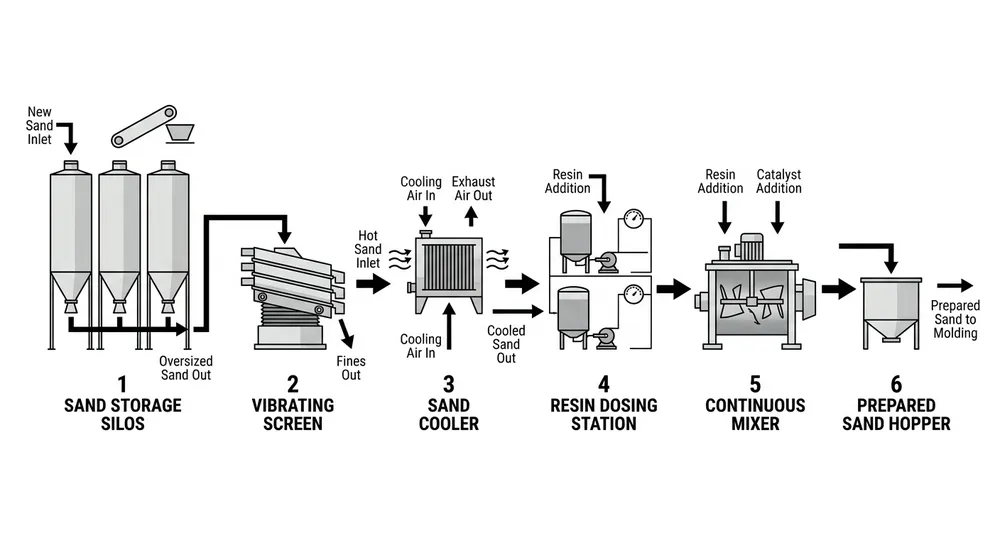
The Six-Stage Resin Sand Preparation Process Flow

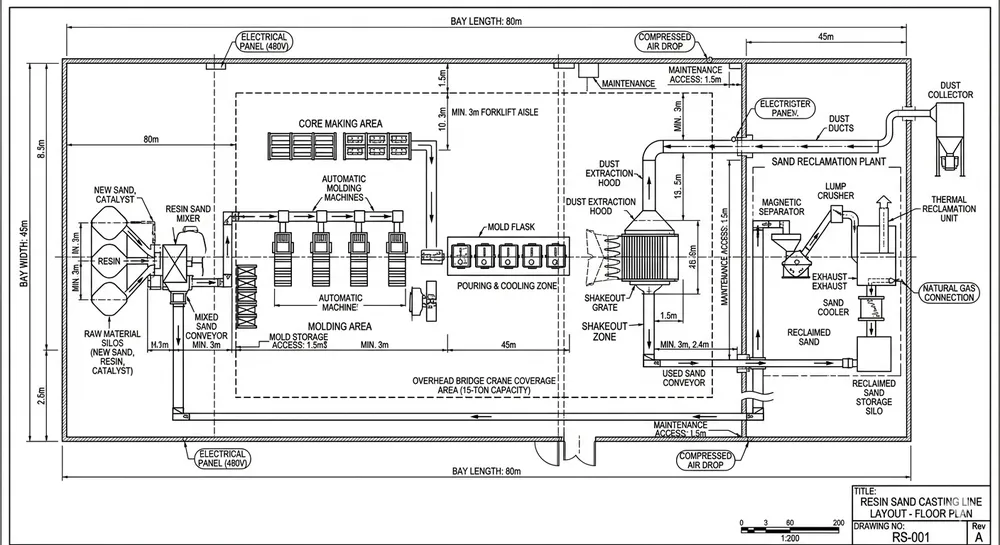
The preparation line runs as a continuous system. Each stage feeds the next, and any bottleneck upstream shows up as inconsistency downstream. Here's the full sequence from raw material intake to molding station delivery.

Stage 1: Raw Sand Storage and Reclaim Integration

Raw silica sand arrives in bulk and goes into storage silos (typically 20-50 ton capacity depending on your daily throughput). If you're running a reclamation system, this is where reclaimed sand re-enters the loop. Most foundries target 70-85% reclaimed sand mixed with 15-30% fresh sand to maintain grain size distribution and minimize LOI (loss on ignition) buildup.

The storage system uses vibrating feeders or screw conveyors to meter sand flow into the preparation line. Flow rate control at this stage matters — if sand enters the line in surges instead of steady flow, your downstream dosing accuracy suffers. We set feeder speed based on your target hourly throughput (5 t/h, 10 t/h, 20 t/h) and calibrate it during commissioning so the belt scale or load cell sees consistent material flow.

Reclaimed sand quality determines how much you can reuse. Sand that's been through mechanical reclamation (crushing, screening, magnetic separation) typically comes back at 95%+ purity, meaning you can run higher reclaim ratios. Thermally reclaimed sand is cleaner but costs more to process. Your reclaim ratio directly impacts binder cost per ton of prepared sand — every 10% increase in reclaim ratio saves roughly 8-12% on fresh sand purchasing.

Stage 2: Screening and Grain Size Control

Sand moves by bucket elevator or pneumatic conveying to vibrating screens (usually dual-deck or triple-deck depending on your grain fineness spec). Screening removes oversized particles, agglomerates from storage, and any foreign material that made it through reclamation.

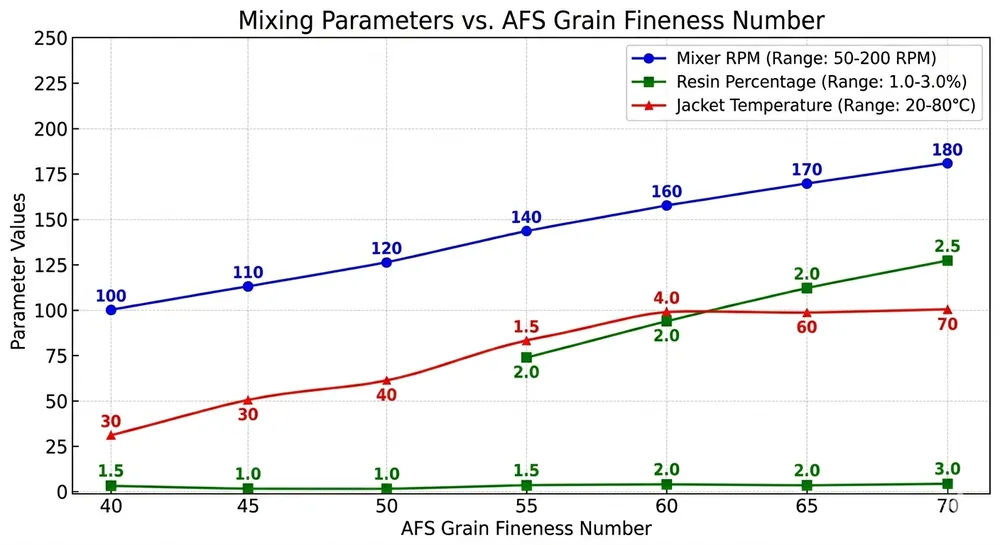
Target grain fineness for resin sand molding typically runs AFS 40-70 (average grain size 0.30-0.15 mm). Finer sand gives better surface finish but requires more resin to coat. Coarser sand uses less binder but increases penetration risk on thin-wall castings. The screen mesh size gets selected based on your casting type — if you're doing aluminum or brass with fine detail, you'll spec toward AFS 50-60. For heavy steel castings, AFS 40-50 works.

Screening capacity needs to match your mixer throughput plus about 15% overhead. If your Resin Sand Mixer runs at 10 t/h, your screen should handle 11-12 t/h to prevent upstream queuing. Undersize material (fines below spec) gets rejected and either sent back to reclamation or discarded depending on your process. Oversize material goes to a crusher or gets removed entirely.

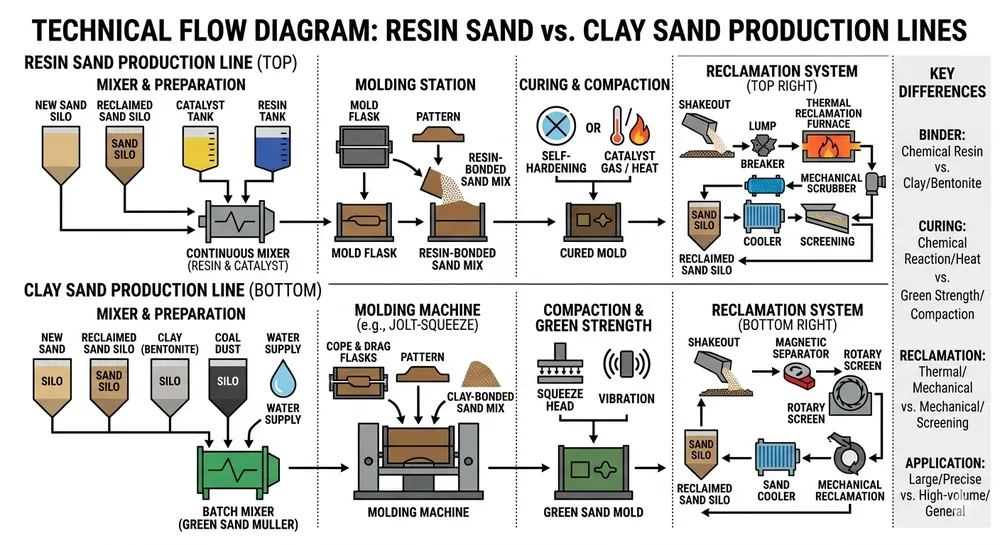
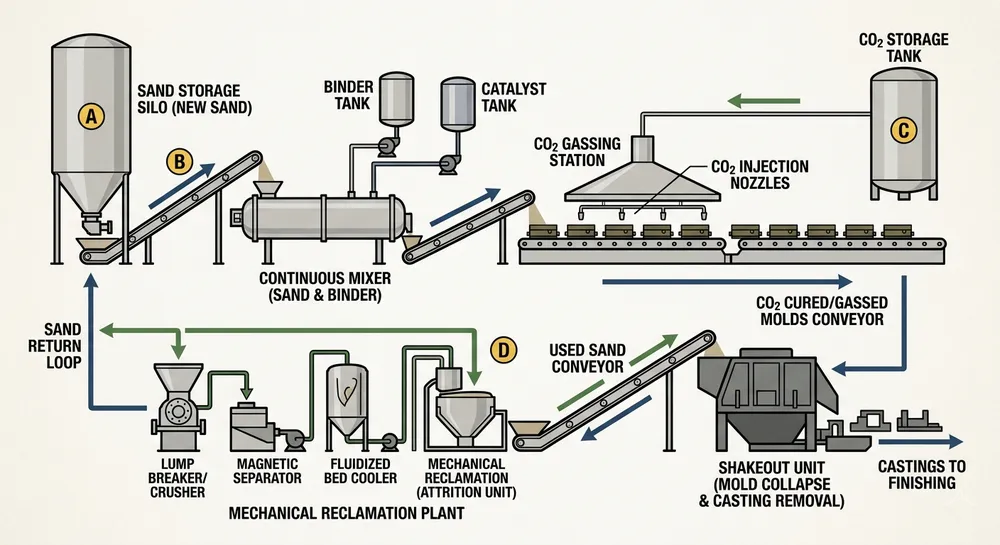
Resin sand preparation production line process flow diagram showing six stages from raw sand storage through mixing to mold-ready output

Stage 3: Sand Temperature Conditioning

Resin cure time is temperature-dependent. If sand enters the mixer at 35°C instead of 25°C, your working time drops from 8 minutes to 5 minutes, and molds start hardening before the operator finishes ramming. Sand temperature control happens in a fluidized bed cooler or a rotary drum cooler, depending on your climate and throughput.

Target sand temperature before mixing: 20-30°C for furan resin systems, 25-35°C for phenolic systems. In hot climates (Middle East, Southeast Asia), raw sand coming out of outdoor storage can hit 45-50°C in summer. The cooler brings it down using ambient air or chilled air depending on how much temperature drop you need.

Cooler capacity is rated in tons per hour at a specific temperature differential. A 10 t/h cooler rated for ΔT=20°C can handle 10 tons per hour when cooling sand from 45°C to 25°C. If your temperature differential is smaller (say 35°C to 25°C), the same cooler can handle higher throughput. We size coolers based on your worst-case ambient conditions, not average conditions, because summer production can't stop for temperature issues.

Some buyers skip the cooler to save cost. That works if you're in a temperate climate and your sand storage is indoors. But if you're casting ductile iron or steel where mold strength consistency matters, the cooler pays for itself in reduced scrap within six months.

Stage 4: Resin and Catalyst Dosing

This is where binder cost gets controlled or wasted. Resin addition ratio for furan systems typically runs 1.2-2.0% by weight of sand (12-20 kg resin per ton of sand). Catalyst addition runs 20-50% of resin weight. A 0.1% dosing error on a 10 t/h line means you're either wasting 10 kg of resin per hour (€150-200 per day) or producing weak molds that crack during pouring.

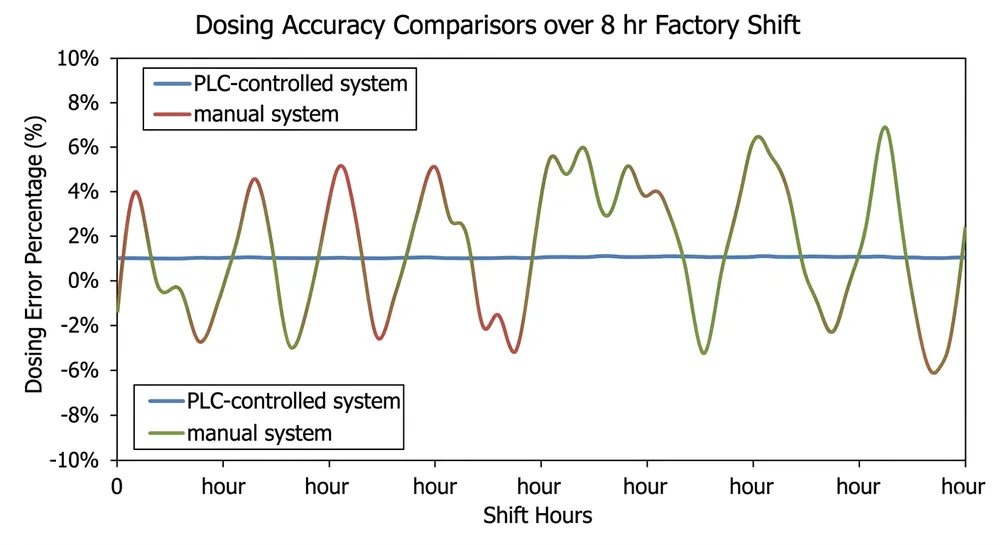
Modern preparation lines use PLC-controlled dosing pumps with flow meters and closed-loop feedback. The system weighs the sand flow on a belt scale, calculates the required resin volume in real time, and adjusts pump speed to maintain the target ratio. Dosing accuracy on a properly calibrated system: ±2% of setpoint. Manual dosing or older gear-pump systems without feedback: ±5-8%, which is where your binder cost variance comes from.

Resin and catalyst get stored in separate tanks (typically 1-2 ton capacity each) with level sensors and low-level alarms. Furan resin is moisture-sensitive, so tanks need sealed lids and desiccant breathers. Catalyst (usually an acid like PTSA or TSA) is corrosive, so pump seals and piping need to be acid-resistant (PTFE or stainless steel).

The dosing station injects resin and catalyst into the sand stream just before it enters the mixer. Injection points are usually at the mixer inlet chute or directly into the mixer bowl depending on mixer design. Timing matters — if resin hits the sand too early, it starts curing before mixing completes. If it hits too late, you get uneven distribution.

Comparison chart showing resin dosing accuracy between PLC-controlled automated systems and manual gear pump systems over 8-hour production shift

Stage 5: Continuous Mixing

The Resin Sand Mixer blends sand, resin, and catalyst into a homogeneous coated mixture. Mixing time: 60-120 seconds depending on mixer type and resin system. Furan resin needs shorter mixing (60-90 seconds) because it starts curing faster. Phenolic resin can handle longer mixing (90-120 seconds) and actually benefits from the extra blending time.

Mixer types: continuous paddle mixers (most common for production lines), batch mixers (used for small foundries or lab testing), and high-intensity mixers (for coated sand production). Continuous mixers feed sand in at one end and discharge prepared sand at the other in a steady stream. Batch mixers load a fixed quantity, mix it, dump it, then reload — slower but easier to control for recipe testing.

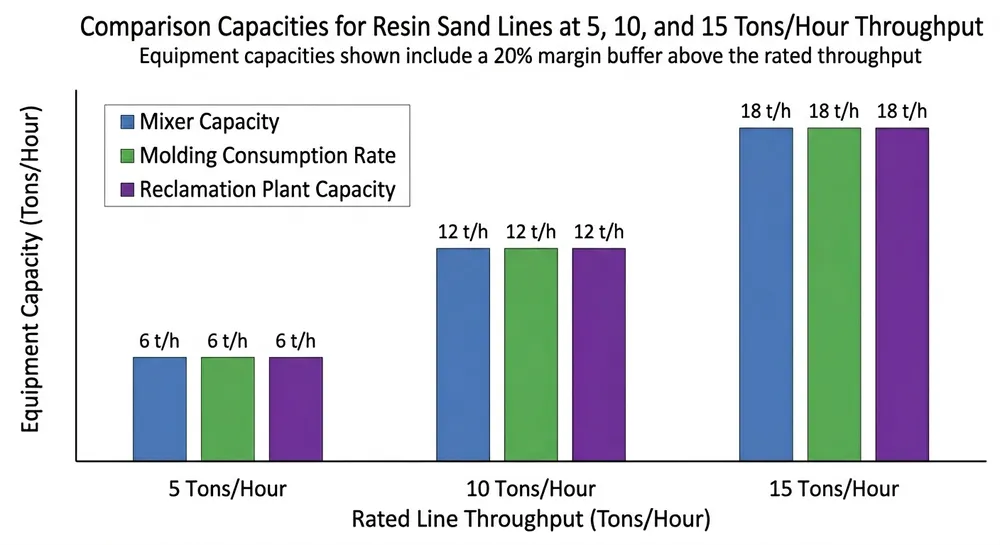
Mixer capacity needs to match your molding line consumption rate. If your molding machines use 8 t/h of prepared sand, your mixer should be rated for 10 t/h to give you buffer capacity during peak demand or when you're running multiple molds simultaneously. Undersized mixers create bottlenecks — the molding line sits idle waiting for sand, which kills your effective capacity.

Mixing quality shows up in tensile strength testing. Properly mixed resin sand should give you 2.5-4.0 MPa tensile strength (depending on resin type and addition ratio) with less than 10% variation across samples taken from different points in the batch. If you're seeing 20-30% strength variation, the problem is usually incomplete mixing or inconsistent resin dosing.

Stage 6: Prepared Sand Storage and Delivery

Mixed sand discharges into a prepared sand hopper (typically 2-5 ton capacity) that feeds your molding stations. The hopper acts as a buffer between the continuous preparation line and the batch-mode molding process. Working time starts the moment resin and catalyst mix, so the hopper needs to turn over fast enough that sand doesn't start hardening before it gets used.

For furan resin systems, working time is 8-15 minutes at 25°C sand temperature. That means your hopper should empty and refill every 10-12 minutes maximum. If your molding line is slow and sand sits in the hopper for 20+ minutes, you'll see progressive hardening — the sand becomes difficult to ram, mold surfaces get rough, and eventually the sand turns into unusable lumps.

Hopper design matters. Conical hoppers with steep walls (60-70° angle) prevent bridging and ensure first-in-first-out flow. Flat-bottom hoppers or shallow angles cause sand to stagnate in corners, and that stagnant sand hardens and contaminates fresh batches. Vibrators on the hopper walls help maintain flow, but they're a band-aid — proper hopper geometry solves the problem at the design stage.

Delivery from hopper to molding station: belt conveyors for short distances (under 10 meters), pneumatic conveying for longer distances or multi-floor layouts. Pneumatic systems are faster but add air into the sand, which can cause porosity in molds if not properly vented. Belt conveyors are gentler and don't introduce air, but they take up more floor space.

Critical Process Parameters and Quality Checkpoints

Running a preparation line isn't just about moving sand through equipment. You need to monitor and control specific parameters at each stage to maintain consistent output quality.

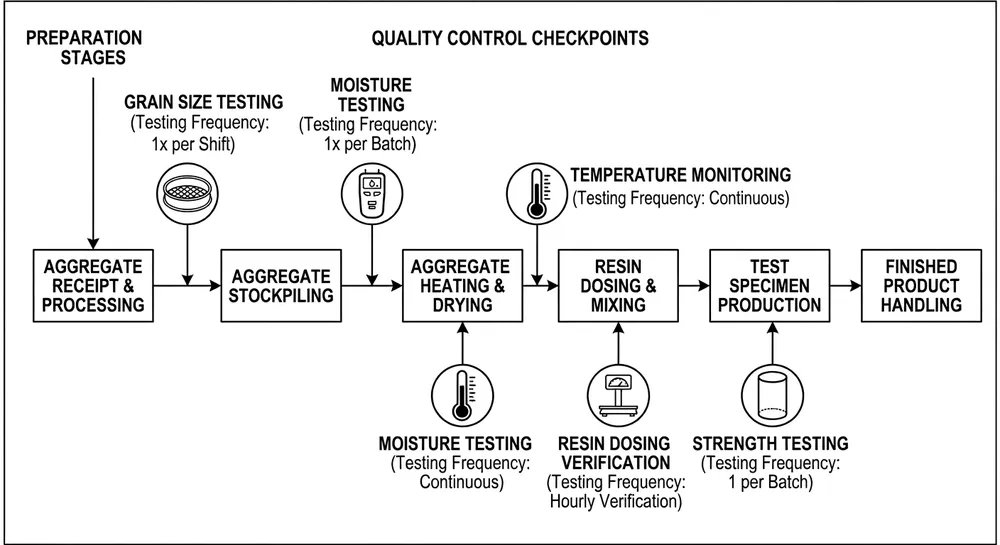
Sand grain fineness (AFS number): Check daily using sieve analysis. Target range depends on your casting type, but variation should stay within ±3 AFS points. If fineness drifts, your resin consumption changes and mold strength becomes unpredictable.

Moisture content: Raw sand should be under 0.3% moisture before mixing. Excess moisture interferes with resin curing and causes mold defects (gas holes, surface roughness). Check with a moisture analyzer or by oven-drying a sample and weighing before/after.

Sand temperature: Monitor continuously with thermocouples at the cooler outlet and mixer inlet. If temperature rises above your target range, adjust cooler airflow or reduce line speed to give sand more residence time in the cooler.

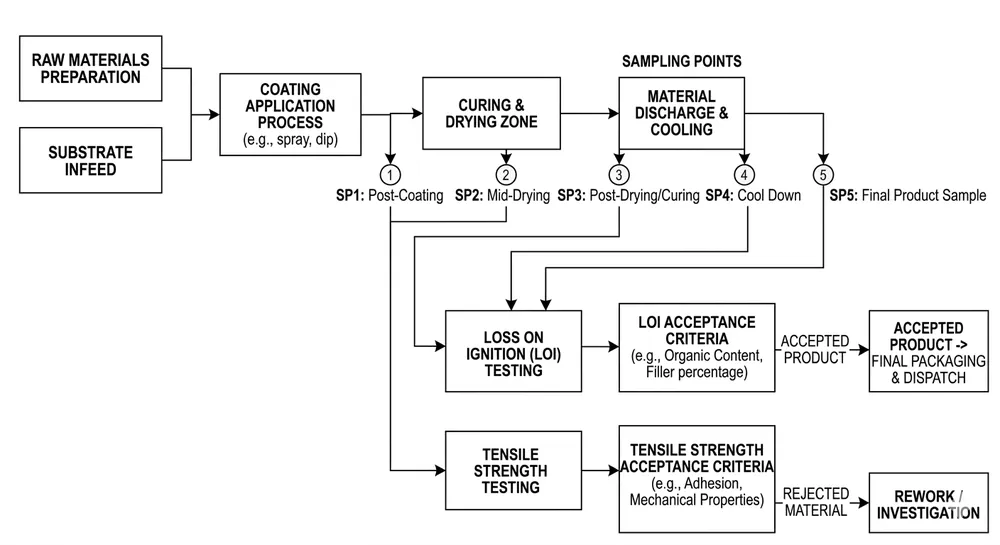
Resin addition ratio: Verify weekly by collecting a timed sample of prepared sand, burning off the resin in a furnace, and calculating LOI (loss on ignition). Target LOI should match your resin addition ratio — if you're dosing 1.5% resin, LOI should be 1.4-1.6% accounting for catalyst and moisture loss.

Tensile strength: Pull test samples every 2-4 hours and cure them for the standard time (usually 24 hours at room temperature). Test on a universal testing machine. Furan resin sand: 2.5-3.5 MPa typical. Phenolic resin sand: 3.0-4.0 MPa typical. Strength below target means insufficient resin, poor mixing, or contaminated sand. Strength above target means you're over-dosing resin and wasting money.

Compressive strength: Less commonly tested than tensile, but useful for heavy castings where mold crush resistance matters. Target: 8-12 MPa for furan systems, 10-15 MPa for phenolic systems.

Quality control checkpoint flowchart for resin sand preparation showing testing points at each process stage

How Reclaimed Sand Re-Enters the Preparation Loop

Sand reclamation is what makes resin sand molding economically viable for high-volume production. After casting shakeout, used sand goes through a Resin Sand Reclamation Plant that removes binder residue and returns clean sand to the preparation line.

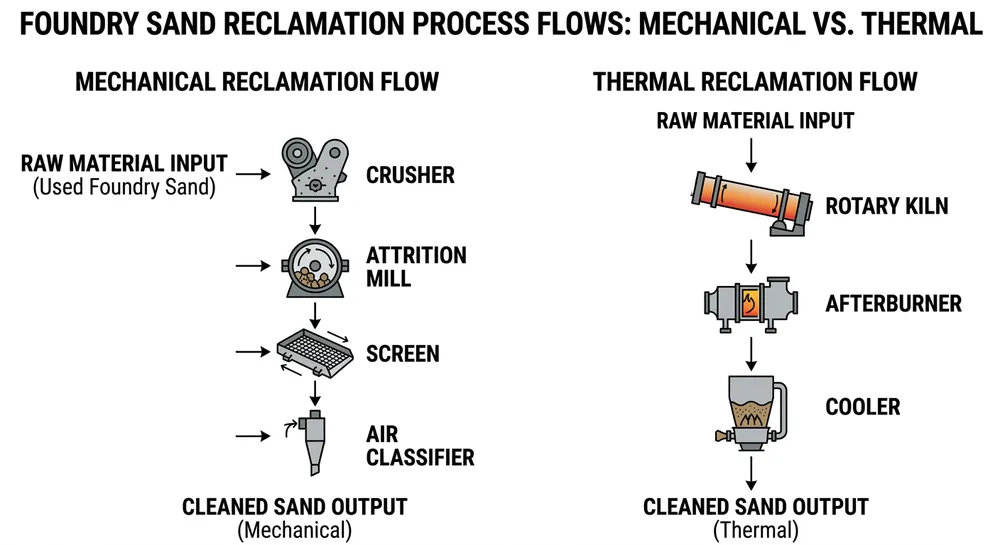
Reclamation methods: mechanical (crushing, attrition, screening) or thermal (burning off resin in a rotary kiln at 600-800°C). Mechanical reclamation is cheaper to operate but leaves 3-5% residual binder on the sand. Thermal reclamation is more expensive (fuel cost, equipment cost) but returns sand at 98-99% purity.

Reclaimed sand quality affects how much you can reuse. With mechanical reclamation, most foundries run 70-80% reclaimed sand mixed with 20-30% fresh sand. With thermal reclamation, you can push 85-90% reclaimed sand. Higher reclaim ratios save on raw material cost but require tighter process control — residual binder from reclaimed sand changes your effective resin addition ratio, so you need to adjust dosing to compensate.

The reclaimed sand re-enters at Stage 1 (storage and integration). It gets blended with fresh sand in the storage hopper before feeding into the preparation line. Blending ratio is controlled by adjusting the feed rates from the reclaimed sand silo and the fresh sand silo. Some lines use separate feeders with individual speed controls. Others use a single feeder with a pre-mixed blend ratio set at the silo discharge gates.

Reclaim ratio monitoring: track your daily sand consumption (fresh + reclaimed) and compare it to your casting output. If you're producing 50 tons of castings per day and consuming 60 tons of sand (fresh + reclaimed), your sand-to-metal ratio is 1.2:1. Industry typical: 1.0-1.5:1 for resin sand molding. If your ratio is higher, you're either losing sand during handling or your reclamation efficiency is low.

Layout and Utility Planning for a 5-20 t/h Preparation Line

Floor space, power supply, compressed air, and dust collection are the four constraints that determine whether a preparation line fits your facility. Most buyers underestimate space requirements and end up with equipment that doesn't fit or requires expensive building modifications.

Floor space: A complete 10 t/h preparation line (storage, screening, cooling, dosing, mixing, prepared sand hopper) occupies roughly 150-200 m² of floor area in a linear layout. Vertical layouts (using bucket elevators and multi-level platforms) can reduce footprint to 100-120 m² but add structural cost for elevated platforms. If you're retrofitting into an existing building, measure your available length, width, and ceiling height before requesting quotes — equipment height with bucket elevators can reach 8-10 meters.

Power supply: Total connected load for a 10 t/h line: 80-120 kW depending on equipment configuration. Major consumers: mixer motor (15-30 kW), bucket elevator motors (7.5-15 kW each), vibrating screen (5-10 kW), sand cooler fan (10-20 kW), dust collector fan (15-25 kW), resin dosing pumps (1-2 kW). You need 3-phase 380V or 400V supply (or 220V 3-phase in some regions). Single-phase power won't work for motors above 5 kW.

Compressed air: Resin and catalyst dosing pumps, pneumatic valves, and control instruments need compressed air at 6-8 bar pressure. Consumption: 0.5-1.0 m³/min for a 10 t/h line. If you don't have an existing air compressor, budget for a 1.5-2.0 m³/min screw compressor with air dryer and filters. Moisture in compressed air causes control valve problems and dosing inaccuracy.

Dust collection: Screening, mixing, and material transfer points generate silica dust. You need a centralized dust collection system with fabric filter bags or cartridge filters. Airflow requirement: 3,000-5,000 m³/h for a 10 t/h line depending on how many dust pickup points you have. Dust collector discharge needs to go outside or into a sealed collection bin — don't vent silica dust back into the work area.

Utility cost estimation: For a 10 t/h line running 16 hours per day, 300 days per year:

  • Electrical power: 80 kW × 16 h × 300 days = 384,000 kWh/year. At €0.10/kWh: €38,400/year.
  • Compressed air: negligible if you already have a compressor. If dedicated: add €5,000-8,000/year for compressor power and maintenance.
  • Resin and catalyst: 1.5% resin addition on 48,000 tons/year sand = 720 tons resin. At €1,200/ton: €864,000/year. This is your biggest operating cost by far.

Furan vs Phenolic Resin Preparation Requirements

The preparation line layout is the same for both resin types, but process parameters and equipment sizing differ.

Furan resin systems:

  • Faster curing (working time 8-15 minutes)
  • Lower resin addition ratio (1.2-1.8% typical)
  • More sensitive to sand temperature (target 20-28°C)
  • Shorter mixing time (60-90 seconds)
  • Stronger odor during mixing and pouring (furfuryl alcohol smell)
  • Better for thin-wall castings and fine detail (lower gas generation)

Phenolic resin systems:

  • Slower curing (working time 15-25 minutes)
  • Higher resin addition ratio (1.5-2.2% typical)
  • Less temperature-sensitive (target 25-35°C)
  • Longer mixing time (90-120 seconds)
  • Lower odor (phenol smell is less intense than furan)
  • Better for heavy-section castings (higher hot strength)

If you're running both resin types on the same line, you need separate resin and catalyst tanks with dedicated dosing pumps. Switching between resin types requires flushing the dosing lines and mixer bowl to prevent cross-contamination. Most foundries that run both types install two separate preparation lines rather than trying to share equipment — the downtime and contamination risk aren't worth the equipment savings.

For buyers evaluating which resin system to specify: furan is more common in North America and Europe for aluminum and brass casting. Phenolic is more common in Asia and for steel casting. If you're exporting castings to Europe, check whether your customer has odor restrictions — some automotive and appliance buyers won't accept furan-molded castings due to residual smell in machined parts.

Evaluating Supplier Capability Before You Request a Quote

Most preparation line suppliers can provide equipment. Fewer can provide a system that actually works at your target capacity with your specific sand type and resin system. Here's what to verify before you commit to a purchase order.

Ask for process flow drawings with equipment specifications. Not just a block diagram — you need equipment model numbers, motor sizes, conveyor speeds, hopper capacities, and material flow rates at each stage. If the supplier can't provide this level of detail at the quotation stage, they're guessing at system design and you'll discover the gaps during commissioning.

Request reference installations with similar capacity and resin type. A supplier who has installed 50 clay sand lines but only 2 resin sand lines doesn't have the process knowledge you need. Resin sand preparation is more sensitive to dosing accuracy and mixing quality than clay sand. Ask for customer contacts and verify that the reference lines are actually running at rated capacity.

Verify PLC programming capability for resin dosing control. The PLC needs to read the belt scale, calculate resin flow rate in real time, adjust pump speed, and log dosing data for quality traceability. If the supplier outsources PLC programming or uses generic ladder logic without closed-loop feedback, your dosing accuracy will suffer. We program our own PLCs and can show you the control logic during factory acceptance testing.

Check whether the line ships as a modular system or requires field fabrication. Modular systems (pre-assembled on skid frames) reduce installation time and eliminate field welding errors. Our preparation lines ship in 1-2 × 40HQ containers with all piping, wiring, and controls pre-installed. You bolt the modules together, connect utilities, and commission. Field-fabricated systems take 3-4 weeks longer to install and introduce more variables that affect final performance.

Confirm spare parts availability and lead time. Resin dosing pumps, proximity sensors, solenoid valves, and PLC I/O modules are the most common wear items. If the supplier uses proprietary components with 8-week lead times, you're looking at extended downtime when something fails. We use Siemens or Mitsubishi PLCs, standard industrial pumps, and off-the-shelf sensors that you can source locally or from us with 1-2 week delivery.

Ask about commissioning support and training. Remote commissioning (video call guidance) works if your installation team can read hydraulic schematics and use a multimeter. On-site commissioning (supplier engineer travels to your facility) costs more but reduces startup time and ensures the line hits rated capacity before the engineer leaves. Training should cover operation, routine maintenance, dosing calibration, and basic troubleshooting — not just "here's the start button."

Planning Your Resin Sand Preparation Line Specification

When you're ready to request a quote, provide these details so suppliers can give you accurate pricing and lead time:

Target capacity: Specify in tons per hour of prepared sand output. Match this to your molding line consumption rate plus 20-30% buffer. If you're planning future expansion, mention it — oversizing the preparation line now is cheaper than replacing it later.

Sand type and grain fineness: Silica sand AFS number (40-70 typical), or specify if you're using chromite sand, zircon sand, or other specialty sands. Different sands have different bulk densities and flow characteristics that affect conveyor sizing and mixer design.

Resin system: Furan, phenolic, or both. Include resin supplier name and product code if you've already selected a binder — different resins have different viscosities that affect pump sizing.

Reclaimed sand integration: Specify your target reclaim ratio (70%, 80%, 90%) and reclamation method (mechanical or thermal). This affects how we size the fresh sand and reclaimed sand feed systems.

Available floor space: Length × width × ceiling height in meters. Include any obstructions (columns, existing equipment, overhead cranes) that affect layout. If you have a building drawing, send it.

Utility availability: Electrical supply voltage and frequency (380V 50Hz, 400V 50Hz, 220V 60Hz, etc.), compressed air pressure and flow rate if existing, dust collection system if existing.

Casting alloy and production volume: Aluminum, brass, iron, steel — this helps us recommend appropriate resin addition ratios and mixing parameters. Annual casting tonnage gives us a sense of whether you need heavy-duty industrial equipment or lighter-duty systems.

Send your requirements to TZFoundry and we'll provide a process flow layout with equipment specifications and factory pricing. Our engineering team will review your floor space and recommend either a linear layout or a vertical layout depending on your building constraints. If you're unsure about any of the specifications above, we can guide you through the selection process based on your casting type and production goals.

Top 10 Resin Sand Production Line Manufacturers in India (2026) – Pricing, Quality, and Export Readiness Compared

Indian foundries consumed 2.8 million tons of resin-bonded sand in 2025, and that number keeps climbing as automotive and heavy machinery casting demand grows. If you're screening local suppliers for a Resin Sand Production Line, you're likely weighing three factors: lead time, landed cost, and whether the equipment can actually hold ±2% binder dosing accuracy across an 8-hour shift.

Most buyers start with Indian manufacturers because the logic seems obvious — shorter shipping distance, easier communication, faster emergency support. That's true for small orders and urgent replacements. But when you're committing to a 5-10 ton/hour production line that'll run for the next decade, the decision gets more complex. Binder cost is the number everyone watches, but it's the mixing accuracy that decides whether you're wasting resin or wasting castings.

This article ranks 10 Indian resin sand equipment manufacturers based on capacity, certifications, export track record, and technical support infrastructure. Then we'll show you where factory-direct China sourcing changes the economics — not to dismiss local suppliers, but to help you protect margin on repeat-volume orders.

How to Evaluate Resin Sand Production Line Suppliers

Before we look at specific manufacturers, here's what actually matters when you're comparing datasheets and quotes:

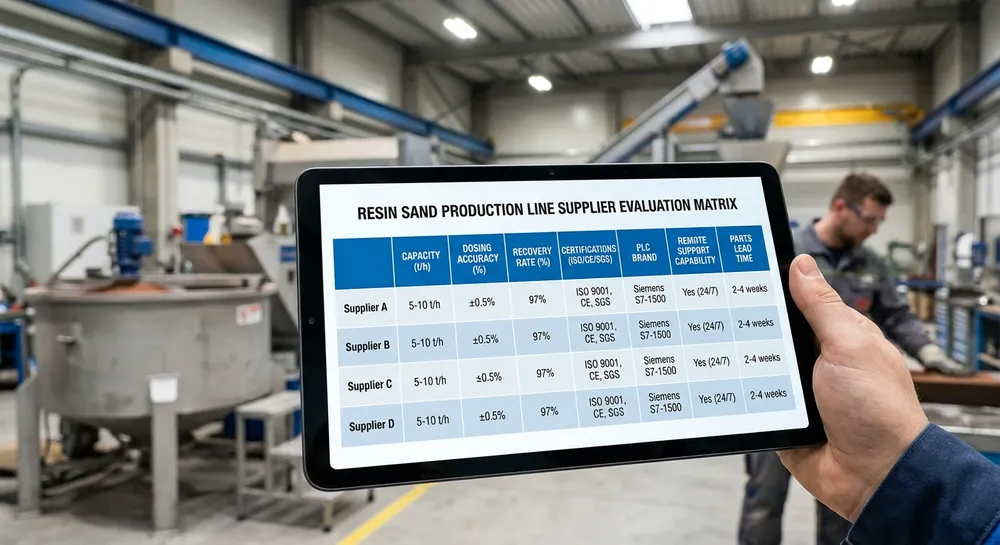
Mixer capacity and binder dosing accuracy — A 5 t/h mixer means nothing if the resin-to-sand ratio drifts by 5% between batches. Look for ±1-2% dosing accuracy with automatic calibration. We've commissioned lines where buyers chose the cheapest mixer, then spent 12% more on resin annually because the dosing pump couldn't hold tolerance.

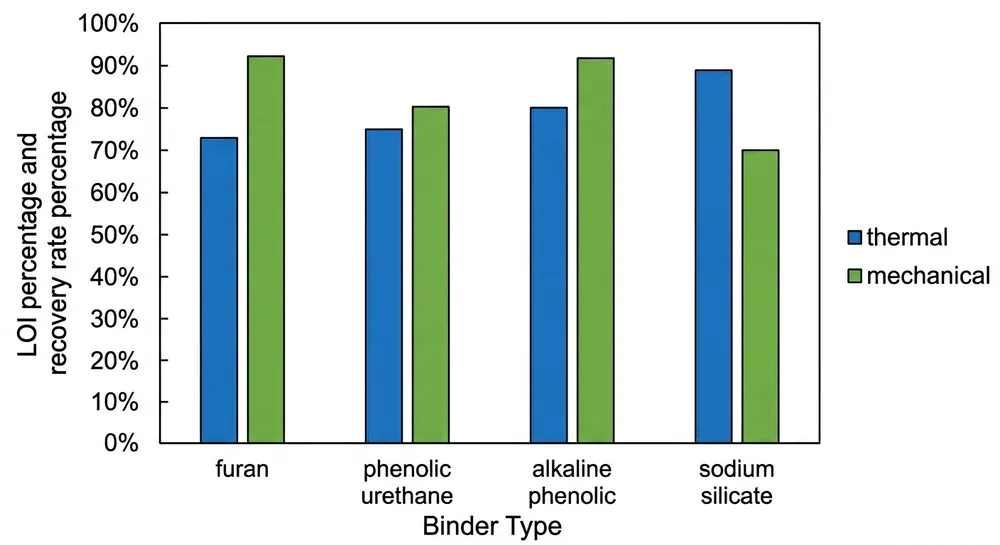
Sand reclamation recovery rate — Mechanical reclamation should hit 90-92% recovery, thermal reclamation 95%+. Anything below 85% means you're buying fresh sand constantly. Ask for test data from the supplier's own lab, not just spec sheet claims.

PLC brand and remote diagnostics — Siemens, Mitsubishi, or Schneider PLCs with 4G connectivity let your team troubleshoot sensor failures without flying someone to the plant. Proprietary control systems lock you into the supplier's service network forever.

Certification coverage — ISO 9001 is baseline. CE marking matters if you're exporting castings to Europe (your buyers will ask about equipment compliance). SGS pre-shipment inspection adds third-party verification that the equipment actually performs to spec before it leaves the factory.

After-sales parts availability — Hydraulic seals, proximity sensors, and solenoid valves fail. Can the supplier ship replacement parts within 72 hours, or will your line sit idle for 3 weeks waiting on a $40 sensor from overseas?

Container-optimized design — If you're importing equipment, modular frames that fit 40HQ dimensions (12.03m × 2.35m × 2.69m) cut your freight cost by 20-30% compared to oversized cargo that needs flat racks.

Evaluation criteria matrix for resin sand production line manufacturers showing capacity, certifications, and support infrastructure

The Indian Resin Sand Equipment Landscape

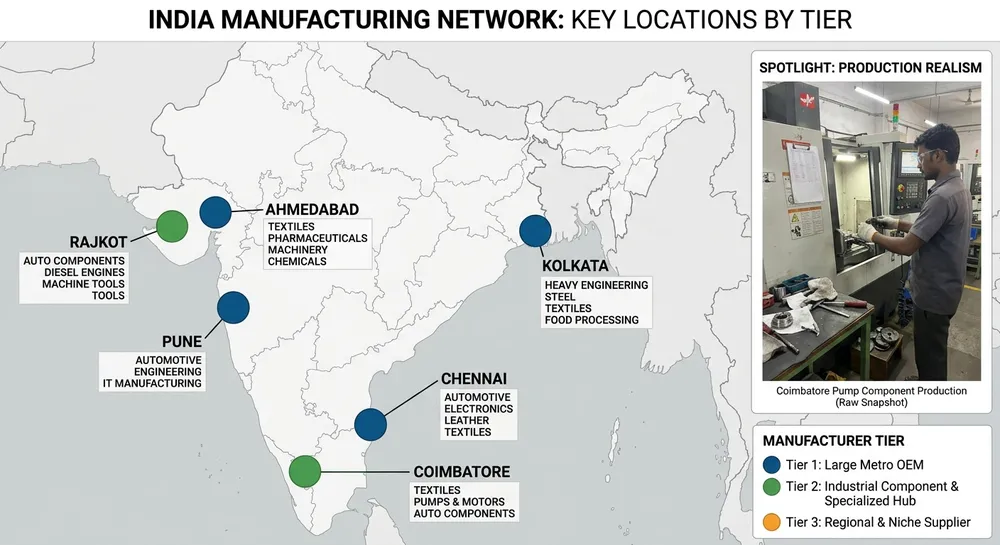
India's foundry equipment sector splits into three tiers: established manufacturers with export experience, mid-tier domestic suppliers serving regional foundries, and small fabricators building custom one-off systems. Here's where the serious capacity sits.

1. Omega Foundry Machinery (Rajkot, Gujarat)

Omega builds complete resin sand molding lines from their Rajkot facility, serving automotive and pump casting foundries across western India. Their equipment range covers furan and phenolic resin systems with mixer capacities from 2-8 t/h. They've supplied lines to foundries in Gujarat, Maharashtra, and Tamil Nadu.

Strengths: Regional service network, experience with Indian casting grades, local spare parts inventory.

Limitations: CE certification status unclear for export markets, limited English-language technical documentation, remote diagnostics capability not standard across all models.

2. Inductotherm Group India (Chennai, Tamil Nadu)

Inductotherm India operates as the local arm of the global Inductotherm Group, primarily known for induction melting equipment but also offering sand processing systems. Their resin sand equipment integrates with their melting furnace installations for turnkey foundry projects.

Strengths: Multinational backing, established quality systems, technical support from global engineering team.

Limitations: Higher pricing than domestic-only manufacturers, equipment often specified as part of larger melting system packages rather than standalone sand lines.

3. Kelsons Engineers (Ahmedabad, Gujarat)

Kelsons manufactures sand mixers, reclamation plants, and material handling systems for foundries. They've been operating since the 1990s and supply equipment to foundries across India and select Middle East markets.

Strengths: Decades of manufacturing experience, custom capacity configurations, established domestic customer base.

Limitations: Export documentation and certification coverage varies by project, lead times extend during peak domestic demand periods.

4. DISA India (Pune, Maharashtra)

DISA India represents the Danish DISA Group's local assembly and service operations. They offer vertical flaskless molding systems and associated sand processing equipment, primarily targeting large-scale automotive foundries.

Strengths: Global technology platform, comprehensive training programs, strong after-sales support network.

Limitations: Premium pricing tier, minimum capacity thresholds may not suit smaller foundries, equipment designed for high-volume automotive applications.

5. Saverglass Equipments (Coimbatore, Tamil Nadu)

Saverglass builds sand mixers, continuous mixers, and sand reclamation systems for resin sand applications. They serve foundries in southern India and have supplied equipment to Sri Lanka and Bangladesh.

Strengths: Competitive pricing for domestic market, flexible MOQ, experience with both batch and continuous mixing systems.

Limitations: Limited international certification documentation, remote commissioning capability not standard, English technical support availability varies.

6. Vulcan Engineering (Kolkata, West Bengal)

Vulcan manufactures foundry equipment including resin sand mixers, core shooters, and sand handling systems. They've supplied equipment to foundries in eastern India and have some export experience to Southeast Asian markets.

Strengths: Regional presence in eastern India, custom engineering for space-constrained facilities, local service response.

Limitations: Smaller production capacity than western India manufacturers, export packaging and documentation less standardized.

7. Primech Engineering (Rajkot, Gujarat)

Primech builds sand mixers, reclamation plants, and material handling systems from their Gujarat facility. They focus on mid-capacity equipment (3-6 t/h) for general engineering foundries.

Strengths: Mid-market pricing, experience with both furan and phenolic systems, regional spare parts availability.

Limitations: CE certification not standard, PLC brands vary by project, remote diagnostics require custom specification.

8. Foseco India (Multiple Locations)

Foseco India, part of Vesuvius Group, primarily supplies foundry consumables (coatings, binders, refractories) but also offers technical consulting and equipment recommendations for resin sand systems. They partner with equipment manufacturers for complete line installations.

Strengths: Deep metallurgical expertise, global technical resources, strong relationships with major Indian foundries.

Limitations: Not a direct equipment manufacturer, equipment sourcing through third-party partnerships, pricing includes consulting and consumables bundling.

9. Rösler India (Pune, Maharashtra)

Rösler India manufactures surface finishing equipment and also offers sand reclamation systems as part of their foundry equipment portfolio. They're the Indian subsidiary of the German Rösler Group.

Strengths: German engineering standards, focus on reclamation efficiency, established quality management systems.

Limitations: Reclamation-focused rather than complete production lines, premium pricing, minimum order values may be higher than domestic-only suppliers.

10. Fenix Foundry Equipment (Ahmedabad, Gujarat)

Fenix builds sand mixers, continuous mixers, and sand cooling systems for resin sand applications. They serve foundries across western and northern India with equipment in the 2-7 t/h capacity range.

Strengths: Competitive domestic pricing, custom capacity configurations, experience with high-temperature sand cooling requirements.

Limitations: Export certification coverage unclear, technical documentation primarily in Hindi/Gujarati with English translations available on request, remote support infrastructure limited.

Geographic distribution map of major resin sand production line manufacturers across India showing clusters in Gujarat, Maharashtra, and Tamil Nadu

Pricing Reality: What Indian Resin Sand Lines Actually Cost

Here's what you'll actually pay for a complete resin sand production line from Indian manufacturers, based on 2025-2026 market rates:

3-5 t/h capacity line (mixer, sand cooler, reclamation system, material handling): ₹45-75 lakh ($54,000-$90,000 USD) from domestic manufacturers. Multinational subsidiaries (DISA, Inductotherm) price 30-40% higher.

5-8 t/h capacity line: ₹75-1.2 crore ($90,000-$145,000 USD) depending on automation level and PLC brand selection.

8-12 t/h capacity line: ₹1.2-2 crore ($145,000-$240,000 USD) for fully automated systems with Siemens/Mitsubishi controls.

These prices typically include basic commissioning support but exclude:

  • International shipping and customs duties (if exporting equipment)
  • Foundation engineering and civil work
  • Operator training beyond initial startup
  • First-year spare parts kits
  • Extended warranty or annual maintenance contracts

The hidden cost: Binder consumption variance. A mixer with ±5% dosing accuracy costs ₹8 lakh less upfront than a ±1% accuracy system, but wastes ₹12-15 lakh annually in excess resin on a 5 t/h line running 16 hours/day. We've seen buyers choose the cheaper mixer, then spend three years trying to calibrate it manually.

Where Indian Manufacturers Excel

Local sourcing makes commercial sense in specific scenarios, and it's worth understanding where Indian manufacturers genuinely add value:

Emergency equipment replacement — If your existing mixer fails and you need a replacement within 4-6 weeks, Indian manufacturers can fabricate and deliver faster than overseas suppliers. Domestic logistics cut 8-10 weeks off the timeline.

Small-batch custom configurations — Need a 3.5 t/h mixer with specific hopper dimensions to fit under a 5-meter ceiling? Indian fabricators handle one-off custom builds more flexibly than factory-direct suppliers optimized for standard configurations.

Regional service response — When a hydraulic seal fails or a sensor needs replacement, having the supplier's service team 4 hours away instead of 4,000 km away matters. Local manufacturers maintain spare parts inventory in-country.

Domestic payment terms — Indian buyers avoid forex risk and can negotiate payment schedules in rupees with domestic suppliers. Letter of credit requirements and international wire transfer fees disappear.

Familiar communication — Technical discussions happen in Hindi, Gujarati, or Tamil with engineers who understand Indian foundry practices, alloy grades, and production constraints.

These advantages are real. For urgent small orders, local convenience often outweighs the cost premium.

The Certification and Quality Gap

Here's where Indian manufacturers commonly fall short compared to international suppliers, and why it matters for your business:

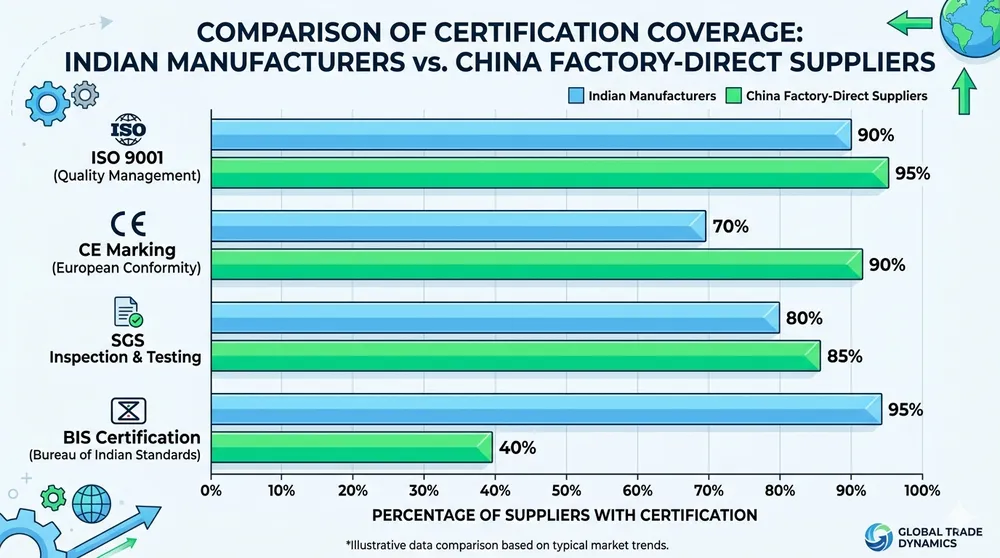
CE marking coverage — Most Indian manufacturers don't maintain CE technical files or conduct EMC testing required for European market compliance. If you're exporting castings to Europe and your buyer audits your equipment certifications, missing CE documentation creates compliance risk.

Dosing accuracy verification — Spec sheets claim ±2% accuracy, but few Indian suppliers provide calibration test data from your specific unit before shipment. You discover the actual tolerance after installation, when it's too late to negotiate.

PLC and HMI standardization — Equipment often ships with whatever PLC brand the manufacturer sourced that month. Mixing Siemens, Schneider, and Delta PLCs across your facility means your maintenance team needs three different programming environments and spare parts inventories.

Remote diagnostics infrastructure — 4G-connected PLCs with VPN access for remote troubleshooting aren't standard. When a sensor fails at 2 AM, your team can't pull error logs remotely — you wait for the supplier's technician to arrive the next day.

English technical documentation — Operation manuals and electrical schematics often exist primarily in regional languages with English translations added later. Wiring diagrams with mixed-language labels slow down troubleshooting.

Sand reclamation test data — Suppliers claim 95% recovery rates but rarely provide lab test results from your specific sand type and binder system. You're buying based on theoretical performance, not verified data.

None of these gaps are insurmountable — you can specify CE compliance, demand calibration reports, and require Siemens PLCs in your RFQ. But it adds negotiation complexity and often pushes pricing closer to international suppliers who include these features as standard.

Factory-Direct China Alternative: Where the Economics Shift

We manufacture resin sand production lines at our 15,000 m² Qingdao facility, and we're not pretending to be an Indian supplier. But here's where factory-direct sourcing changes the cost-quality equation for buyers who can plan 12-16 weeks ahead:

Triple certification as standard — ISO 9001:2015 + CE + SGS certification comes with every line we ship. CE technical files include EMC testing reports and machinery directive compliance documentation. SGS conducts pre-shipment inspection and provides third-party performance verification before the equipment leaves our facility.

Verified dosing accuracy — Every Resin Sand Mixer goes through calibration testing at our facility. We run your specified resin-to-sand ratio through 20 batch cycles and document the actual dosing variance. The commissioning report shows measured performance from your specific unit, not generic spec sheet claims.

Sand reclamation testing lab — Send us a 50 kg sample of your foundry sand and we'll run it through mechanical or thermal reclamation to verify recovery rate before you commit to the order. We've tested sand from 14 countries and can show you exactly what 95% recovery looks like with your material.

Standardized PLC platform — Siemens or Mitsubishi PLCs (your choice) with multilingual HMI in English, Spanish, Arabic, or Russian. 4G connectivity module included for remote diagnostics — your maintenance team can pull error logs, adjust parameters, and troubleshoot sensor failures without waiting for an on-site visit.

Container-optimized modular design — Our engineering team designs equipment frames to fit 40HQ container dimensions (12.03m × 2.35m × 2.69m) without wasted space. A complete 5 t/h line ships in 2 containers, an 8 t/h line in 3 containers. That's 20-30% lower freight cost compared to oversized equipment that needs flat rack shipping.

Remote commissioning support — We've commissioned equipment in 14 countries via video call. Your installation team follows our engineer's instructions to connect hydraulic lines, wire control panels, and run initial test cycles. As long as your team can read hydraulic schematics and use a multimeter, remote commissioning works. (We learned this during COVID lockdowns when flying engineers became impossible — turned out remote support was faster anyway.)

First-year spare parts kit included — Every line ships with hydraulic seals, proximity sensors, solenoid valves, and PLC I/O modules you'll need for the first year. No waiting 3 weeks for a $40 sensor to arrive from overseas.

Pricing comparison — Our 5 t/h resin sand production line with mechanical reclamation, sand cooling, and Siemens PLC: $78,000-$92,000 FOB Qingdao. That's competitive with mid-tier Indian manufacturers, but includes CE certification, calibration test data, and remote diagnostics as standard rather than optional add-ons.

The trade-off: 12-16 week lead time from order to shipment, compared to 6-8 weeks from Indian domestic suppliers. If you're planning capacity expansion 6 months out, the timeline works. If your existing mixer failed yesterday, local sourcing is faster.

Certification coverage comparison chart showing ISO, CE, and SGS certification rates across Indian manufacturers vs China factory-direct suppliers

Decision Framework: When to Source Locally vs Factory-Direct

Here's how to decide which sourcing route protects your margin:

Choose Indian local suppliers when:

  • You need equipment delivered within 6-8 weeks for urgent capacity expansion or replacement
  • Order size is small (single mixer or reclamation unit under $30,000) where import logistics don't make economic sense
  • Your facility requires extensive custom modifications that benefit from on-site engineering visits
  • You're a first-time foundry buyer who values face-to-face technical support during startup
  • Domestic payment terms in rupees eliminate forex risk for your business

Choose factory-direct China sourcing when:

  • You're ordering a complete production line ($75,000+) where certification coverage and dosing accuracy directly impact your operating costs
  • You're exporting castings to Europe or North America and need CE-compliant equipment documentation
  • You can plan 12-16 weeks ahead and prioritize landed cost over delivery speed
  • You want standardized PLC platforms and remote diagnostics to reduce long-term maintenance costs
  • You need verified sand reclamation test data from your specific sand type before committing to the purchase

The hybrid approach: Some buyers source mixers and core equipment from China factory-direct for certification coverage and dosing accuracy, then purchase material handling systems and auxiliary equipment from Indian suppliers for faster delivery and easier customization. This splits the risk and optimizes cost across different equipment categories.

What to Ask Before You Commit

Whether you're sourcing from India or China, here are the questions that separate serious suppliers from spec-sheet optimists:

For dosing accuracy: "Can you provide calibration test data from my specific unit before shipment, showing actual resin-to-sand ratio variance across 20 consecutive batches?"

For reclamation performance: "Will you run a test batch of my foundry sand through your reclamation system and document the recovery rate before I place the order?"

For certification: "Can you provide the CE technical file including EMC testing reports and machinery directive compliance documentation, not just a CE declaration of conformity?"

For remote support: "What PLC brand and communication protocol do you use, and can your system connect via 4G/VPN for remote diagnostics?"

For spare parts: "What's your guaranteed lead time for shipping replacement hydraulic seals, sensors, and solenoid valves to my location?"

For container optimization: "How many 40HQ containers does this line require, and can you provide the packing list showing how equipment modules fit container dimensions?"

The suppliers who answer these questions with specific data and test reports are the ones who'll actually deliver what they promise. The ones who deflect to "we'll discuss during installation" are the ones who'll leave you troubleshooting dosing accuracy problems six months after commissioning.

Frequently Asked Questions

What is the typical lead time for a resin sand production line from Indian manufacturers?

6-8 weeks for standard capacity configurations (3-5 t/h) from domestic Indian manufacturers, 8-12 weeks for custom builds or higher capacities. Multinational subsidiaries (DISA, Inductotherm) often quote 10-14 weeks. Factory-direct China sourcing typically requires 12-16 weeks from order to shipment. Add 3-4 weeks for ocean freight and customs clearance if importing.

Do Indian resin sand equipment manufacturers provide CE certification?

CE certification is not standard across most Indian manufacturers. DISA India and Inductotherm India typically provide CE documentation due to their multinational parent companies. Domestic manufacturers like Omega, Kelsons, and others can pursue CE marking if specified in the RFQ, but it adds 4-6 weeks to lead time and increases cost by 8-12%. Always request the complete CE technical file, not just a declaration of conformity.

What is the price difference between Indian and China factory-direct resin sand lines?

For a 5 t/h complete line, Indian domestic manufacturers quote ₹45-75 lakh ($54,000-$90,000), while China factory-direct pricing sits at $78,000-$92,000 FOB. The overlap zone is significant. The difference comes in what's included as standard: China factory-direct typically includes CE certification, calibration test data, Siemens/Mitsubishi PLCs, and remote diagnostics without upcharge. Indian manufacturers often quote these as optional add-ons.

How do I verify sand reclamation recovery rate claims before purchasing?

Request lab test data from your specific sand type and binder system. Serious suppliers will run a test batch (you provide 50 kg of your foundry sand) through their reclamation system and document the recovery rate, residual binder content, and sand grain size distribution after reclamation. Spec sheet claims of "95% recovery" mean nothing without test data from your material. We run these tests at our Qingdao facility before shipment — it's the only way to verify performance.

What PLC brands do Indian manufacturers typically use?

It varies by manufacturer and often by individual project. You'll see Siemens, Schneider, Delta, Mitsubishi, Allen-Bradley, and sometimes Indian brands like Xylem or L&T. This inconsistency creates maintenance headaches if you're running multiple lines — your team needs different programming software and spare parts inventory for each PLC brand. Always specify the PLC brand in your RFQ and confirm it's a firm commitment, not a "subject to availability" clause.

Can Indian manufacturers provide remote commissioning support?

Remote commissioning capability varies significantly. Multinational subsidiaries (DISA, Inductotherm) typically offer remote support with 4G-connected PLCs and VPN access. Domestic manufacturers often require on-site commissioning visits, though some have added video call support since 2020. If remote diagnostics matter for your operation, specify 4G connectivity and VPN access in your RFQ and confirm the supplier has successfully commissioned equipment remotely before.

What is the minimum order quantity for resin sand production lines?

Most manufacturers will sell individual components (single mixer, single reclamation unit) without MOQ restrictions. For complete production lines, there's no formal MOQ, but economic viability starts around $50,000-$75,000 total order value when importing from China. Below that threshold, domestic Indian sourcing often makes more sense due to logistics costs. We've shipped single 3 t/h mixers to buyers who needed to match existing equipment, but complete line orders are more common.

If you're comparing quotes and need factory-direct pricing with CE certification and verified dosing accuracy, send your casting type, required capacity (t/h), and facility dimensions to sales@tzfoundry.com. We'll provide a detailed proposal with FOB pricing, lead time, and commissioning support options. For buyers who want to see sand reclamation test data before committing, we can run your sand sample through our lab and send you the results within 2 weeks.

Resin Sand Coating Plant Design Guide – Heating Systems, Dust Collection, and Throughput Planning

Most coating plant failures don't happen during operation — they happen during specification. You order a 5-ton-per-hour system, the supplier ships equipment sized for 3 tons, and your dust collector can't handle the resin fume load. By the time you discover the heating drum can't hold ±5°C temperature stability, you've already paid 60% of the contract value.

A Resin Sand Coating Plant heats silica sand to 140-180°C, sprays liquid phenolic or furan resin onto the grain surface, then cools and screens the coated product. The coating thickness (typically 1.5-3% resin by weight) determines shell strength and shelf life. Get the heating system wrong and you waste resin. Undersize the dust collection and you fail emission compliance. Miscalculate throughput and your foundry molding line sits idle waiting for coated sand.

This guide covers the three engineering decisions that determine whether your coating plant meets spec or becomes an expensive lesson: heating system selection, dust collection sizing, and throughput capacity planning.

Heating System Selection — Temperature Stability vs Energy Cost

The heating drum brings sand from ambient temperature to coating temperature (140-180°C depending on resin type). Temperature uniformity across the sand batch determines coating adhesion — a 10°C variance causes uneven resin polymerization, which shows up as weak spots in your shell molds six weeks later.

We've built coating plants with all three heating configurations. Each has a specific cost-performance zone.

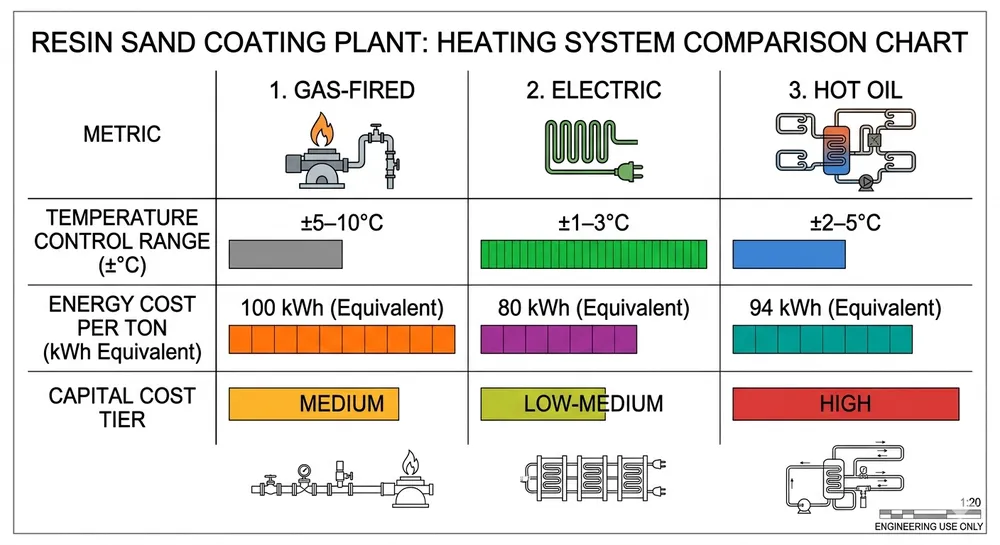
Gas-Fired Rotary Drum Direct flame heating through a burner mounted at the drum inlet. Fast heat-up (sand reaches target temperature in 8-12 minutes), lowest capital cost, highest fuel consumption. Natural gas or LPG burners deliver 150,000-300,000 kcal/hour depending on drum size.

Temperature control accuracy: ±8-12°C. The flame cycles on and off based on exhaust temperature sensors, so you get thermal lag. For phenolic resin coating (requires 160-170°C), this works fine — the resin tolerance band is wide enough. For furan systems that need tighter control, gas-fired drums waste resin through incomplete polymerization.

Energy cost: approximately 12-15 kWh equivalent per ton of coated sand (converted from gas consumption). We see this configuration on plants rated 3-8 tons per hour where fuel cost is low and the buyer prioritizes capital cost over operating expense.

Electric Heating Elements Resistance heating elements mounted inside the drum shell or in a separate pre-heater chamber. Slower heat-up (15-20 minutes to target temperature), higher capital cost, precise temperature control.

Temperature control accuracy: ±3-5°C. PLC-controlled element banks modulate power in 5-10% increments, so you get stable heat without the overshoot/undershoot cycle of gas burners. This matters for furan resin coating where a 5°C temperature drop extends cure time and increases resin consumption by 8-12%.

Energy cost: 18-22 kWh per ton of coated sand at typical industrial electricity rates. Higher than gas in most regions, but the resin savings from better temperature control often offset the energy premium. We recommend electric heating for plants rated 2-5 tons per hour where coating uniformity is critical and electricity cost is below $0.12/kWh.

Hot Oil Jacket System Thermal oil circulates through a jacketed drum, heated by a separate oil boiler (gas or electric). Highest capital cost, best temperature uniformity, lowest maintenance.

Temperature control accuracy: ±2-3°C. The thermal mass of circulating oil buffers temperature swings, giving you the most stable coating environment. We've installed this configuration for buyers producing premium shell sand where resin cost is $800-1,200 per ton and a 3% resin savings pays back the system premium in 18 months.

Energy cost: 14-18 kWh equivalent per ton (gas-fired oil boiler) or 20-24 kWh (electric boiler). The efficiency advantage comes from heat recovery — you can preheat incoming sand using exhaust heat from the oil circuit, which gas-fired drums can't do effectively.

Suitable for plants rated 5-15 tons per hour where continuous operation justifies the capital investment. The oil boiler runs 24/7 at stable load, which is more efficient than cycling a gas burner on and off.

Comparison chart of gas-fired, electric, and hot oil heating systems for resin sand coating plants showing temperature control accuracy and energy cost per ton

Dust Collection System Sizing — CFM Requirements by Throughput

Resin fume extraction isn't optional — phenolic and furan resins release volatile organic compounds during heating, and uncaptured fumes condense on downstream equipment. We've seen coating plants where inadequate dust collection caused resin buildup on cooling screens, requiring daily manual cleaning and cutting effective throughput by 30%.

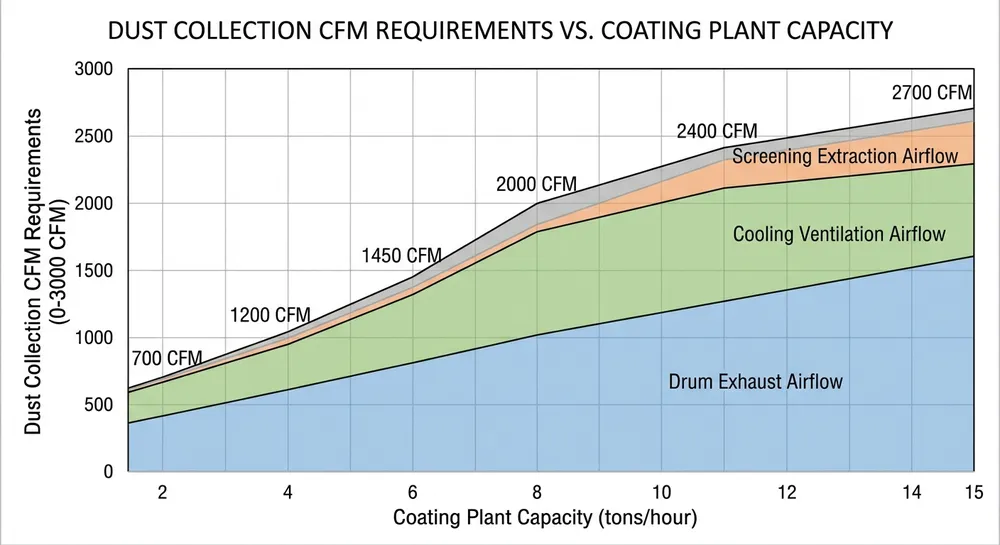
The dust collector must handle three airflow sources: drum exhaust (carries resin vapor and fine sand dust), cooling section ventilation (removes residual heat and VOCs), and screening station extraction (captures dust from product separation).

Airflow Sizing Formula Required CFM = (Drum volume × 15 air changes/hour) + (Cooling section volume × 10 air changes/hour) + (Screening station capture velocity × hood area)

For a 5-ton-per-hour coating plant with a 3.5 m³ drum, 8 m² cooling conveyor, and 1.2 m² screening hood:

  • Drum exhaust: 3.5 m³ × 15 changes/hour × 35.3 ft³/m³ ÷ 60 min = 309 CFM
  • Cooling section: 8 m² × 0.5 m height × 10 changes/hour × 35.3 ft³/m³ ÷ 60 min = 235 CFM
  • Screening capture: 1.2 m² × 100 ft/min capture velocity = 120 CFM
  • Total required: 664 CFM minimum

We typically size the dust collector at 120-130% of calculated CFM to account for filter loading and ductwork pressure drop. For the example above, specify an 800-850 CFM baghouse collector.

Filter Media Selection Phenolic resin fumes condense at 80-95°C, so your filter bags must handle 120-140°C operating temperature with chemical resistance to acidic condensate. We use polyester felt bags (continuous rating 130°C) for standard phenolic coating plants. For furan resin systems that run hotter and produce more aggressive fumes, specify Nomex or P84 filter media rated to 200°C.

Filter cleaning cycle matters more than buyers expect. Pulse-jet cleaning every 60-90 seconds keeps pressure drop below 6 inches water column. We've commissioned plants where the buyer specified a shaker-type collector to save $3,000 on capital cost, then discovered the filter bags needed manual cleaning every 4 hours because resin dust caked the fabric. The labor cost exceeded the equipment savings in three months.

Emission Compliance Most regions require VOC emissions below 50-100 mg/m³ at the stack. A properly sized baghouse collector captures 95-98% of particulate matter but doesn't remove gaseous VOCs. If your local regulations require VOC control, add a secondary treatment stage: activated carbon adsorption (for plants under 5 tons/hour) or thermal oxidizer (for larger continuous operations).

We integrate dust collection into our Resin Sand Production Line layouts by routing all exhaust streams to a central baghouse positioned outside the main building. This keeps filter maintenance separate from production operations and simplifies ductwork routing.

Dust collection airflow requirements chart showing CFM sizing for resin sand coating plants from 2 to 15 tons per hour capacity

Throughput Capacity Planning — Drum Sizing and Residence Time

Coating plant capacity depends on four linked parameters: drum diameter and length, rotation speed, sand feed rate, and residence time. Change one and you must recalculate the others. Most throughput problems trace back to mismatched parameters — a drum sized for 5 tons per hour running at 3 tons because the residence time is too short for complete resin polymerization.

Drum Diameter and Length Larger diameter increases sand bed depth, which improves heat transfer efficiency but requires more heating power. Longer drum increases residence time but adds capital cost and floor space.

Standard drum sizing by capacity:

  • 2-3 tons/hour: Ø1.2m × 6m length
  • 4-6 tons/hour: Ø1.5m × 8m length
  • 7-10 tons/hour: Ø1.8m × 10m length
  • 12-15 tons/hour: Ø2.2m × 12m length

We design drums with 8-12° internal flights (lifting paddles) that cascade sand through the hot air stream. Flight spacing and height determine mixing intensity — too aggressive and you get sand grain fracture, too gentle and you get uneven coating.

Rotation Speed and Feed Rate Drum rotation speed controls residence time. Faster rotation moves sand through the drum quicker, reducing residence time and increasing throughput — but only if the heating system can maintain target temperature at the higher feed rate.

Typical rotation speeds: 4-8 RPM depending on drum diameter. Larger drums run slower because the sand bed has more time to cascade through each rotation.

The relationship between feed rate, rotation speed, and residence time: Residence time (minutes) = (Drum volume × Fill factor) ÷ (Feed rate × Rotation speed factor)

For a Ø1.5m × 8m drum (14.1 m³ volume) at 6 RPM with 12% fill factor and 5 tons/hour feed rate: Residence time = (14.1 m³ × 0.12) ÷ (5 tons/hour ÷ 60 min × 1.6 m³/ton × 0.85 rotation factor) = 12.4 minutes

That's sufficient for phenolic resin coating at 165°C. Furan resin needs 15-18 minutes residence time, so you'd reduce feed rate to 4 tons/hour or increase drum length to 10m.

Resin Addition Ratio Control Coating thickness is controlled by resin spray rate, not by residence time. The spray nozzles inject liquid resin at 1.5-3.0% of sand mass flow rate, atomized by compressed air at 4-6 bar.

We use mass flow meters on both the sand feeder and resin pump, with PLC control that adjusts resin flow to maintain constant ratio regardless of feed rate fluctuations. This is critical — a 0.2% variation in resin ratio across a 50-ton batch means 100 kg of wasted resin at $1,000/ton.

The most common mistake: buyers specify a coating plant capacity but don't verify the resin pump can deliver the required flow rate. A 5-ton-per-hour plant coating at 2.5% resin ratio needs 125 kg/hour resin flow. Standard gear pumps max out at 80-100 kg/hour, so you need a larger pump or dual-pump configuration.

Reference Plant Layout — Equipment Sequence and Spacing

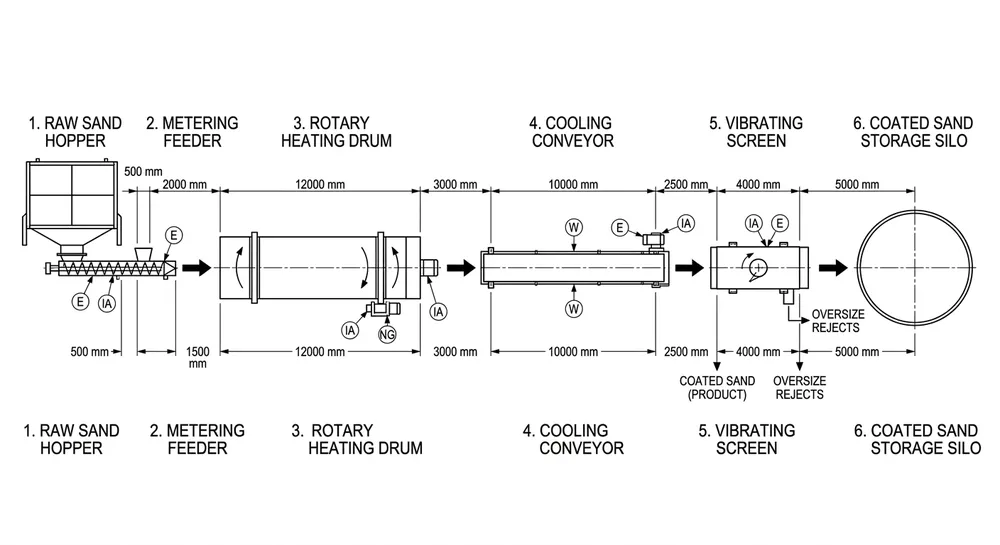
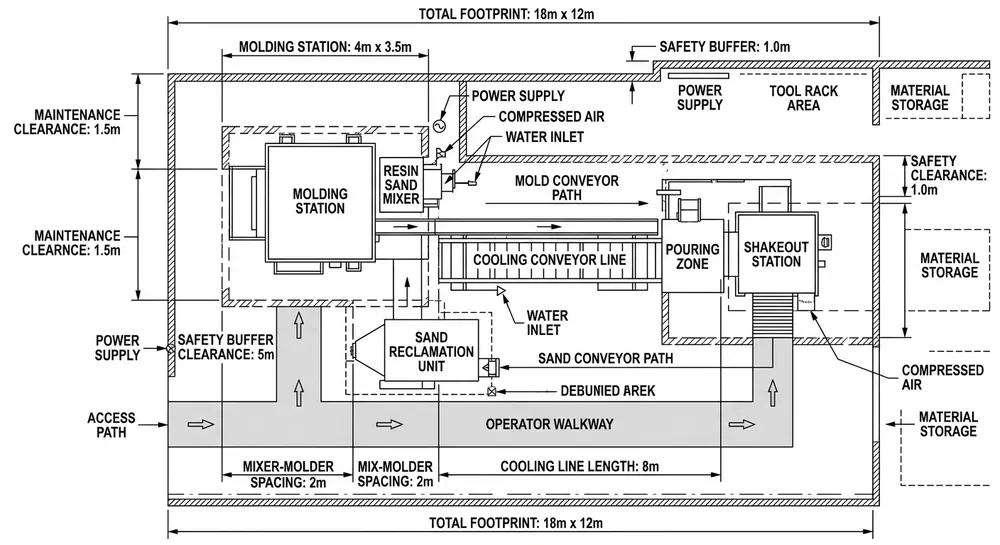
A complete coating plant occupies 15-25 meters of floor length depending on capacity. Material flows in one direction: raw sand storage → metering feeder → heating drum → resin spray section → cooling conveyor → vibrating screen → coated sand storage.

Equipment Spacing Requirements

  • Sand hopper to drum inlet: 2-3 meters (allows feeder access and maintenance clearance)
  • Drum discharge to cooling conveyor: 1.5 meters (transition chute and temperature sensor location)
  • Cooling conveyor length: 6-10 meters (sand must cool to below 60°C before screening)
  • Screen to storage silo: 2 meters (bucket elevator or pneumatic conveyor connection)

Vertical clearance: 4.5-5.5 meters minimum for drum installation and removal. The drum shell is a single welded unit that can't be disassembled, so you need overhead crane access for maintenance.

We design coating plants in modular sections sized for 40HQ container shipping (12m length limit). A 5-ton-per-hour plant ships in two containers: one with the drum assembly and heating system, one with the cooling conveyor, screen, and control cabinet. This cuts your landed cost by 30-40% compared to oversized cargo shipping.

Utility Requirements by Capacity For a 5-ton-per-hour electric heating system:

  • Electrical power: 180-220 kW (heating elements 150 kW, motors and controls 30 kW, dust collector 20 kW)
  • Compressed air: 0.8-1.2 m³/min at 6 bar (resin atomization and pneumatic controls)
  • Cooling water: 2-3 m³/hour at 15-25°C (optional for hot oil system heat exchanger)

Floor loading: 800-1,200 kg/m² under the drum support structure when filled with sand. Most industrial floors handle this, but verify if you're installing in a retrofitted building.

Resin sand coating plant layout diagram showing equipment sequence from sand hopper through heating drum, cooling conveyor, screening, and storage with spacing dimensions

Common Design Mistakes That Kill Throughput

Undersized Cooling Section Sand exits the heating drum at 160-180°C and must cool to below 60°C before screening. If you screen hot sand, the resin is still tacky and clogs the screen mesh. We see buyers specify an 8-meter cooling conveyor for a 7-ton-per-hour plant, then discover the sand temperature at the screen inlet is still 85°C. The screen blinds in 20 minutes and throughput drops to 4 tons per hour.

Cooling conveyor length should provide 8-12 minutes residence time. For a 5-ton-per-hour plant, that's 10-12 meters of conveyor at 0.8-1.0 m/min belt speed. Add forced air cooling (ambient air blown across the sand bed) if floor space is limited — this cuts required conveyor length by 30-40%.

Incorrect Resin-to-Sand Ratio Control Manual resin addition (operator adjusts pump speed by watching a sight glass) causes 15-25% variation in coating thickness across a production shift. This shows up as inconsistent shell strength and unpredictable resin consumption.

Automated ratio control using mass flow meters costs $4,000-6,000 more than manual systems but pays back in 6-9 months through reduced resin waste. We've measured 12-18% resin savings on plants that switched from manual to automated control — that's $15,000-20,000 per year on a 5-ton-per-hour plant running one shift.

Inadequate Resin Storage and Heating Phenolic and furan resins must be stored at 20-30°C and heated to 40-50°C before spraying to reduce viscosity. Buyers in cold climates often skip the resin tank heating system to save $2,000, then discover the resin won't atomize properly when ambient temperature drops below 15°C in winter.

We include jacketed resin storage tanks with electric heating elements on all coating plants shipped to regions with winter temperatures below 10°C. The tank heater runs 24/7 during cold months — energy cost is $50-80 per month, which is trivial compared to the production loss from poor resin atomization.

Specifying Your Coating Plant for RFQ

When you request quotes for a resin sand coating plant, provide these parameters so suppliers can size equipment correctly:

Production Requirements

  • Target throughput: X tons per hour (specify whether this is continuous or batch operation)
  • Operating schedule: hours per day, days per week
  • Sand grain size range: AFS 40-70, 50-100, etc. (finer sand requires longer residence time)
  • Resin type: phenolic, furan, or both (determines heating temperature and dust collection requirements)

Site Conditions

  • Available floor space: length × width × height (determines whether you need vertical or horizontal layout)
  • Electrical supply: voltage, phase, available capacity in kW
  • Compressed air: available pressure and flow rate
  • Ambient temperature range: minimum and maximum (affects heating system sizing and resin storage design)

Regulatory Requirements

  • VOC emission limits: mg/m³ at stack (determines whether you need secondary VOC treatment)
  • Noise limits: dB(A) at property line (affects dust collector and motor enclosure specifications)
  • Safety certifications: CE, OSHA, local standards

Preference Factors

  • Heating system preference: gas-fired, electric, or hot oil (if you have strong fuel cost or temperature control requirements)
  • Control system: PLC brand preference (Siemens, Mitsubishi, Allen-Bradley) and HMI language
  • Modular design: specify if you need container-friendly sections for lower shipping cost

We've commissioned coating plants in 14 countries. The installations that go smoothly are the ones where the buyer provided complete site data and production requirements upfront. The problem projects are the ones where we discover the electrical supply is 50 kW short or the ceiling height won't clear the drum after equipment arrives on site.

Choosing the Right Configuration for Your Foundry

Small-Scale Operations (2-4 tons/hour) Electric heating drum with pulse-jet baghouse collector. Lower capital cost, simpler operation, suitable for single-shift production. Expect $85,000-120,000 FOB for a complete system including controls and dust collection.

This configuration works for foundries producing 500-1,000 tons of coated sand per year, typically supporting 3-5 molding lines. The electric heating gives you good temperature control without the complexity of a gas burner system.

Mid-Scale Production (5-8 tons/hour) Gas-fired or electric heating (depending on local fuel cost), larger baghouse with automated filter cleaning, PLC control with remote monitoring. Capital cost $150,000-220,000 FOB.

This is the most common configuration for foundries running two shifts with 8-12 molding lines. The automated controls reduce labor cost and improve coating consistency. We include mass flow meters for resin ratio control at this capacity level — the resin savings justify the added cost.

High-Volume Continuous Operation (10-15 tons/hour) Hot oil jacket heating system, high-capacity dust collector with VOC treatment if required, fully automated PLC control with recipe management for multiple resin types. Capital cost $280,000-400,000 FOB.

This configuration supports foundries producing 3,000+ tons of coated sand annually, typically large operations with 20+ molding lines running three shifts. The hot oil system's temperature stability and heat recovery features pay back the capital premium through lower resin consumption and energy cost.

(Note: if you're adding coating capacity to an existing Resin Coated Sand Production Line, verify your current dust collection system can handle the additional airflow before ordering a standalone coating plant — you may be able to tie into existing infrastructure and save $15,000-25,000 on dust collector cost.)

Send us your target throughput, sand grade, resin type, and available floor space. Our engineering team will return a plant layout with equipment sizing, utility requirements, and FOB pricing within 48 hours. We'll also flag any site condition issues that could affect installation cost or timeline — better to know before you commit to a purchase order than after equipment arrives at your facility.

Resin Sand Molding Production Line Components: What Every First-Time Import Buyer Needs to Know

Most first-time buyers focus on the mixer capacity and reclamation rate. Then the equipment arrives and they realize they ordered a system with a Siemens PLC but their maintenance team only knows Mitsubishi, or the shakeout unit doesn't fit through their factory door. The datasheet said "complete production line" — but nobody explained which components ship assembled and which arrive as knock-down sections you'll bolt together on-site.

A resin sand molding production line is a modular system, not a single machine. Understanding what each component does, how they connect, and how they ship determines whether your first import order runs smoothly or turns into a three-month commissioning nightmare.

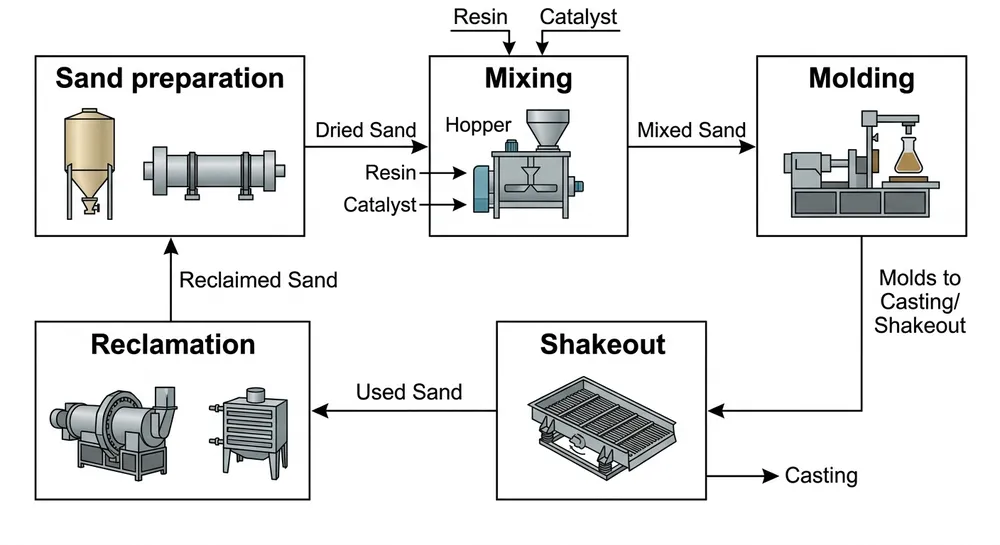
Core System Architecture: Five Functional Blocks

Every resin sand production line breaks down into five functional blocks, regardless of whether you're running furan, phenolic, or sodium silicate binder systems.

Sand preparation and storage — Raw silica sand enters through a receiving hopper, passes through magnetic separation to remove tramp metal, then moves to storage silos. Most lines use 10-20 ton capacity silos with level sensors that trigger automatic refill cycles. The magnetic separator matters more than buyers expect — even 0.1% iron contamination causes surface defects on aluminum castings.

Mixing and binder dosing — This is where resin and catalyst combine with sand. The mixer itself (continuous or batch type) runs 30-120 seconds per cycle depending on binder chemistry. Binder cost is the number everyone watches — but it's the mixing accuracy that decides whether you're wasting resin or wasting castings. A ±2% dosing error on a 2% binder ratio means you're either running weak molds or burning 4% extra resin cost across your entire production volume.

Molding and core making — Mixed sand moves to molding stations or core boxes. For high-volume operations, this includes automated sand shooters, pattern handling systems, and mold assembly conveyors. The cycle time here determines your hourly output — a 60-second mold cycle gives you 60 molds per hour per station, minus downtime for pattern changes.

Shakeout and cooling — After casting, molds travel through a cooling zone (usually 15-30 minutes for ferrous alloys), then hit the shakeout unit where castings separate from sand. Shakeout equipment ranges from simple vibrating grids to automated drum-type units with integrated casting extraction. The cooling zone length affects your floor space requirement — a 20-ton-per-hour line needs roughly 40 meters of conveyor for adequate cooling time.

Sand reclamation — Used sand returns to the system after mechanical or thermal reclamation. Mechanical reclamation (attrition mills, pneumatic impact) works for furan and phenolic binders, achieving 90-95% sand recovery. Thermal reclamation (fluidized bed, rotary kiln) burns off organic binders completely but costs more to operate. We run recovery rate tests in our sand lab before shipment — if your line is rated for 95% recovery, you'll see the test data from your specific reclamation unit.

Resin sand molding production line component flow diagram showing sand preparation, mixing, molding, shakeout, and reclamation stages

Component-by-Component Breakdown: What Ships and How

Import logistics depend on understanding which components ship as complete assemblies and which break down for container loading.

Sand Mixer (Continuous or Batch Type)

The mixer is the heart of the system. Continuous mixers (paddle or plow type) run 5-15 tons per hour for high-volume foundries. Batch mixers (typically 500-2000 kg per batch) suit job shops with frequent binder changes.

What ships: Mixer body, drive motor, gearbox, and internal mixing blades ship as one assembled unit if the mixer diameter stays under 2.3 meters (40HQ container width limit). Larger mixers ship with the body in one section and the drive assembly separate — you'll bolt them together on-site using the alignment jigs we include.

Binder dosing system: Resin and catalyst pumps, flow meters, and dosing controllers ship as a separate skid. This is intentional — the dosing skid mounts near the mixer but needs independent access for calibration and maintenance. Dosing accuracy depends on flow meter calibration, which we verify at ±1% before shipment. Most buyers don't realize the flow meters need recalibration every 6 months in production — we include the calibration procedure and reference weights in the commissioning manual.

Control integration: The mixer PLC communicates with the dosing system via Modbus or Profibus protocol. If you're adding this mixer to an existing line, confirm your current PLC brand and protocol — mixing Siemens and Mitsubishi PLCs in one system works, but the protocol conversion adds cost and commissioning time.

Sand Reclamation Unit (Mechanical or Thermal)

Reclamation equipment determines your sand cost and environmental compliance. Mechanical reclamation costs less upfront but leaves 5-10% residual binder on sand grains. Thermal reclamation delivers cleaner sand but burns fuel.

Mechanical reclamation components:

  • Primary crusher (jaw or impact type) breaks up used mold lumps
  • Attrition mill or pneumatic impact chamber removes binder film from sand grains
  • Vibrating screens separate sand by particle size
  • Magnetic separator removes metal fragments
  • Dust collection system (bag filter or cyclone)

What ships: The attrition mill and crusher ship as complete units. Screens, conveyors, and dust collectors ship as modular sections — you'll assemble the frame on-site and mount the equipment. A complete mechanical reclamation line for 10 tons per hour typically fills 2-3 forty-foot containers.

Thermal reclamation components:

  • Fluidized bed or rotary kiln (burns off organic binder at 600-800°C)
  • Burner system (natural gas or LPG)
  • Heat exchanger for exhaust gas
  • Cooling screw conveyor
  • Afterburner for VOC emissions (required in most export markets)

Thermal systems ship in more pieces because of the refractory lining. The kiln body ships separately from the burner assembly and refractory bricks. Budget 5-7 days for on-site refractory installation and curing before first fire-up.

Conveyor and Material Handling System

Sand moves through the system on belt conveyors, bucket elevators, and screw conveyors. This is where container optimization matters most — a 30-meter belt conveyor doesn't ship as a 30-meter unit.

Modular conveyor design: We design conveyors in 3-meter or 6-meter sections that bolt together on-site. Each section includes the belt, rollers, drive motor (if powered), and mounting brackets. A 24-meter conveyor ships as four 6-meter sections plus one drive unit. You'll need a crew with basic hand tools and a forklift for assembly — no welding required.

Bucket elevators: These ship with the casing in sections, buckets and belt as a kit, and the drive unit separate. The casing sections nest inside each other for container loading. Assembly takes 2-3 days including belt splicing and tension adjustment.

Pneumatic conveying: Some lines use pneumatic systems instead of mechanical conveyors for sand transport. Pneumatic systems ship as pipe sections, blower unit, and diverter valves. The advantage is flexibility — you can route pipes around existing equipment. The disadvantage is higher power consumption and more maintenance on the blower seals.

Control System and HMI

The PLC and human-machine interface control the entire line. This is where first-time buyers make expensive mistakes by not specifying their requirements clearly.

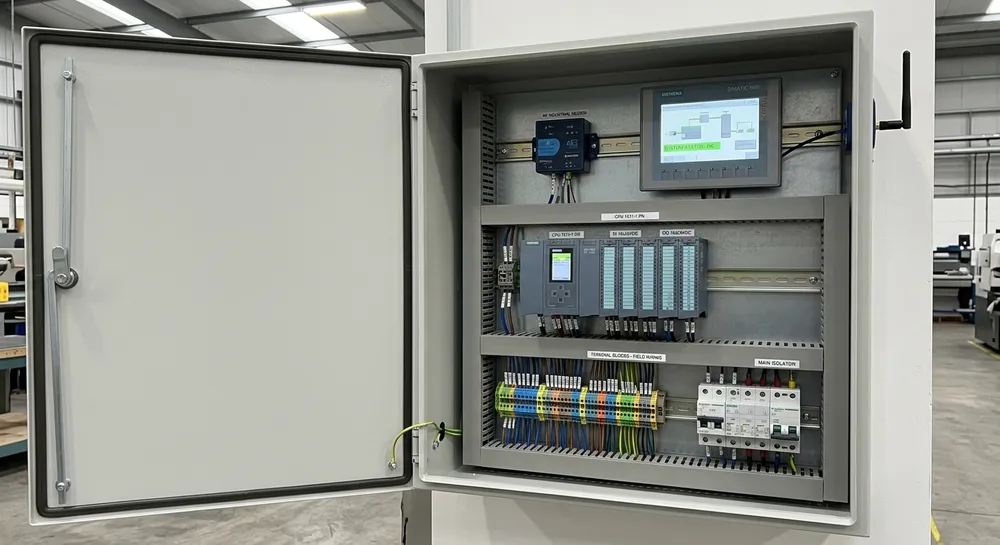
PLC options: We offer Siemens S7-1200/1500 or Mitsubishi FX5U/Q series. Both work reliably, but your choice should match your maintenance team's experience. Switching PLC brands mid-project adds 3-4 weeks to commissioning while your electricians learn the new programming environment.

HMI touchscreen: 10-inch or 15-inch color touchscreen with multilingual interface (English, Spanish, Arabic, Russian available). The HMI displays real-time data: mixer batch count, binder consumption, reclamation throughput, alarm history. We program the screens based on your preferred units (metric or imperial) and language before shipment.

Remote diagnostics: Our control systems include a 4G modem for remote access. Your maintenance team can pull error logs, adjust process parameters, and troubleshoot sensor issues without waiting for an engineer to fly in. This feature saved one of our Mexican buyers $8,000 in emergency service calls during their first year — they had three false alarms from a faulty proximity sensor that we diagnosed and fixed remotely in under an hour.

What ships: PLC, HMI, and control cabinet ship as one assembled unit with all wiring terminated. Sensor cables and field device connections ship separately — your electrician will pull these cables during installation. We provide a complete wiring diagram with terminal numbers and color codes.

Resin sand production line PLC control cabinet showing Siemens controller, HMI touchscreen, and remote diagnostics module

Container Loading and Knock-Down Packaging Strategy

A complete 10-ton-per-hour resin sand line weighs 35-45 tons and occupies roughly 400 cubic meters if you tried to ship it fully assembled. That's 8-10 forty-foot containers at terrible space utilization. We design for 3-4 containers instead.

40HQ container dimensions: 12.03m length × 2.35m width × 2.69m height. Every component we manufacture considers these limits. The mixer body diameter maxes out at 2.2 meters so it fits with 150mm clearance for packaging material. Conveyor sections are 6 meters or less so two sections fit lengthwise with room for the drive units.

Knock-down packaging approach:

  • Heavy equipment (mixer, crusher, attrition mill) ships on wooden skids with steel banding
  • Structural frames ship as bolt-together sections with pre-drilled holes and alignment pins
  • Small components (motors, sensors, valves) pack in plywood crates with foam padding
  • Long items (conveyor sections, pipe runs) bundle together with protective wrapping

Assembly time: A typical 10-ton-per-hour line takes 15-20 days to assemble and commission with a 4-person crew (2 mechanical, 1 electrical, 1 commissioning engineer). The mechanical assembly is straightforward — bolt patterns align, no field welding required. Electrical work takes longer because every sensor and motor needs termination and testing.

Foundation requirements: We provide foundation drawings showing anchor bolt locations, concrete pad dimensions, and floor loading requirements. Most buyers underestimate the floor loading — a sand silo holding 15 tons of sand concentrates that weight on four support legs. Your facility needs 8-10 tons per square meter load capacity in the silo area, which is higher than typical warehouse floors. Check this before you order.

Binder System Compatibility: Furan, Phenolic, or Sodium Silicate

The mixer and reclamation equipment must match your binder chemistry. This isn't interchangeable.

Furan resin systems — Most common for ferrous castings. Furan uses acid catalyst (typically phosphoric or sulfonic acid), so all wetted parts need acid-resistant coatings. Mixer blades are stainless steel or hard-chromed carbon steel. Dosing pumps are PTFE-lined or stainless. Mechanical reclamation works well for furan — the binder film breaks off easily in attrition mills.

Phenolic resin systems — Used for high-temperature castings (steel, high-chrome iron). Phenolic requires alkaline catalyst, so material compatibility differs from furan. Phenolic sand has longer strip time (time before you can shake out the casting), which affects your cooling conveyor length. Mechanical reclamation works but requires more aggressive attrition because phenolic bonds harder to sand grains.

Sodium silicate (water glass) systems — CO₂-cured or ester-cured. Sodium silicate is non-toxic and low-cost, but reclamation is harder. Mechanical methods don't work well — you need thermal reclamation or wet reclamation (washing with hot water). If you're running sodium silicate, specify this upfront so we design the reclamation system accordingly.

Switching binder types: Some buyers want one line that handles multiple binder chemistries. This is possible but adds cost — you need dual dosing systems, chemical-resistant materials throughout, and separate sand storage to avoid cross-contamination. Most foundries run dedicated lines per binder type instead.

Quality Verification Before Shipment: What We Test

Every component goes through three-stage inspection before it ships. Here's what that means for you.

Mixer calibration: We run the mixer with actual sand and binder (not water, not dry sand — real production materials) to verify mixing uniformity. We pull samples from five locations in the discharge stream and measure binder content. If the spec is 2.0% ± 0.1%, all five samples must fall within that range. You'll receive the calibration report with your equipment.

Reclamation performance test: We process 500 kg of used sand through your reclamation unit and measure recovery rate, residual binder content, and particle size distribution. If your line is rated for 95% recovery with <0.3% residual binder, the test report proves it before the equipment leaves our facility. This test happens in our sand lab using sand samples that match your specified grain size and binder type.

Control system simulation: We run the PLC through all operating modes (auto, manual, emergency stop) and verify every sensor input and output signal. The HMI screens get tested for correct data display and alarm triggering. Remote diagnostics get tested by connecting to our office network and pulling simulated error logs.

Pressure and leak testing: Pneumatic conveying systems, dust collectors, and any pressurized vessels get tested at 1.5× operating pressure. Hydraulic systems (if your line includes hydraulic molding presses) get tested at 1.5× rated pressure with leak detection dye.

Common Specification Mistakes First-Time Buyers Make

Mistake 1: Ordering mixer capacity based on casting weight instead of sand throughput

A buyer says "we pour 5 tons of castings per hour, so we need a 5-ton mixer." Wrong. You need to calculate sand-to-metal ratio. For typical iron castings, that ratio is 3:1 to 5:1. So 5 tons of castings requires 15-25 tons of sand per hour. Order the mixer based on sand throughput, not casting weight.

Mistake 2: Ignoring dust collection requirements

Resin sand systems generate dust at the mixer discharge, reclamation crusher, and screening stations. Most export markets require enclosed dust collection with <50 mg/m³ emissions. Budget for a bag filter system with 5,000-10,000 m³/hour capacity depending on line size. Dust collectors add 10-15% to total system cost but you can't legally operate without them in most countries.

Mistake 3: Underspecifying electrical supply

A 10-ton-per-hour line draws 150-200 kW total power. That's the sum of all motors, heaters (if thermal reclamation), and control systems. Confirm your facility has adequate transformer capacity and that your local utility can supply this load. We've had buyers order equipment, then discover their facility only has 100 kW available and they need a $50,000 transformer upgrade.

Mistake 4: Not planning for spare parts storage

Resin sand lines have consumable parts: mixer blades wear out every 6-12 months depending on sand abrasiveness, dosing pump seals need replacement every 3-6 months, vibrating screen meshes tear and need replacement. We ship a first-year spare parts kit with every line, but you need warehouse space to store it. Budget 10-15 square meters for spare parts storage.

Decision Framework: Matching Components to Your Production Requirements

If you're running 5-10 tons of castings per day (small job shop):

  • Batch mixer (500-1000 kg per batch)
  • Mechanical reclamation (attrition mill type)
  • Manual molding or semi-automatic core shooter
  • Basic PLC with local HMI (remote diagnostics optional)
  • 1-2 container shipment
  • Budget: $80,000-$150,000 depending on automation level

If you're running 20-50 tons of castings per day (medium production foundry):

  • Continuous mixer (5-10 tons per hour)
  • Mechanical reclamation with automated screening
  • Automated molding line with pattern handling
  • Full PLC control with remote diagnostics
  • 3-4 container shipment
  • Budget: $200,000-$400,000

If you're running 100+ tons of castings per day (high-volume production):

  • Multiple continuous mixers or high-capacity single mixer (15-20 tons per hour)
  • Thermal reclamation for maximum sand quality
  • Fully automated molding with robotic casting extraction
  • Redundant control systems with SCADA integration
  • 6-8 container shipment
  • Budget: $500,000-$1,000,000+

The right configuration depends on your casting mix, binder type, environmental regulations, and available floor space. Send us your production requirements — daily casting tonnage, alloy types, available floor area, and local electrical supply specs. We'll recommend the component configuration that fits your operation and provide a detailed quote with container loading plan and commissioning timeline.

For technical questions about binder dosing accuracy, reclamation system selection, or control system integration with your existing equipment, contact our engineering team at sales@tzfoundry.com or WhatsApp +86 13335029477.

Resin Sand Casting Machine Selection Guide – Mold Size, Clamping Force, and Automation Options

Most buyers start with mold dimensions and end up with a machine that either can't hold the flask closed during pouring or costs 40% more than necessary because the automation tier doesn't match their actual throughput. The datasheet says "800×600 mm working area" and "150 tons clamping force," but nobody explains whether that's enough for your 25 kg iron castings or whether you're paying for capacity you'll never use.

A resin sand casting machine is a molding press that compacts resin-coated sand around a pattern, then clamps the mold halves together during metal pouring. The three specs that determine whether you bought the right machine are mold size (flask dimensions), clamping force (tonnage to resist metal pressure), and automation level (manual loading vs. fully automated cycle). Get any one wrong and you're either rejecting castings or watching an expensive machine sit idle.

Mold Size and Clamping Force — The Core Relationship

Mold size defines the maximum flask dimensions the machine can handle. Clamping force is the hydraulic tonnage that holds the cope and drag together when molten metal tries to separate them. The relationship isn't linear — larger molds need disproportionately higher clamping force because metal pressure acts across the entire parting surface.

Here's the reference table we use when sizing machines for export buyers:

Flask Size (mm) Parting Area (cm²) Minimum Clamping Force (tons) Typical Casting Weight (kg) Common Applications
600×500 3,000 80-100 5-15 Small valve bodies, pump housings
800×600 4,800 120-150 15-30 Medium machinery parts, gearbox housings
1000×800 8,000 180-220 30-60 Large valve bodies, engine blocks
1200×1000 12,000 250-300 60-100 Heavy machinery components, large pump casings
1500×1200 18,000 350-400 100-150 Industrial equipment frames, large castings

The "minimum" column assumes gray iron or ductile iron with standard gating. If you're pouring steel or using bottom-gating systems that increase back-pressure, add 20-30% to the clamping force. We've seen buyers spec a 150-ton machine for 800×600 molds and then switch to steel castings six months later — the molds start separating at the parting line and you get flash that needs grinding.

Clamping force distributes across the parting surface through the machine's platen. Uneven distribution causes one side of the mold to lift while the other stays closed. Our machines use four-point hydraulic cylinders with synchronized pressure control — each corner gets monitored independently so the PLC can adjust if one side lags. This matters more as mold size increases; on a 1500×1200 flask, a 2mm height difference between corners translates to visible parting-line shift in the casting.

Resin sand casting machine mold size vs clamping force reference chart showing flask dimensions and required tonnage

Automation Tiers — Manual, Semi-Auto, and Fully Automated

Resin sand casting machines come in three automation levels. The difference isn't just labor cost — it's cycle time consistency and whether your night shift can hold the same quality as your day shift.

Manual machines require an operator to load the pattern, position the flask, trigger the squeeze cycle, remove the mold, and reload. Cycle time runs 4-6 minutes per mold depending on operator skill. These work for low-volume production (under 30 molds per shift) or when you're running multiple different patterns daily and setup flexibility matters more than speed. We still ship manual machines to tool rooms and prototype foundries where batch sizes are 5-20 pieces.

Semi-automated machines handle the squeeze and clamp cycle automatically but require manual pattern loading and mold extraction. The operator places the pattern, presses start, and the machine runs through sand fill, compaction, and clamp-up without further input. Cycle time drops to 2.5-3.5 minutes because the hydraulic sequence is programmed and repeatable. This tier makes sense when you're running 50-120 molds per shift on 3-5 different patterns — you get consistent compaction without paying for full automation.

Fully automated lines integrate pattern handling, sand delivery, mold compaction, and mold transfer into a continuous cycle. The operator monitors the HMI and handles pattern changeovers. Cycle time hits 1.5-2 minutes per mold, and you can sustain 200+ molds per 8-hour shift. The PLC controls sand dosing accuracy (±2% by weight), compaction pressure (±3 bar), and cure time, so every mold comes out identical. We program these systems with Siemens S7-1200 or Mitsubishi FX5U PLCs, and the remote diagnostics module lets your maintenance team pull error logs without flying someone to the site.

The cost jump between tiers is significant. A manual 800×600 machine runs around $45,000-$55,000. Semi-auto adds $20,000-$30,000 for the automated hydraulic sequencing and PLC. Full automation adds another $60,000-$80,000 for pattern handling, conveyor integration, and advanced control systems. The payback calculation is straightforward: if your labor cost per mold exceeds the incremental machine cost divided by expected mold output over 3-5 years, automation pays for itself. Most export buyers in North America and Europe hit that threshold around 80-100 molds per shift.

Installation Footprint and Ceiling Height Constraints

Machine datasheets list "overall dimensions," but they don't tell you whether the equipment actually fits your facility or whether you'll need structural modifications before installation.

A standard 1000×800 resin sand casting machine occupies roughly 4.5m × 3.5m of floor space, but you need an additional 1.5-2m clearance on the loading side for pattern handling and 1m on the discharge side for mold removal. If you're integrating a conveyor system for automated mold transfer, add another 3-4m for the conveyor run. Total footprint becomes 9-10m × 4-5m when you account for operator access and maintenance clearance.

Ceiling height matters more than most buyers expect. The machine's vertical stroke (the distance the upper platen travels during mold opening) determines minimum ceiling clearance. For an 800×600 machine with 400mm stroke, you need at least 3.2m floor-to-beam height to allow for pattern removal and overhead crane access. Larger machines with 600-800mm stroke require 4-5m clearance. We've had buyers order equipment and then discover their existing building has 3.5m ceilings — the machine physically fits, but they can't lift patterns in and out without hitting the roof structure.

Retrofit projects add another layer of complexity. If you're adding a resin sand line to a facility that already runs clay sand or lost foam, the new machine needs to interface with your existing sand handling system. Our engineering team designs the material flow during the quotation stage — we'll calculate hopper capacity, conveyor speeds, and whether your current dust collection system can handle the additional load. This isn't extra service; it's necessary to avoid discovering integration problems after the equipment arrives.

Resin sand casting machine installation footprint diagram showing floor space, clearance zones, and ceiling height requirements

PLC Control Systems and Remote Diagnostics

The control system determines whether your maintenance team can troubleshoot a fault in 20 minutes or whether you're waiting three days for a technician to fly in. We use Siemens or Mitsubishi PLCs (buyer's choice) with English, Spanish, or Arabic HMI interfaces. The program includes all hydraulic sequencing, pressure monitoring, sand dosing control, and fault diagnostics.

Remote diagnostics run through a 4G module built into the control cabinet. When a sensor fails or a hydraulic valve sticks, the PLC logs the fault code and sends an alert to your maintenance team's phone. Your technician can log into the system remotely, pull the error history, check real-time sensor readings, and adjust parameters without opening the cabinet. We've diagnosed and resolved 60-70% of service calls this way — a proximity sensor that drifted out of range, a pressure switch that needed recalibration, a timer setting that got changed accidentally during pattern changeover.

The alternative is buying from a reseller who doesn't control the PLC programming. They source the machine from a third-party manufacturer, install a generic control system, and hand you a manual. When something breaks, they can't access the program logic because they didn't write it. You're stuck waiting for the original manufacturer to respond, and if that manufacturer is in another country with a 12-hour time difference, your line sits idle for days.

We maintain the source code for every control system we ship. If you need a parameter changed, a new pattern profile added, or a sensor threshold adjusted, we can push the update remotely or send you the modified program file with instructions. This matters more as your production evolves — six months after installation, you're running different casting weights, different sand formulations, or different cure times, and the machine needs to adapt.

Container-Friendly Modular Frame Design

Export buyers care about landed cost, and landed cost includes freight. A resin sand casting machine that ships in one piece costs 40-50% more to transport than a modular design that breaks down into container-friendly sections.

Our machines use a modular frame system where the base, columns, upper platen, and hydraulic power unit ship as separate assemblies. An 800×600 machine fits into one 40HQ container (12.03m × 2.35m × 2.69m internal dimensions). A 1200×1000 machine ships in two containers. The frame sections bolt together on-site using precision-machined alignment pins and grade 10.9 fasteners — no welding, no machining, no alignment adjustments beyond what a torque wrench and dial indicator can handle.

This isn't just about freight savings. Modular design means you can move the machine later if your facility layout changes. We've had buyers relocate equipment to a different building three years after installation — they unbolt the frame, load it onto trucks, and reassemble it in the new location over a weekend. A welded one-piece frame would require cutting, transport as oversized cargo, and re-welding with post-weld stress relief.

The hydraulic and electrical systems follow the same logic. Hydraulic hoses use quick-disconnect fittings with color-coded tags. Electrical connections run through numbered terminal blocks with matching labels on both the cabinet and the machine side. Your installation team doesn't need to read hydraulic schematics or trace wire numbers — they match the colors and numbers, tighten the fittings, and the system is ready for commissioning.

Matching Machine Specs to Your Production Reality

The selection process starts with three questions: what's your largest flask size, what's your target output per shift, and what's your facility's ceiling height?

If you're running 600×500 to 800×600 flasks at 40-60 molds per shift, a semi-automated 150-ton machine covers most scenarios. You get consistent cycle times, programmable compaction pressure, and enough clamping force for iron and aluminum castings up to 30 kg. Installation fits into a standard 6m × 4m floor space with 3.5m ceiling clearance.

If you're targeting 100+ molds per shift on 1000×800 or larger flasks, full automation becomes necessary. Manual loading can't sustain that pace across an 8-hour shift, and operator fatigue leads to inconsistent sand fill and compaction. The fully automated line costs more upfront, but the labor savings and quality consistency pay back within 18-24 months at that production volume.

If you're adding resin sand capacity to an existing foundry, send us your current layout, ceiling height, and available floor space during the RFQ stage. Our engineering team will design the material flow, calculate whether your existing sand handling system can supply the new machine, and confirm that the equipment fits through your building's doors and aisles before you commit to the purchase. We've caught installation problems at the quotation stage that would have cost $15,000-$20,000 to fix after delivery.

For more details on complete resin sand production systems, see our resin sand production line page. If you're comparing resin sand to other molding methods, our guide on clay sand vs resin sand molding systems covers the cost and quality trade-offs. Ready to spec a machine for your facility? Send us your flask dimensions and target output — we'll recommend the exact configuration with factory commissioning data from similar installations.

Common Selection Mistakes and How to Avoid Them

Under-speccing clamping force for future casting types. Buyers size the machine for their current product mix (gray iron, simple gating) and then add steel castings or bottom-pour systems later. The molds start flashing at the parting line because the clamping force is 20-30% short. If there's any chance you'll pour steel or use pressurized gating in the next 2-3 years, spec the next clamping force tier up. The cost difference is $8,000-$12,000; the cost of replacing an under-spec'd machine is $50,000+.

Choosing full automation for low-volume, high-mix production. Fully automated lines excel at repeatable high-volume runs. They're inefficient when you're changing patterns every 20-30 molds because the setup time (loading new pattern profiles, adjusting sand dosing, recalibrating sensors) eats into the cycle time advantage. If you're running 10-15 different patterns per week at 20-50 molds each, semi-auto gives you better flexibility without the automation overhead.

Ignoring installation access during equipment selection. The machine fits through the factory door, but the hydraulic power unit doesn't. Or the upper platen clears the door, but the crane can't lift it high enough to clear the door frame. We've seen buyers rent a mobile crane and remove roof panels to get equipment into the building — $5,000-$8,000 in unplanned costs. Send us photos of your building access points (door dimensions, ceiling height, floor load capacity) during quotation. We'll confirm the equipment can be delivered and installed without structural modifications.

Buying based on price without verifying PLC support. The lowest-price machine often comes with a generic PLC program and no remote access. When a fault occurs, you're emailing screenshots of error codes to a supplier who may or may not respond within 24 hours. The $10,000 you saved upfront costs you $2,000-$3,000 per day in lost production when the line goes down. Verify that the supplier maintains the PLC source code and offers remote diagnostics before you sign the purchase order.

What to Request During RFQ

When you're comparing resin sand casting machine quotes, ask for these specific items:

  • Mold size and clamping force with application confirmation. Don't just accept "suitable for your needs." Ask the supplier to confirm the clamping force calculation based on your specific flask size, casting weight, and metal type. We provide a written calculation showing parting area, metal pressure, and safety factor.
  • Cycle time data from a similar installation. "2 minutes per mold" means nothing without context. Ask for commissioning reports from a machine running similar flask sizes and casting types. We send factory test data showing actual cycle times measured during pre-shipment commissioning.
  • PLC brand, model, and remote access capability. Verify whether the control system supports remote diagnostics and whether the supplier maintains the source code. Ask for a sample HMI screenshot showing the interface language and parameter access levels.
  • Installation footprint drawing with clearance zones. Request a CAD layout showing the machine footprint, operator access areas, and required clearances. This should include ceiling height requirements and any special foundation or floor loading considerations.
  • Modular frame design and container loading plan. If you're importing, ask how the machine breaks down for shipping and how many containers it requires. Request photos or drawings of the frame connection points to verify that field assembly doesn't require welding or precision machining.
  • Spare parts list and lead times. Ask for a recommended spare parts kit covering the first year of operation. Verify lead times for critical components like hydraulic seals, proximity sensors, and solenoid valves. We ship a first-year spare parts kit with every machine — it includes the consumables you'll actually need, not a generic list.

Resin Sand Production Line Buyer’s Guide: Equipment Selection, Binder Systems, and Factory Layout for Foundries

Most foundries discover their resin sand line is undersized six months after commissioning — when they're running two shifts to meet demand and the mixer becomes the bottleneck. Or they spec a furan binder system for ductile iron work, then realize the fume extraction wasn't sized for it. The purchase decision looks straightforward until you're standing on the factory floor watching molds crack because someone saved $8,000 on a reclamation plant that should have been part of the original order.

A resin sand production line is the complete equipment chain that mixes silica sand with resin binder, forms molds or cores, and reclaims used sand for reuse. For foundries casting ferrous and non-ferrous parts, it's the system that determines your mold quality, binder consumption, and sand cost per ton of castings.

The Core Equipment Chain: What You're Actually Buying

A complete resin sand line includes four functional stages, and each one affects the others. Undersize one component and the entire line runs at the speed of your slowest piece.

Resin sand mixer — the heart of the system. Continuous mixers feed molding machines at steady rates (5-20 tons/hour typical). Batch mixers work for core production or smaller foundries (0.5-3 tons per batch). Mixing time runs 90-180 seconds depending on binder type. The critical spec is binder dosing accuracy: ±2% is acceptable for furan systems, ±1% for phenolic if you're chasing tight dimensional tolerances on aluminum castings.

Molding or core-making station — where mixed sand forms the actual mold. For high-volume work, this is usually a flaskless molding line or a core shooter. Cycle time here sets your throughput target. If your molding machine runs 120 molds/hour and each mold uses 80 kg of sand, your mixer needs to deliver 9.6 tons/hour minimum. Add 20% margin for startup waste and batch variations.

Shakeout and sand return system — conveyors and elevators that move used sand from casting shakeout back to reclamation. Dust extraction happens here. Underestimate this and you'll have sand piling up on the floor while your reclamation plant sits idle.

Sand reclamation plant — mechanical or thermal systems that strip resin coating from used sand so it can be remixed. Recovery rates run 92-96% for mechanical reclamation, 85-90% for thermal (the higher temperature burns off more fines). A 10-ton/hour molding line generates roughly 8 tons/hour of reclaimable sand after accounting for sand lost in castings and spillage.

Resin sand production line equipment flow diagram showing mixer, molding station, shakeout, and reclamation plant connections

Binder System Selection: Furan, Phenolic, or Sodium Silicate

Binder chemistry drives your operating cost, cure behavior, and emission profile. Most buyers focus on resin price per ton, but the real cost is resin consumption per ton of castings plus the downstream effects on reclamation and fume extraction.

Binder Type Resin Cost ($/ton sand) Cure Time Typical Addition Rate Surface Finish Fume Level Best For
Furan $45-65 20-40 sec 1.2-1.8% Excellent High Ferrous castings, complex cores
Phenolic urethane $55-75 15-30 sec 1.0-1.5% Excellent Medium Aluminum, high-volume production
Sodium silicate (CO₂) $25-40 5-15 sec 3.5-5.0% Good Low Large ferrous castings, lower precision

Furan resin systems dominate ferrous work because they handle the thermal shock of molten iron (1400°C+) without breaking down. The fumes are strong — you need 2,000-3,000 m³/hour extraction per ton/hour of mixing capacity. We've commissioned lines where buyers skipped the fume scrubber to save $15,000, then couldn't keep workers on the mixing floor.

Phenolic urethane systems cure faster and produce less odor, which is why aluminum foundries prefer them. The resin costs more per kilogram, but you use less of it (1.0-1.5% vs 1.2-1.8% for furan), so the per-ton cost often lands within 10% of furan. The catch: phenolic is more sensitive to humidity. If your facility runs above 70% relative humidity without climate control, you'll see inconsistent cure times.

Sodium silicate systems use CO₂ gas to harden the sand instead of a chemical catalyst. Resin cost is lowest, but you're adding 3.5-5.0% binder by weight — nearly triple the furan rate. For large castings where dimensional precision isn't critical (manhole covers, counterweights, agricultural parts), the economics work. For precision work, the higher binder content makes sand reclamation harder and increases breakage risk during shakeout.

(Note: if you're running both ferrous and non-ferrous work, don't try to use one binder system for everything. The cost savings from a single resin tank disappear when you're rejecting aluminum castings because the furan binder left surface defects.)

Factory Layout Requirements: Floor Space, Utilities, and Material Flow

A 10-ton/hour resin sand line needs 800-1,200 m² of floor space depending on configuration. That's not just equipment footprint — it's the working envelope for maintenance access, sand storage, and forklift traffic.

Ceiling height: Minimum 6 meters for bucket elevators and dust collection ductwork. Standard designs assume 8 meters. If your facility has lower ceilings, the equipment can be reconfigured horizontally, but expect to add 15-20% to your floor space requirement and pay for custom engineering.

Floor loading: Resin sand mixers and reclamation plants are heavy. A 5-ton/hour continuous mixer weighs 3,500 kg empty, plus another 2,000 kg when the mixing chamber is full. Sand storage silos add point loads of 8-12 tons depending on capacity. Your facility needs 5-8 kN/m² floor loading capacity in the equipment zone. Older buildings with wooden joist floors won't support this without reinforcement.

Crane access: You'll need overhead lifting for mixer maintenance (the mixing blades wear and need replacement every 6-12 months depending on sand abrasiveness). A 3-ton hoist with 4-meter hook height covers most maintenance tasks. If you don't have an overhead crane, budget for a mobile gantry or plan to rent a crane for annual service.

Utility connections:

  • Electrical: 380V three-phase, 150-200 kW for a 10-ton/hour line (mixer, conveyors, dust collectors, reclamation plant)
  • Compressed air: 0.6-0.8 MPa, 2-3 m³/min for pneumatic valves and core shooters
  • Dust extraction: 8,000-12,000 m³/hour airflow for a 10-ton/hour line, routed to a bag filter or cyclone separator

Material flow matters more than most buyers realize. Sand moves in a loop: new sand enters at the mixer, used sand returns from shakeout, reclaimed sand feeds back into the mixer. If your shakeout area is 50 meters from the mixer, you're paying for 50 meters of enclosed screw conveyors or pneumatic transport. We've seen buyers try to save money with open belt conveyors, then spend twice that amount six months later enclosing them because dust complaints shut down production.

Resin sand production line factory layout showing equipment placement, material flow paths, and utility connection points

Sand Reclamation Economics: When It Pays for Itself

New silica sand costs $40-80 per ton depending on your location and grain size spec. Resin binder costs $1,200-1,800 per ton. If you're running 10 tons/hour of sand through your line, that's 80 tons per 8-hour shift. Without reclamation, you're buying 80 tons of new sand and disposing of 80 tons of used sand daily.

A mechanical reclamation plant recovers 92-96% of that sand. At 95% recovery, you're only buying 4 tons of new sand per shift to replace losses. The math:

  • Without reclamation: 80 tons/day × $60/ton = $4,800/day in sand cost, plus disposal fees
  • With reclamation: 4 tons/day × $60/ton = $240/day in sand cost
  • Daily savings: $4,560

A 10-ton/hour mechanical reclamation plant costs $85,000-120,000 depending on configuration. Payback period runs 20-30 days of production. Even if you're only running one shift, payback happens in 60-90 days.

Thermal reclamation plants cost more ($150,000-200,000 for 10-ton/hour capacity) because they include a rotary kiln and afterburner for fume control. Recovery rate is lower (85-90%) because the high temperature burns off fine particles. The advantage: thermal reclamation strips resin more completely, so reclaimed sand performs closer to new sand. For precision aluminum casting where mold surface finish is critical, the extra cost makes sense. For general ferrous work, mechanical reclamation is sufficient.

The mistake we see: buyers who skip reclamation on the initial order, planning to add it later. Six months in, they realize they're spending $80,000-100,000 annually on sand that could have been reclaimed. By then, they're also dealing with used sand disposal costs and the logistical headache of coordinating a reclamation plant installation while production is running.

Supplier Qualification Checklist: What to Verify Before You Pay

Resin sand equipment ships in containers and gets commissioned on your floor. If the supplier doesn't know what they're doing, you're the one who pays for the rework. Here's what to check:

ISO 9001 certification — not just a certificate on the wall, but an active quality management system. Ask for the certificate number and verify it with the issuing body. ISO 9001 means the supplier has documented processes for design review, incoming inspection, and final testing. It doesn't guarantee perfect equipment, but it means there's a system in place when something goes wrong.

Commissioning support — who travels to your site, and what's included? Standard practice: the supplier sends a commissioning engineer for 5-7 days to supervise installation, run test batches, and train your operators. Get this in writing. Some suppliers quote "remote commissioning" (video calls while your team does the work), which can work if your team has experience, but it's not the same as having their engineer on-site.

Container-optimized design — equipment should break down into modules that fit 40HQ containers (12.03m × 2.35m × 2.69m internal dimensions) without wasted space. A 10-ton/hour line typically ships in 2-3 containers. If the supplier quotes 5 containers for the same capacity, you're paying extra freight for poor packaging. We design our mixer frames to nest inside the reclamation plant's structural supports during shipping — that's the kind of detail that separates export-focused manufacturers from domestic suppliers trying to break into overseas markets.

Spare parts availability — ask for a recommended spare parts list with lead times. Critical wear items for a resin sand line: mixer blades (replace every 6-12 months), conveyor belts, pneumatic seals, proximity sensors, solenoid valves. If the supplier can't provide a parts list with part numbers and prices, you'll be scrambling when something breaks at 2 AM on a Saturday.

Control system documentation — PLC programs should come with ladder logic printouts and I/O lists in English (or your preferred language). If you need to troubleshoot a sensor failure, your electrician needs to know which input terminal corresponds to which physical device. We provide full electrical schematics and PLC source code with every line — it's your equipment, you should be able to service it without calling us for every minor issue.

Reference installations — ask for contact information for 2-3 customers who bought similar equipment in the past 2 years. Call them. Ask about commissioning experience, equipment reliability, and how responsive the supplier was when problems came up. If the supplier won't provide references, that's a red flag.

Equipment Sizing: Matching Capacity to Your Casting Output

The most common sizing mistake: calculating mixer capacity based on current production, then discovering you're at 90% capacity utilization within a year. Size for your 3-year production target, not today's output.

Sizing formula:

  • Determine your target casting output (tons/hour)
  • Calculate sand-to-metal ratio for your typical castings (usually 3:1 to 8:1 depending on casting size and complexity)
  • Add 20% margin for startup waste and batch variations
  • Match mixer capacity to molding machine consumption rate

Example: You're casting ductile iron pump housings, 500 kg average casting weight, targeting 2 tons/hour of finished castings. Sand-to-metal ratio for this type of work runs about 5:1. That's 10 tons/hour of sand consumption. Add 20% margin = 12 tons/hour mixer capacity.

Your resin sand mixer should be rated for 12-15 tons/hour continuous operation. The reclamation plant should match: 12 tons/hour input capacity with 95% recovery gives you 11.4 tons/hour of reclaimed sand, which covers your consumption with a small buffer for new sand addition.

Undersizing the reclamation plant is expensive. If your mixer runs 12 tons/hour but your reclamation plant only handles 8 tons/hour, the remaining 4 tons/hour of used sand piles up. You'll need temporary storage (more floor space, more conveyors) and you're still buying new sand to make up the difference.

Resin sand production line capacity sizing chart showing mixer, molding, and reclamation plant capacity matching requirements

Common Buying Mistakes and How to Avoid Them

Mistake 1: Over-specifying mixer capacity without matching reclamation — Buyers see a 20-ton/hour mixer for only $15,000 more than the 10-ton/hour model and figure they're future-proofing. Then they pair it with a 10-ton/hour reclamation plant because "we're only running 8 tons/hour today." Six months later, they're running two shifts and the reclamation plant is the bottleneck. The mixer sits half-idle while they're buying new sand to keep up.

Mistake 2: Ignoring dust extraction requirements — Resin sand mixing generates dust. Shakeout generates more dust. If you don't spec adequate extraction (8,000-12,000 m³/hour for a 10-ton/hour line), you'll fail air quality inspections or lose workers to respiratory complaints. Budget $25,000-40,000 for a proper bag filter system with automatic pulse cleaning. Trying to save money with a basic cyclone separator doesn't work — the fine resin-coated particles pass straight through.

Mistake 3: Underestimating floor space — Equipment footprint is one thing. Working space is another. You need room for a forklift to deliver sand bags, space for an overhead crane to access the mixer for blade replacement, and clearance for maintenance access to the reclamation plant's crushing chamber. Add 30-40% to the equipment footprint for realistic space planning.

Mistake 4: Choosing binder system based on resin price alone — Sodium silicate resin costs half what furan costs per kilogram, but you're using 3-4 times as much of it per ton of sand. The per-ton cost ends up similar, and you're dealing with harder sand reclamation and lower dimensional accuracy. Match the binder system to your casting requirements first, then optimize cost within that constraint.

Mistake 5: Skipping the spare parts kit — Standard spare parts kits cost $3,000-5,000 and cover the consumables you'll need in the first year: mixer blades, conveyor belts, pneumatic seals, sensors. Without them, you're waiting 4-6 weeks for international shipping when a $200 proximity sensor fails and stops your entire line.

Furan vs Phenolic: The Real Decision Factors

The furan-versus-phenolic debate comes up on every resin sand line quote. Here's what actually matters:

Furan systems handle higher pouring temperatures, which is why they dominate ferrous casting. Ductile iron at 1400°C, gray iron at 1350°C — furan resin holds up through the thermal shock without gas defects. Cure time runs 20-40 seconds depending on catalyst type and ambient temperature. The fumes are strong (formaldehyde and furfuryl alcohol), so you need serious extraction — 2,000-3,000 m³/hour per ton/hour of mixing capacity, plus a scrubber if you're in a jurisdiction with strict VOC limits.

Binder addition rate: 1.2-1.8% by weight. For a 10-ton/hour line, that's 120-180 kg/hour of resin consumption. At $1,400/ton resin cost, you're spending $168-252/hour on binder. Reclamation becomes critical — without it, you're also throwing away that resin with the used sand.

Phenolic urethane systems cure faster (15-30 seconds) and produce less odor, which matters if your mixing area is near other production zones. Aluminum foundries prefer phenolic because the lower pouring temperature (700-750°C) doesn't require the thermal stability of furan, and the faster cure time means higher production rates.

Binder addition rate: 1.0-1.5% by weight. Lower consumption partially offsets the higher resin cost ($1,600-1,800/ton). The real advantage: phenolic-coated sand reclaims more easily in mechanical systems because the resin film is thinner and more brittle. Recovery rates run 94-96% vs 92-94% for furan.

The catch: phenolic is humidity-sensitive. Above 70% relative humidity, cure time becomes inconsistent. If your facility doesn't have climate control and you're in a humid region (Southeast Asia, Gulf Coast, tropical climates), you'll need to add dehumidification or accept variable cure times.

For furan resin sand production lines, we typically recommend enclosed mixing chambers with local extraction to contain fumes at the source. For phenolic systems, general ventilation is usually sufficient unless you're running very high throughput (20+ tons/hour).

When to Add a Coating Plant to Your Line

A resin sand coating plant pre-coats sand grains with resin in a separate process, then stores the coated sand for later use. This is different from continuous mixing, where resin is added immediately before molding.

Coating plants make sense when:

  • You're running multiple molding machines and want to centralize resin mixing
  • You need consistent sand properties across different shifts or operators
  • You're doing core production where work time (time between mixing and hardening) needs to be tightly controlled
  • You want to reduce resin waste from mixed sand that hardens before it's used

The economics: a coating plant adds $60,000-90,000 to your line cost for 5-10 tons/hour capacity. You save 5-10% on resin consumption through better mixing uniformity and reduced waste. Payback runs 12-18 months if you're running high volume (two shifts or more). For smaller operations or foundries just starting with resin sand, continuous mixing is more cost-effective.

Getting Your Layout Right: Lessons from 40+ Installations

We've commissioned resin sand lines in facilities ranging from 2,000 m² job shops to 50,000 m² production foundries. The layout mistakes are consistent:

Mistake: Locating the mixer too far from the molding area — Every meter of distance adds conveyor cost and introduces potential failure points. Ideal distance: 10-15 meters from mixer discharge to molding machine input. Beyond 25 meters, you're adding pneumatic transport or multiple conveyor stages, which means more maintenance and more places for sand to jam.

Mistake: Inadequate sand storage — You need buffer capacity for new sand (2-3 days of consumption) and temporary storage for reclaimed sand during reclamation plant maintenance. For a 10-ton/hour line running one shift, that's 160 tons of storage minimum. At 1.6 tons/m³ bulk density for silica sand, you need 100 m³ of silo or bin capacity. Most buyers underestimate this by half.

Mistake: Poor access for maintenance — Mixer blades wear and need replacement. Reclamation plant crushing chambers need periodic inspection. Conveyor belts need tensioning. If you can't get a forklift or overhead crane to these locations, you're doing maintenance the hard way. Leave 3-4 meters of clear space around major equipment for access.

Mistake: Ignoring future expansion — If your business plan shows 50% growth in three years, leave space for a second molding line or a larger reclamation plant. Adding capacity later is cheaper than relocating equipment because you ran out of floor space.

The layout we recommend for most buyers: mixer and reclamation plant on one side of the production floor, molding and shakeout on the other side, with conveyors running overhead or in floor trenches to keep traffic lanes clear. Sand storage silos go outside if possible (saves floor space and simplifies truck delivery), with screw conveyors feeding into the building.

What to Send When You Request a Quote

The more specific your RFQ, the more accurate the quote. Here's what helps:

Casting specifications:

  • Alloy type (ductile iron, gray iron, aluminum, etc.)
  • Typical casting weight range
  • Target production rate (tons/hour or castings/hour)
  • Required surface finish or dimensional tolerance

Facility constraints:

  • Available floor space (length × width)
  • Ceiling height
  • Floor loading capacity (kN/m²)
  • Overhead crane availability and capacity

Binder preference (if you have one):

  • Furan, phenolic, sodium silicate, or open to recommendation
  • Any environmental restrictions (VOC limits, odor concerns)

Reclamation requirements:

  • Mechanical or thermal (or open to recommendation based on casting type)
  • Target recovery rate

Utilities available:

  • Electrical supply (voltage, phase, available capacity)
  • Compressed air (pressure, flow rate)
  • Dust extraction (existing system or needs to be included)

With this information, we can provide equipment sizing, layout drawings, and factory pricing within 3-5 business days. If you're not sure about some of these details, send what you have — we'll ask follow-up questions to fill in the gaps.

For a detailed quote on a complete resin sand production line with equipment sizing, layout recommendations, and container shipping logistics, request a quote with your casting specifications and facility constraints.

How to Calibrate Your Resin Sand Mixer for Accurate Binder Dosing and Fewer Rejects

A 2% over-dose on furan resin across a 50-ton daily sand batch costs you $180 in wasted binder per day — $65,000 annually. A 2% under-dose gives you molds that crack during pouring, hot tears in your castings, and a reject rate that climbs from 3% to 8%. We've seen both scenarios dozens of times during commissioning visits, and the root cause is almost always the same: the mixer was never properly calibrated after installation, or the calibration drifted and nobody caught it.

Binder dosing accuracy isn't a nice-to-have. It's the difference between a resin sand line that runs at 1.2% addition rate with zero strength complaints and one that burns through 1.5% resin while still generating scrap. This guide walks through the calibration procedure we use at TZFoundry when commissioning Resin Sand Mixers — the same steps that cut binder consumption by 12% across our customer base without weakening mold strength.

Why Dosing Calibration Fails (and What It Costs You)

Most resin sand mixers ship with factory-set dosing parameters based on standard conditions: 20°C sand temperature, 4-6% moisture content, furan resin at 1.2% addition rate. Your actual production floor runs at 28°C in summer, your reclaimed sand comes in at 8% moisture after washing, and you're mixing phenolic urethane at 1.5% for high-temperature iron castings. The factory settings don't apply.

When dosing drifts out of spec, you see it in three places:

Binder waste: Over-dosing by 0.2-0.3% sounds minor until you calculate annual consumption. A foundry mixing 50 tons of sand daily at 1.5% target rate uses 750 kg of resin per day. A 0.2% over-dose adds 100 kg daily — 36 tons of wasted resin per year. At $2,500/ton for furan resin, that's $90,000 in unnecessary binder cost.

Casting rejects: Under-dosing shows up as low tensile strength in sand specimens (you're targeting 0.35 MPa but measuring 0.22 MPa), which translates to mold cracking during metal pouring, hot tears in castings, and poor shakeout. We tracked one customer's reject rate over six months after calibration — it dropped from 7.2% to 2.8% once their actual binder addition matched their target spec.

Inconsistent batch quality: The worst scenario is dosing that varies batch-to-batch because the pump flow rate isn't verified or the weigh-scale tolerance is too loose. You get molds that pass strength testing in the morning and fail in the afternoon, and your QC team can't figure out why.

Chart showing relationship between binder dosing accuracy and casting reject rate in resin sand foundries

Pre-Calibration Checks: Verify Your Baseline Before Adjusting Ratios

You can't calibrate dosing until you know your equipment is measuring accurately. We run these four checks before touching any binder ratio settings.

1. Pump flow rate verification

Disconnect the binder feed line from the mixer and run the pump into a graduated container for 60 seconds. Weigh the output. Your pump datasheet lists the rated flow (typically 8-15 L/min for continuous mixers, 2-5 L/min for batch mixers). If measured flow is more than 5% off the rated spec, the pump diaphragm is worn or the pressure regulator needs adjustment.

We replaced a customer's binder pump last year because flow had dropped from 12 L/min to 9.2 L/min over 18 months of operation. Their PLC was commanding 1.2% addition, but actual delivery was 0.92% — they'd been compensating by cranking the setpoint to 1.55% without realizing the pump was the problem.

2. Weigh-scale accuracy check

Place calibrated test weights on the sand weigh hopper (use weights that span your typical batch size — 50 kg, 100 kg, 200 kg). The scale should read within ±0.5% of the known weight. If your scale drifts beyond ±1%, recalibrate it before proceeding. A 2% scale error on a 500 kg sand batch means your binder calculation is off by 10 kg of sand — enough to throw your resin percentage from 1.2% to 1.32%.

3. Sand moisture content measurement

Take three sand samples from your reclaimed or new sand supply. Weigh 100g of each sample, dry in an oven at 105°C for 2 hours, then reweigh. Moisture content = (wet weight – dry weight) / wet weight × 100%. Record the average. High moisture (above 6%) affects binder reactivity and can require catalyst ratio adjustment. We've seen foundries running 8-9% moisture on washed reclaimed sand without realizing it — their molds were setting too slowly because the excess water was diluting the catalyst.

4. Sand temperature monitoring

Install a temperature probe in your sand storage hopper or measure sand temperature at the mixer inlet. Furan and phenolic resin cure rates are highly temperature-dependent. Sand at 15°C needs more catalyst than sand at 30°C to achieve the same 8-12 minute strip time. If your sand temperature swings more than 10°C between winter and summer, you need seasonal calibration adjustments (or a PLC with automatic temperature compensation, which we'll cover later).

Visual checklist showing four pre-calibration verification steps for resin sand mixer binder dosing systems

Step-by-Step Calibration Procedure

This procedure applies to both continuous and batch resin sand mixers. The difference: continuous mixers adjust dosing on the fly based on sand feed rate, while batch mixers dose a fixed quantity per batch cycle. The calibration logic is the same.

Step 1: Set your target binder addition rate

Start with your resin supplier's recommended addition rate for your sand type and casting application. Typical ranges:

  • Furan resin (furfuryl alcohol): 1.0-1.5% by sand weight
  • Phenolic urethane: 1.2-1.8% by sand weight
  • Alkaline phenolic (sodium silicate): 2.5-4.0% by sand weight

For this example, we'll use furan resin at 1.2% target rate.

Step 2: Calculate binder mass per batch

For a 500 kg sand batch at 1.2% addition rate: Binder mass = 500 kg × 0.012 = 6.0 kg

Your mixer PLC should have a parameter screen where you enter this value (or it calculates automatically from sand weight × percentage). On Siemens PLCs, this is typically under "Recipe Parameters" → "Binder A Setpoint." On Mitsubishi systems, look for "Dosing Control" → "Resin Addition."

Step 3: Set catalyst ratio relative to binder

Catalyst (typically PTSA for furan, or proprietary hardeners for phenolic systems) is dosed as a percentage of binder mass, not sand mass. Standard starting ratios:

  • Furan + PTSA: 40-60% catalyst by binder weight (higher ratio = faster cure)
  • Phenolic urethane: 8-15% hardener by binder weight
  • Alkaline phenolic + CO₂: gas flow rate, not liquid catalyst (separate calibration)

For furan at 50% catalyst ratio: Catalyst mass = 6.0 kg binder × 0.50 = 3.0 kg

Enter this in the PLC catalyst parameter. The system will dose binder and catalyst sequentially or simultaneously depending on your mixer configuration.

Step 4: Run test batches and measure tensile strength

Mix three test batches using your calibrated settings. From each batch, prepare three standard AFS (American Foundry Society) tensile test specimens:

  • Compact sand into a standard dog-bone mold (50mm × 50mm cross-section)
  • Allow specimens to cure for the specified strip time (typically 8-12 minutes for furan)
  • Test tensile strength on a universal testing machine

Target tensile strength for furan resin sand: 0.30-0.40 MPa at 10 minutes cure time. If you're consistently below 0.25 MPa, you're under-dosed. Above 0.45 MPa, you're over-dosed (and wasting binder).

Step 5: Adjust and iterate

If tensile strength is low:

  • Increase binder addition by 0.1% increments (1.2% → 1.3%)
  • OR increase catalyst ratio by 5% (50% → 55%) if strip time is too long

If tensile strength is excessive:

  • Decrease binder addition by 0.1% increments
  • OR decrease catalyst ratio if strip time is too short (molds setting before you can close the flask)

Run another test batch after each adjustment. Lock in your settings once you hit target strength consistently across three batches.

Step 6: Document your calibration

Record the final parameters in your production log:

  • Sand type and supplier
  • Binder type, supplier, and lot number
  • Binder addition rate (%)
  • Catalyst type and ratio (%)
  • Sand temperature during calibration
  • Sand moisture content
  • Tensile strength results (average of 9 specimens)
  • Date and operator name

This becomes your baseline. If you change sand suppliers, switch binder lots, or see strength drift over time, you have a reference point to compare against.

Binder-to-Catalyst Ratio Reference Table

These ratios are starting points based on typical foundry conditions. Adjust based on your actual sand temperature and target strip time.

Resin System Binder Addition (% by sand weight) Catalyst Ratio (% by binder weight) Typical Strip Time Sand Temp Range
Furan (furfuryl alcohol) + PTSA 1.0-1.5% 40-60% 8-12 min 15-30°C
Phenolic urethane + hardener 1.2-1.8% 8-15% 10-15 min 18-28°C
Alkaline phenolic (sodium silicate) + CO₂ 2.5-4.0% CO₂ gassing: 2-4% by sand weight 5-8 min 20-30°C
Cold-box (phenolic + polyisocyanate) + amine gas 0.8-1.2% (Part A + Part B combined) Amine gas: 3-6 seconds per mold Instant cure 15-35°C

Temperature compensation rules:

  • For every 5°C increase in sand temperature, reduce catalyst ratio by 5% OR reduce strip time expectation by 1-2 minutes
  • For every 5°C decrease, increase catalyst ratio by 5% OR extend strip time by 1-2 minutes

Cold sand in winter is the most common cause of "slow-setting" complaints. We've had customers call saying their resin "stopped working" — sand temperature had dropped from 25°C to 12°C overnight and nobody adjusted the catalyst ratio.

Reference chart showing binder-to-catalyst ratios for furan, phenolic urethane, and alkaline phenolic resin systems across different sand temperatures

Troubleshooting: Mapping Casting Defects Back to Dosing Errors

When casting quality drops, dosing calibration is one of the first things to check. Here's how specific defects connect to binder problems.

Casting Defect Likely Dosing Issue Verification Test Corrective Action
Hot tears (cracks during solidification) Under-dosed binder → low mold strength, can't resist thermal stress Tensile strength < 0.25 MPa Increase binder by 0.1-0.2%
Poor shakeout (sand won't break away from casting) Over-dosed binder → excessive strength, sand fuses to metal Tensile strength > 0.50 MPa, sand specimens difficult to break Reduce binder by 0.1-0.2%
Mold cracking before pour Under-dosed OR catalyst ratio too low → incomplete cure Strip time > 15 min, low green strength Increase catalyst ratio by 5-10%
Excessive smoke during pour Over-dosed binder → excess organic decomposition Binder addition > 1.8% for furan/phenolic Reduce binder to minimum spec for required strength
Inconsistent defects batch-to-batch Dosing variation → pump wear, scale drift, or temperature swings Check pump flow rate, scale calibration, sand temp logs Re-verify pre-calibration checks (Step 1-4 above)
Veining (metal penetration into sand) Under-dosed OR poor sand distribution → weak spots in mold Uneven tensile strength across specimens from same batch Check mixer blade wear, mixing time, sand gradation

The most expensive mistake: assuming the defect is a metallurgical problem (alloy composition, pouring temperature) when it's actually a sand problem. We've seen foundries spend weeks adjusting furnace parameters when the real issue was binder dosing that drifted 0.3% low after a pump diaphragm wore out.

How PLC-Controlled Dosing Automates Calibration (and Prevents Drift)

Manual dosing systems require constant operator attention. You adjust a valve, watch a flow meter, and hope the batch comes out consistent. PLC-controlled systems on TZFoundry mixers eliminate most of that variability.

Automatic temperature compensation: A temperature sensor in the sand hopper feeds real-time data to the PLC. When sand temperature drops from 25°C to 18°C, the PLC automatically increases catalyst ratio by 10% to maintain the same 10-minute strip time. You set the target strip time once during commissioning; the system adjusts catalyst dosing every batch based on current temperature.

Closed-loop flow control: Instead of setting a pump speed and hoping it delivers the right volume, the PLC monitors actual binder mass delivered via a load cell on the binder tank. If the pump is wearing out and flow drops, the PLC extends dosing time to hit the target mass. You see a warning on the HMI screen: "Binder pump flow below spec — schedule maintenance."

Recipe storage and recall: You can store 10-20 different binder recipes in the PLC (furan at 1.2%, phenolic at 1.5%, alkaline phenolic at 3.0%, etc.) and switch between them with a single button press. Each recipe includes binder type, addition rate, catalyst ratio, mixing time, and temperature compensation curve. When you switch from iron castings to aluminum (different resin system), you're not recalibrating from scratch — you're recalling a proven recipe.

Remote diagnostics via 4G module: TZFoundry mixers ship with an optional 4G telemetry module that logs dosing data and sends alerts when parameters drift. We can pull your last 500 batches remotely, see that binder addition has crept from 1.20% to 1.35% over three months, and tell you to check the weigh scale calibration before you waste another ton of resin. (This saved a customer in Mexico $40,000 last year — they didn't realize their scale had drifted until we flagged it from the data logs.)

The ROI on PLC automation is straightforward: if you're mixing 50 tons of sand daily and automation cuts binder waste by 0.2%, you save 100 kg of resin per day. At $2.50/kg for furan, that's $250 daily savings — $91,000 annually. The PLC upgrade pays for itself in 4-6 months.

Maintenance Schedule for Dosing Components

Calibration isn't a one-time event. Dosing accuracy drifts as components wear. Here's the maintenance schedule we recommend to customers.

Weekly checks:

  • Visual inspection of binder and catalyst feed lines for leaks
  • Verify PLC dosing logs match expected batch count
  • Spot-check one tensile strength specimen per shift

Monthly checks:

  • Pump flow rate verification (60-second timed test into graduated container)
  • Weigh scale accuracy check with calibrated test weights
  • Clean binder and catalyst filters (clogged filters reduce flow rate)

Quarterly maintenance:

  • Replace pump diaphragms (or inspect and replace if worn)
  • Recalibrate weigh scales with certified weights
  • Verify temperature sensor accuracy (compare against calibrated thermometer)
  • Run full calibration procedure (Steps 1-6 above) and compare results to baseline

Annual overhaul:

  • Replace all pump seals and diaphragms regardless of condition
  • Professional weigh scale calibration by certified technician
  • Replace binder and catalyst flow sensors if drift is detected
  • Update PLC firmware if remote diagnostics show communication errors

The most common failure mode we see: pump diaphragms that wear gradually over 12-18 months. Flow drops from 12 L/min to 9 L/min so slowly that operators don't notice — they just keep increasing the dosing setpoint to compensate. By the time someone checks the pump, they're running 1.6% binder addition to achieve 1.2% actual delivery, and they've burned through an extra $50,000 in resin.

Quarterly pump inspection catches this before it becomes expensive.

What to Do Next

If your current resin sand line is running above 1.4% binder addition for furan or phenolic systems, or if your casting reject rate sits above 5%, dosing calibration should be your first diagnostic step. The procedure above takes 4-6 hours to complete (including test batch mixing and tensile strength testing), and it typically cuts binder consumption by 10-15% while improving mold consistency.

For foundries running multiple mixer lines or switching between resin systems frequently, PLC automation with recipe storage and temperature compensation eliminates most of the manual calibration work. We've commissioned Resin Sand Production Lines across North America and Europe where the mixer runs three different binder systems in a single shift — the operator selects the recipe on the HMI screen, and the PLC handles all dosing adjustments automatically.

If you're evaluating new mixer equipment or upgrading an existing line, send us your current sand type, resin system, and target production rate. TZFoundry's engineering team will recommend the right mixer configuration (continuous vs batch, PLC automation level, dosing accuracy spec) and provide calibration support during commissioning. Request a quote with your specifications, or read our guide on continuous vs batch resin sand mixers to understand which configuration fits your foundry's workflow.

Binder cost is the number everyone watches — but it's the mixing accuracy that decides whether you're wasting resin or wasting castings.

How to Test Sand Quality at Each Stage of Your Resin Sand Preparation Line

A foundry in Texas ordered a furan resin sand line from us in 2019. Three months after commissioning, they were burning through 18% more resin than their production rate should require. The castings looked fine, but their binder cost per ton was killing the job margin. We flew an engineer out. The problem wasn't the mixer — it was the raw sand. Moisture content was running 0.8-1.2% instead of the 0.2% maximum their resin system needed. The excess water was reacting with the catalyst before the sand even hit the mold, forcing them to overdose resin to compensate.

They'd skipped the moisture test at intake because "the supplier said it was dry." That assumption cost them $47,000 in wasted resin over three months.

Sand quality testing isn't about paperwork. It's about knowing whether you're mixing resin into sand that can actually hold it, and whether the sand coming back from reclamation is clean enough to reuse without wrecking your next batch. Skip the wrong test at the wrong stage, and you either waste binder or scrap castings. Both eat your margin.

Why Sand Quality Changes at Every Stage

A Resin Sand Preparation Production Line moves sand through five distinct states: raw intake, screened and classified, resin-coated, cured in the mold, and thermally reclaimed. Each stage introduces contamination risk or property drift.

Raw sand arrives with clay fines, moisture, and sometimes residual organics from storage or transport. Screening removes oversize particles but doesn't touch moisture or acid demand. Mixing adds resin and catalyst — if the sand's moisture or temperature is wrong, the binder won't coat evenly. Curing locks in the bond, but it also starts the thermal breakdown clock. Reclamation burns off the resin, but it leaves carbon residue (measured as LOI) and can fracture grains if the temperature runs too high.

Testing catches these problems before they compound. A 0.5% moisture error at intake becomes a 12% resin waste at mixing. A 2.5% LOI in reclaimed sand becomes porosity defects in your next casting run. The tests are cheap. The failures are not.

Stage 1: Raw Sand Intake Testing

Test raw sand before it enters your system. We run four checks in our commissioning lab, and we recommend the same protocol for any foundry running a Resin Sand Production Line above 5 tons per hour.

Grain Fineness Number (AFS GFN) — This tells you whether the sand matches your mold design. Run a sieve analysis using the standard AFS 12-sieve set (6 through 270 mesh). Weigh the retained sand on each screen, calculate the fineness number. For furan and phenolic resin systems, most iron and steel casting foundries spec 50-70 GFN. Aluminum foundries often run finer, 60-80 GFN, because the casting detail requires it.

If your GFN drifts more than ±3 points from spec, your permeability and surface finish will shift. We've seen foundries accept "close enough" sand at 45 GFN when their process was designed for 55 GFN — the molds stripped fine, but gas defects went up 8% because the coarser sand changed the permeability.

Moisture Content — Weigh a 50-gram sample, dry it at 105-110°C for two hours, reweigh. Calculate moisture as a percentage. Maximum acceptable moisture for most resin sand systems: 0.2%. Above that, you're paying for water to react with your catalyst instead of sand to bond with your resin.

Furan systems are especially sensitive. Furfuryl alcohol resin cures through an acid-catalyzed reaction, and moisture interferes with the catalyst. If your moisture runs 0.5%, you'll need to increase catalyst dosage by 10-15% to hit the same strip time — and that extra catalyst costs more than the test equipment.

(We learned this the hard way in 2016. A batch of "dry" sand from a coastal supplier tested at 0.9% moisture. The mixer operator kept adding resin because the working time was too short. Took us two days to figure out the sand was the problem, not the resin ratio.)

Clay Content and Fines Percentage — Wash a 50-gram sample through a 325-mesh (45-micron) sieve using the wet sieve method. Dry and weigh what passed through. This is your clay and silt fraction. For resin sand systems, keep this below 1.0%. Clay particles coat the sand grains and prevent resin adhesion. You'll see it as weak tensile strength even when your resin dosage is correct.

Acid Demand Value (ADV) — This test measures how much acid the sand consumes before reaching a target pH. It's critical for sodium silicate (waterglass) binder systems and useful for furan systems if you're sourcing sand from multiple suppliers. High acid demand means the sand contains carbonate minerals or other alkaline contaminants that neutralize your catalyst.

Run the methylene blue or pH titration test per AFS standards. Acceptable ADV for resin sand: below 5 mL. Above that, you'll burn through catalyst trying to overcome the sand's buffering capacity.

Raw sand intake testing protocol showing AFS GFN sieve analysis, moisture content test, and clay content measurement for resin sand preparation line

Stage 2: Post-Screening and Classification Checks

After your sand passes through vibrating screens and air classifiers, verify that the equipment is actually removing what it's supposed to remove. We've commissioned lines where the screen mesh was worn through in one corner — the sand looked clean, but 3% oversize particles were getting through and jamming the Resin Sand Mixer discharge gate.

Sieve Distribution Verification — Pull a sample from the screened sand outlet once per shift. Run a quick 3-sieve check: one screen above your target range, one at your median GFN, one below. You're not recalculating the full GFN — you're just confirming that oversize and undersize fractions are being removed.

Acceptable result: less than 2% retained on the oversize screen, less than 5% passing the undersize screen. If you're outside that range, your screen mesh is either clogged or damaged.

Dust Extraction Validation — If your preparation line includes a dust collection system (and it should — resin sand mixing generates fines), check that it's pulling the right fraction. Weigh the dust collector discharge over a 1-hour run. Compare it to your sand throughput. You should be removing 0.5-1.5% of total sand weight as dust, depending on your raw sand quality.

If dust removal drops below 0.3%, your collector filters are clogged or your airflow is too weak. If it's above 2%, you're pulling good sand into the dust bin and wasting material.

Stage 3: After Mixing — Resin-Coated Sand Testing

This is where most foundries focus their testing effort, and for good reason. The sand leaving your mixer determines whether your molds will strip cleanly, hold dimensional tolerance, and resist metal penetration. We run three tests here, and we recommend inline sampling every 30 minutes during production.

Resin-to-Sand Ratio Verification — The mixer's dosing system should deliver your target resin percentage (typically 1.0-1.8% for furan, 1.2-2.0% for phenolic). But dosing pumps drift, flow meters read wrong, and batch weights vary. Verify the actual resin content using loss on ignition (LOI) on fresh mixed sand.

Weigh a 50-gram sample of resin-coated sand, burn it in a muffle furnace at 650°C for 30 minutes, reweigh. The weight loss is your resin content. Compare it to your target dosage. Acceptable tolerance: ±0.15% of target. If you're targeting 1.5% resin and measuring 1.3%, you're either underdosing or your sand moisture is higher than you think.

(This test also catches mixer calibration errors. We've seen foundries run for weeks at 1.2% resin when their process spec called for 1.5%, simply because no one verified the dosing pump output after a maintenance event.)

Tensile Strength at Set Intervals — Resin sand gains strength as it cures. Measure tensile strength at three points: 1 hour, 3 hours, and 24 hours after mixing. Use a standard dog-bone specimen (AFS standard) and a tensile testing machine.

Typical acceptable ranges for furan resin sand:

  • 1 hour: 150-250 psi (1.0-1.7 MPa)
  • 3 hours: 250-350 psi (1.7-2.4 MPa)
  • 24 hours: 300-450 psi (2.1-3.1 MPa)

If your 1-hour strength is below 150 psi, your working time is fine but your strip time will be too long. If 24-hour strength is below 300 psi, you have a resin dosage problem, a catalyst problem, or a sand contamination problem. Check your moisture and clay content first — those are the usual culprits.

Working Time and Strip Time Measurement — Working time is how long the sand remains flowable after mixing. Strip time is how long before the mold is strong enough to remove the pattern. Both depend on resin type, catalyst level, and ambient temperature.

Measure working time with a simple flow test: pack mixed sand into a standard AFS specimen tube, invert it, and time how long before it stops flowing. Furan systems typically give 8-15 minutes working time at 20-25°C. Phenolic systems run longer, 15-25 minutes.

Measure strip time by making a test core, waiting, and checking when it reaches your minimum handling strength (usually 100-120 psi tensile). For furan, strip time is typically 20-40 minutes. For phenolic, 30-60 minutes.

If working time is too short, your operators can't close the mold before the sand sets. If strip time is too long, your production rate drops. Both are adjustable through catalyst dosage, but only if you're measuring them.

Resin sand tensile strength testing timeline showing specimen preparation and strength measurement at 1 hour, 3 hours, and 24 hours after mixing

Stage 4: Cured Mold and Core Testing

Once the sand has cured in the mold or core box, run these checks to confirm that your process is delivering the properties your casting needs.

Scratch Hardness — This is a quick field test. Drag a standard hardness pick (or even a pocket knife) across the mold surface at a consistent angle and pressure. The mold should resist scratching without crumbling. If the surface powders or flakes, your resin dosage is too low or your cure time was too short.

We don't rely on scratch hardness for specification compliance — it's too subjective — but it's a fast go/no-go check that catches obvious problems before you pour metal.

Permeability — Permeability measures how easily gas can escape through the sand mold during metal pouring. Too low, and you get gas porosity defects. Too high, and you lose dimensional accuracy because the metal penetrates the mold surface.

Use a standard permeability meter (AFS or equivalent). Acceptable range depends on your casting alloy and section thickness, but for general iron and steel work, target 150-250 permeability units. Aluminum castings often run higher, 200-300 units, because the lower pouring temperature generates less gas.

If permeability is out of range, check your sand GFN first. Finer sand = lower permeability. Coarser sand = higher permeability. If GFN is correct, check your resin dosage — excess resin clogs the pore structure and drops permeability.

Loss on Ignition (LOI) Baseline — Before you send the mold to reclamation, establish a baseline LOI. This is the resin content that went into the mold. After reclamation, you'll measure LOI again to see how much resin residue remains. The difference tells you how effective your reclamation process is.

Burn a sample at 650°C for 30 minutes, same procedure as the post-mixing LOI test. Typical baseline LOI for a cured furan mold: 1.5-2.0% (slightly higher than the fresh mixed sand because some moisture has evaporated during cure).

Stage 5: Reclaimed Sand Testing

Sand coming out of your Resin Sand Reclamation Plant is not the same as virgin sand. Thermal reclamation burns off most of the resin, but it leaves carbon residue, changes the grain shape, and can shift the pH. Test reclaimed sand before you blend it back into your mixing system.

LOI After Thermal Reclamation — This is the most critical test for reclaimed sand. LOI measures the carbon residue left on the grain surface after burning off the resin. High LOI means incomplete combustion, and that residue will interfere with resin adhesion in your next batch.

Acceptable LOI for reclaimed sand: below 0.5% for furan systems, below 0.3% for phenolic systems. Phenolic resin leaves more char, so the reclamation temperature needs to run higher (typically 650-750°C vs. 550-650°C for furan).

If your reclaimed sand LOI is above 0.5%, your reclamation furnace temperature is too low, your residence time is too short, or your airflow is insufficient. We've seen foundries try to "save energy" by dropping the furnace setpoint from 650°C to 580°C — their LOI went from 0.4% to 1.2%, and their next batch of molds had 15% lower tensile strength because the resin couldn't bond to the carbon-coated grains.

Grain Shape Analysis — Thermal reclamation fractures sand grains. The longer you recycle the same sand, the more angular and fractured it becomes. Excessive grain fracturing increases surface area, which increases resin demand and lowers permeability.

Run a microscopic grain shape analysis every 500 tons of reclaimed sand throughput (or monthly, whichever comes first). Compare the grain shape to your virgin sand baseline. If you're seeing more than 20% increase in angular grains, your reclamation temperature is too high or your mechanical handling (conveyors, bucket elevators) is too aggressive.

Some grain fracturing is inevitable. The question is whether it's drifting your process out of control. If your resin dosage has crept up 0.2% over six months and your permeability has dropped 30 units, grain fracturing is the likely cause. At that point, you need to either lower your reclamation temperature or bleed off a percentage of reclaimed sand and replace it with virgin material.

pH and Acid Demand for Reuse Suitability — Thermal reclamation can shift sand pH, especially if your casting alloy contains elements that form alkaline oxides (magnesium, calcium). Measure pH using a slurry method: mix 10 grams of reclaimed sand with 25 mL of distilled water, let it sit for 10 minutes, measure with a pH meter.

Acceptable pH range: 6.5-7.5. If pH drifts above 8.0, your reclaimed sand is consuming catalyst and you'll need to increase dosage to compensate. If pH drops below 6.0, you may have acidic contamination from core wash or mold coatings.

Re-run the acid demand test (same procedure as raw sand intake). Acceptable ADV for reclaimed sand: below 7 mL. Slightly higher than virgin sand is normal — the thermal cycle can expose new mineral surfaces — but if ADV exceeds 10 mL, the sand is no longer economical to reuse. You're spending more on extra catalyst than you're saving by recycling the sand.

Reclaimed sand LOI testing procedure and acceptable thresholds for furan and phenolic resin sand systems showing furnace temperature and carbon residue limits

Common Testing Mistakes That Cost Money

Skipping moisture checks in humid climates — Foundries in the Gulf Coast, Southeast Asia, and coastal regions often assume their sand is "dry enough" because it's stored indoors. We've commissioned lines in Houston, Jeddah, and Jakarta where the raw sand moisture was running 0.6-1.0% even in climate-controlled warehouses. The humidity gets into the sand during transport and storage. Test it anyway.

Using outdated AFS sieve sets — Sieve mesh wears out. The openings get larger, and your GFN calculation drifts. We've seen foundries run the same sieve set for 5+ years without calibration. Their "55 GFN" sand was actually 52 GFN, and they couldn't figure out why their permeability kept dropping. Replace your sieves every 2 years or 500 tests, whichever comes first.

Testing tensile strength at the wrong cure time — If your process spec says "minimum 200 psi at 1 hour" and you're testing at 90 minutes, you're not measuring what you think you're measuring. Resin sand strength increases with time, so a late test will pass even if your mixing is wrong. Set a timer. Test at the specified interval.

Ignoring temperature effects on working time — Resin cure rate doubles for every 10°C increase in temperature. If you calibrate your catalyst dosage in January (15°C ambient) and don't recheck it in July (30°C ambient), your working time will drop from 12 minutes to 6 minutes and your operators will be fighting the sand. We recommend seasonal recalibration — check your working time and strip time whenever ambient temperature shifts more than 10°C.

Mixing reclaimed sand back in without testing LOI — This is the most expensive mistake. A foundry in Mexico was recycling sand at 1.8% LOI (nearly four times the acceptable limit) because they'd never tested it. They assumed the reclamation furnace was "working fine" because it was running. Their resin consumption was 40% higher than it should have been, and they were getting porosity defects in 12% of castings. We tested the reclaimed sand, found the LOI problem, adjusted the furnace temperature and residence time, and their resin cost dropped $8,000 per month.

Setting Up an Inline QC Protocol with PLC-Integrated Checkpoints

Manual sampling and lab testing catch problems, but they're reactive. By the time you get the test result, you've already mixed 2 tons of bad sand. Inline quality checkpoints built into your preparation line's PLC control system catch problems in real time.

We integrate three types of inline sensors on TZFoundry preparation lines for buyers who want automated QC:

Moisture sensors at raw sand intake — Capacitance or microwave moisture sensors mounted in the sand feed hopper. The sensor reads moisture content continuously and sends the data to the PLC. If moisture exceeds your setpoint (typically 0.2%), the PLC triggers an alarm and optionally diverts the sand to a drying system before it reaches the mixer.

Cost to add this during line commissioning: approximately $3,500-5,000 per sensor. Payback period: 2-4 months if you're running more than 10 tons per hour, because it prevents the resin overdosing that happens when wet sand hits the mixer.

Resin flow meters on mixer dosing pumps — Magnetic or Coriolis flow meters measure actual resin flow rate in real time. The PLC compares measured flow to target flow and adjusts the pump speed to maintain your setpoint. This eliminates the manual resin ratio verification test — the system is self-correcting.

We've shipped lines with closed-loop resin dosing control to buyers in Germany and South Korea where labor cost makes manual testing uneconomical. The flow meter adds $4,000-6,000 to the mixer cost, but it cuts resin waste by 3-5% and eliminates the need for a technician to run LOI tests every 30 minutes.

Temperature sensors in reclamation furnace zones — Multi-zone temperature monitoring with PLC feedback control. The system maintains each furnace zone at the target temperature (typically 3-5 zones ranging from 400°C preheat to 700°C combustion to 300°C cooling). If any zone drifts more than ±20°C from setpoint, the PLC adjusts burner output or airflow to correct it.

This prevents the LOI drift that happens when furnace temperature sags during high-throughput periods. We include multi-zone temperature control as standard on our reclamation plants above 5 tons per hour capacity.

Automated sampling alerts — Even with inline sensors, you still need periodic lab verification. Program your PLC to trigger a sampling reminder every X tons of throughput or Y hours of runtime. The HMI screen displays "Sample Due — Raw Sand Intake" or "Sample Due — Reclaimed Sand LOI" and logs whether the operator acknowledged it. This creates an audit trail and prevents the "we forgot to test" problem.

Equipment and Instrumentation Checklist for a Foundry Sand Testing Lab

If you're setting up sand testing capability in-house (and you should — sending samples to an outside lab adds 2-3 days to your feedback loop), here's the minimum equipment list:

For raw sand and reclaimed sand testing:

  • AFS standard sieve set (12 sieves, 6 through 270 mesh) with mechanical sieve shaker — $2,500-4,000
  • Moisture analyzer or drying oven (105-110°C) with analytical balance (0.01g resolution) — $1,500-3,000
  • Muffle furnace (650°C minimum) for LOI testing — $2,000-4,500
  • pH meter with calibration solutions — $300-800
  • Wet sieve setup (325 mesh) for clay content testing — $400-700

For resin-coated sand testing:

  • Tensile strength testing machine (dog-bone specimen, 0-500 psi range) — $8,000-15,000
  • AFS standard specimen tubes and rammers — $500-1,000
  • Permeability meter (AFS standard) — $3,000-6,000
  • Timer and temperature/humidity monitor for working time tests — $200-400

Total investment for a basic in-house sand testing lab: $18,000-32,000. This pays for itself in 6-12 months if you're running a preparation line above 3 tons per hour, because it eliminates the resin waste and scrap castings that come from untested sand.

(We run this exact equipment set in our commissioning lab. Every preparation line we ship gets tested with sand samples the buyer provides, and we send them the full test report before the equipment leaves our facility. If you're buying a line from us, you'll see these numbers on your commissioning documentation.)

What to Do Next

Sand quality testing is not optional if you want your resin sand preparation line to run at target efficiency. The tests are straightforward, the equipment is affordable, and the payback is immediate — you stop wasting resin on bad sand and stop scrapping castings because of contamination you didn't catch.

If you're specifying a new preparation line or upgrading an existing system, send us your sand specifications: grain size range, resin type (furan/phenolic/sodium silicate), target tensile strength, and production rate. Our engineering team will recommend the preparation line configuration with the right inline testing checkpoints and tell you which tests you can automate and which ones need manual sampling. We'll also send you the commissioning test data from your specific equipment before it ships, so you know exactly what performance to expect when it arrives at your facility.

For foundries already running a preparation line, start with the five-stage testing protocol in this article. Test raw sand at intake, verify screening performance, check resin dosage and tensile strength after mixing, measure LOI on reclaimed sand, and adjust your process when the numbers drift. The testing takes 30-45 minutes per shift. The resin savings and scrap reduction will show up in your cost reports within the first month.

How to Cut Resin Sand Binder Costs on Your Production Line Without Sacrificing Mold Strength

Binder cost is the number everyone watches — but it's the mixing accuracy that decides whether you're wasting resin or wasting castings.

I've commissioned over 40 resin sand lines in the last 11 years, and the pattern is consistent: foundries that cut binder costs by buying cheaper resin end up with cracked molds and scrap castings. Foundries that cut costs by fixing their equipment save 12-18% on binder consumption without touching mold strength.

The difference comes down to three equipment-side factors: mixer dosing accuracy, sand reclamation rate, and temperature control. Get those right, and you can run furan resin at 1.2-1.4% instead of 1.6-1.8% without changing your casting reject rate.

Why Binder Costs Spiral Out of Control

Most foundries track binder cost as kg resin per ton of sand. The problem is that number hides two separate waste streams: resin you're adding to compensate for poor mixing, and resin you're throwing away with contaminated sand.

We see this in commissioning audits. A foundry running at 1.8% binder ratio should be using 18 kg of furan resin per ton of sand. But when we measure actual consumption from their resin tanks, it's 22-24 kg per ton. The extra 4-6 kg isn't going into stronger molds — it's covering up equipment problems.

The three hidden waste points:

  • Inconsistent dosing: Peristaltic pumps wear out and deliver 8-15% less resin than the control system thinks. Operators compensate by raising the setpoint, but they're guessing. You end up over-dosing on some batches and under-dosing on others.
  • Poor mixing distribution: Paddle wear and incorrect mixer speed leave resin concentrated in some areas and absent in others. The mold looks fine until it cracks during pouring because 30% of the sand never got coated.
  • Virgin sand dependency: Without effective reclamation, you're buying new sand at 3-5x the cost of reclaimed sand, and you're buying proportionally more binder to coat it.

The cost compounds. If your line produces 50 tons of sand per shift and you're wasting 4 kg of resin per ton, that's 200 kg of wasted resin per shift. At $2.80/kg for furan resin, you're losing $560 per shift, or $164,000 annually on a single-shift operation.

The Equipment-Side Solution: Calibration, Reclamation, and Control

Cutting binder costs without weakening molds requires fixing the equipment that meters, mixes, and recycles your sand. This isn't about resin chemistry — it's about mechanical precision and process control.

Step 1: Calibrate Your Binder Dosing System

Start with the dosing pump. Most resin sand mixers use peristaltic pumps or gear pumps to meter liquid resin into the mixer. Both types drift out of calibration as seals wear and tubing hardens.

Calibration procedure:

  1. Disconnect the resin feed line at the mixer inlet
  2. Run the pump for exactly 60 seconds at your normal operating setpoint (e.g., 1.5% binder ratio)
  3. Weigh the discharged resin
  4. Compare actual flow rate to the control system's programmed flow rate

If the actual flow is more than 5% off from the programmed value, recalibrate the pump or replace worn components. We've seen pumps delivering 12% less resin than programmed after 18 months of continuous operation — operators had raised the setpoint to 1.9% to compensate, but the inconsistency was still causing mold failures.

Dosing accuracy targets:

  • Peristaltic pumps: ±3% repeatability after calibration
  • Gear pumps: ±2% repeatability after calibration
  • PLC-controlled systems with flow meters: ±1.5% repeatability in real time

The PLC-controlled systems cost more upfront but pay back fast. Real-time flow monitoring catches pump wear before it affects your castings, and closed-loop control adjusts pump speed automatically to hit your target ratio every batch.

Step 2: Verify Mixing Uniformity

Dosing accuracy means nothing if the mixer can't distribute resin evenly through the sand. Mixing uniformity depends on paddle condition, mixer speed, and batch residence time.

Mixing uniformity test:

  1. Run a normal production batch through your mixer
  2. Pull five sand samples from different locations in the discharge stream (beginning, middle, end of batch, plus two random points)
  3. Measure compressive strength on test specimens from each sample
  4. Calculate the coefficient of variation (standard deviation ÷ mean strength)

Target: coefficient of variation under 8%. If you're above 12%, your mixing is inconsistent enough to cause random mold failures.

Common mixing problems:

  • Worn paddles: Paddle edges wear down and lose their ability to lift and fold sand. Replace paddles when edge thickness drops below 80% of original dimension.
  • Incorrect mixer speed: Too slow and resin doesn't distribute. Too fast and you're shearing the resin film off the sand grains. For continuous mixers, 25-35 rpm is typical for furan systems. For batch mixers, 45-60 rpm.
  • Short residence time: Sand needs 90-120 seconds of mixing time for complete resin coating. If you're pushing throughput by cutting residence time to 60 seconds, you're creating weak spots in your molds.

We rebuilt a mixer for a gray iron foundry in 2022 — they'd been running with paddles worn down to 60% thickness and compensating by adding extra resin. After paddle replacement and speed adjustment, they dropped from 1.7% to 1.3% binder ratio with no change in mold strength. The resin was always sufficient; the mixing was the problem.

Resin sand mixer calibration checklist showing dosing pump flow test, paddle wear measurement, and mixing uniformity verification steps

Step 3: Implement Sand Reclamation

Sand reclamation is the fastest way to cut binder costs because reclaimed sand needs less resin than virgin sand. The reason: reclaimed sand retains a thin resin film even after mechanical or thermal reclamation, so you're coating a partially-treated surface instead of raw silica.

Binder savings from reclamation:

  • Virgin sand: 1.5-1.8% binder ratio typical for furan systems
  • Reclaimed sand (mechanical): 1.2-1.5% binder ratio for the same mold strength
  • Reclaimed sand (thermal): 1.3-1.6% binder ratio (cleaner surface than mechanical, but higher reclamation cost)

The savings come from two sources: lower binder consumption per ton of sand, and lower sand purchase cost. If you're buying virgin sand at $45/ton and you can reclaim at 95% recovery rate, your effective sand cost drops to $2.25/ton (5% makeup sand only).

Reclamation system selection:

For furan and phenolic resin systems, mechanical reclamation works well. Attrition mills or pneumatic impact systems break down the resin film and separate it from sand grains. Target 95% sand recovery with residual resin content under 0.3%.

For sodium silicate systems, thermal reclamation is more effective because the binder forms a glass-like coating that mechanical systems can't fully remove. Thermal reclamation at 600-700°C burns off organic binders and decomposes silicate films.

We run reclamation tests in our facility before shipping equipment. If you're buying a mechanical reclamation line rated for 95% recovery, we'll show you the test data from your specific unit — actual sand samples before and after reclamation, sieve analysis, and residual binder content measured by loss-on-ignition testing.

Step 4: Control Sand Temperature

Sand temperature affects resin cure rate and working time. If your sand temperature varies by more than 5°C between batches, you're either getting premature hardening (hot sand) or extended strip times (cold sand). Both problems push operators to adjust binder ratio as a workaround, and that destroys your cost control.

Temperature control targets:

  • Furan resin systems: 20-30°C sand temperature at mixing
  • Phenolic resin systems: 25-35°C sand temperature at mixing
  • Sodium silicate + CO₂: 15-25°C sand temperature (CO₂ cure is less temperature-sensitive)

If your facility has seasonal temperature swings, you need either a sand cooler (for hot climates) or a sand heater (for cold climates). The equipment cost is $8,000-$15,000 for a 10-ton/hour cooling system, and it pays back in 6-9 months through binder savings and reduced scrap.

Cold sand is the bigger problem in most facilities. At 10°C sand temperature, furan resin cure time doubles, so operators raise the catalyst percentage to compensate. That increases binder cost and makes the working time unpredictable. A simple fluidized-bed sand heater brings sand to 25°C and eliminates the guesswork.

The Binder Cost Calculation Framework

Track binder cost as a system, not just as resin price per kilogram. The real cost includes resin purchase, catalyst, sand purchase, sand disposal, and scrap castings from mold failures.

Total binder cost per ton of castings:

(Resin kg/ton sand × Resin price) + (Catalyst kg/ton sand × Catalyst price) + (Virgin sand cost × (1 - Reclamation rate)) + (Scrap rate × Casting value)

Example for a gray iron foundry running furan resin:

  • Resin: 1.5% ratio = 15 kg/ton sand at $2.80/kg = $42.00
  • Catalyst: 20% of resin weight = 3 kg/ton sand at $3.50/kg = $10.50
  • Virgin sand: $45/ton × (1 – 0.90 reclamation rate) = $4.50
  • Scrap: 3% scrap rate × $800/ton casting value = $24.00
  • Total: $81.00 per ton of sand

Now run the same calculation with optimized equipment:

  • Resin: 1.2% ratio = 12 kg/ton sand at $2.80/kg = $33.60
  • Catalyst: 20% of resin weight = 2.4 kg/ton sand at $3.50/kg = $8.40
  • Virgin sand: $45/ton × (1 – 0.95 reclamation rate) = $2.25
  • Scrap: 1.5% scrap rate × $800/ton casting value = $12.00
  • Total: $56.25 per ton of sand

That's a $24.75 saving per ton of sand, or 30.5% reduction in total binder system cost. For a foundry producing 50 tons of sand per shift, that's $1,237 per shift or $363,000 annually.

The equipment investment to get there: $12,000 for dosing system upgrade, $85,000 for mechanical reclamation line, $10,000 for sand temperature control. Total $107,000, with 3.5-month payback.

Binder cost comparison chart showing cost breakdown before and after equipment optimization for resin sand production line

Validation: How to Confirm Your Binder Reduction Worked

Cutting binder ratio is only useful if mold strength stays consistent. Run these checks after any equipment changes:

Mold strength verification:

  1. Pull sand samples from production batches at your new lower binder ratio
  2. Make standard test specimens (50mm cubes or cylinders per AFS or ISO standards)
  3. Measure compressive strength at 1-hour, 3-hour, and 24-hour cure times
  4. Compare to your historical baseline data at the old binder ratio

Target: 24-hour compressive strength within 10% of your baseline. If you were getting 2.8 MPa at 1.6% binder ratio, you should see 2.5-2.8 MPa at 1.3% binder ratio after equipment optimization.

Production validation:

Track casting reject rate for the first 500 molds after binder reduction. If reject rate increases by more than 1 percentage point, you've cut too far — raise binder ratio by 0.1% and retest.

The validation period matters. Don't judge results from the first 50 molds. Equipment changes need time to stabilize, and operators need time to adjust to new working times and strip times.

When the Problem Starts Before Mixing

Sometimes high binder consumption isn't your mixer's fault — it's the sand quality you're starting with.

Sand contamination issues:

  • Clay content above 1%: Clay absorbs resin and increases binder demand. If your virgin sand supplier is delivering material with 1.5-2% clay, you're wasting resin before mixing even starts. Specify max 0.5% clay content in your sand purchase contract.
  • Moisture content above 0.2%: Water interferes with resin coating and causes lumping. Wet sand needs 15-20% more binder to achieve the same strength as dry sand. If your sand storage is outdoors and uncovered, you're paying for that moisture in binder cost.
  • Inconsistent grain size distribution: Sand with too many fines (below 0.15mm) has higher surface area and needs more resin to coat. Sand with too many coarse grains (above 0.6mm) has poor packing and weak mold strength. AFS grain fineness number should stay within ±3 points batch-to-batch.

We've seen foundries chase binder cost problems for months, adjusting mixer settings and trying different resin suppliers, when the real issue was contaminated sand from their reclamation system. A $4,000 sand washing unit fixed it — removed the clay fines, brought moisture content down to 0.1%, and dropped binder consumption by 0.3 percentage points.
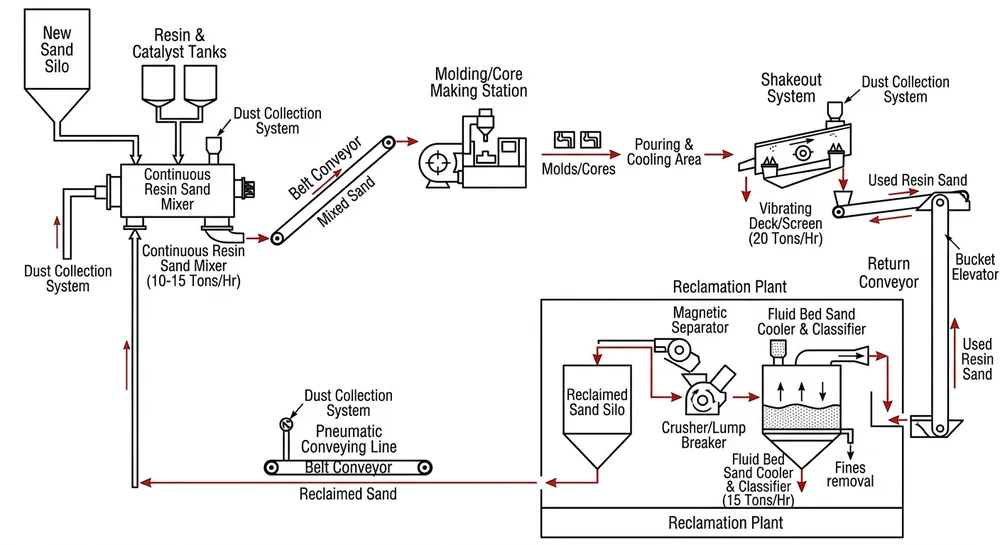
Equipment That Enables Sustained Cost Reduction

Binder cost optimization isn't a one-time adjustment. It's a control system that maintains accuracy as equipment wears and conditions change.

PLC-controlled dosing with feedback:

Standard resin sand mixers use open-loop control — you set a binder ratio, and the pump runs at a fixed speed. PLC systems with mass flow meters measure actual resin delivery in real time and adjust pump speed to hit your target ratio every batch. When the pump starts wearing out, the control system compensates automatically instead of waiting for an operator to notice mold failures.

The cost difference: $8,000 for a basic open-loop system, $18,000 for closed-loop PLC control with flow monitoring. The PLC system pays for itself in 8-12 months through tighter binder control and reduced scrap.

Integrated reclamation with quality monitoring:

Mechanical reclamation lines should include continuous monitoring of reclaimed sand quality — residual binder content, grain size distribution, and temperature. If reclaimed sand quality drifts out of spec, the system can automatically adjust the virgin sand makeup percentage to maintain consistent mixing performance.

We build reclamation lines with inline sieve analysis and loss-on-ignition testing. The control system tracks sand quality shift-by-shift and alerts operators when reclaimed sand needs adjustment. That prevents the common problem where reclamation performance degrades slowly over 3-4 weeks and nobody notices until mold strength drops.

Sand temperature control with seasonal compensation:

Fluidized-bed sand coolers and heaters should integrate with your mixer control system. When ambient temperature changes, the sand conditioning system adjusts automatically to maintain your target mixing temperature. No operator intervention, no seasonal binder ratio adjustments, no scrap rate spikes in summer and winter.

TZFoundry manufactures both resin sand mixers and reclamation systems — we can address binder cost from both dosing precision and sand reuse angles. Our PLC-controlled mixer systems include real-time binder dosing feedback, and our reclamation plants validate 95%+ recovery rates in our in-house testing lab before shipment.

Practical Next Steps

If you're running a resin sand line and binder cost is eating your margin, start with the equipment audit:

  1. Calibrate your dosing pump this week. It takes 30 minutes and costs nothing. If you find more than 5% deviation, you've identified your first cost leak.
  1. Pull mixing uniformity samples on your next production shift. Five samples, strength testing, coefficient of variation calculation. If you're above 12% variation, your mixer needs attention before you touch binder ratio.
  1. Calculate your total binder system cost using the framework above. Include resin, catalyst, sand, and scrap. That's your baseline for measuring improvement.
  1. Run the payback math on reclamation. If you're buying virgin sand and throwing away used sand, reclamation pays for itself in under a year for most production volumes.

The foundries that cut binder costs successfully are the ones that treat it as an equipment precision problem, not a purchasing problem. Cheaper resin saves you $0.20/kg. Better equipment saves you 3-4 kg per ton of sand.

If you're evaluating resin sand production line upgrades or adding reclamation capacity, send us your current binder ratio, sand throughput, and production schedule. We'll calculate the equipment configuration that hits your cost target and show you the payback timeline with factory pricing. Contact our engineering team for equipment recommendations and commissioning support.

How to Bring Reclaimed Resin Sand Back to Spec Without Increasing Binder Usage

Your reclaimed sand LOI came back at 2.8% when your spec calls for 1.5% max. The mixer operator compensated by bumping resin dosage from 1.2% to 1.5%. Molds stopped cracking, but your monthly binder invoice just jumped 25%. Three months later, you're still running the higher ratio because no one wants to risk another batch of scrap castings.

This is how reclaimed sand quality problems turn into permanent binder cost increases. The real issue isn't that reclaimed sand can't meet spec — it's that most foundries treat the symptom (weak molds) instead of fixing the root cause (out-of-spec reclaimed sand). Every 0.3% increase in binder dosage costs a 50-ton-per-day line roughly $45,000 annually in furan resin alone. Multiply that across phenolic and coated sand systems, and you're looking at six-figure waste.

We've commissioned over 40 Resin Sand Reclamation Plant systems for export buyers. The foundries that control binder costs long-term are the ones that treat reclamation quality as an equipment tuning problem, not a mixing problem. This guide walks through the diagnostic sequence we use during commissioning to bring reclaimed sand back to spec without touching the binder dosage knob.

Why Reclaimed Sand Drifts Out of Spec

Reclaimed resin sand fails on four parameters: LOI (loss on ignition), grain fineness number (GFN), pH, and grain shape factor. Each one maps to a different failure point in the reclamation process.

LOI measures residual resin and carbon. When LOI runs high, you're coating new resin over old resin film. The sand grains can't bond properly, so you compensate with more binder. Mechanical reclamation alone typically delivers 1.5–2.5% LOI. Thermal reclamation can push that below 0.5%, but only if calcination temperature and residence time are dialed in correctly.

GFN measures grain size distribution. Reclaimed sand that's been over-processed generates fines — sub-100-mesh particles that don't contribute to mold strength but do absorb extra resin. If your GFN drifts from 55 to 62 after reclamation, you've crushed grains during attrition. The fines pack into voids, reduce permeability, and soak up binder without improving green strength.

pH shifts happen in thermal reclamation. Furan resin systems need slightly acidic sand (pH 6.0–6.5). Phenolic systems tolerate neutral to slightly alkaline (pH 7.0–7.5). If you thermally reclaim furan sand and don't check pH afterward, residual alkalinity from binder decomposition can inhibit catalyst activation. The mixer operator sees weak molds and adds more resin when the real problem is pH drift blocking the cure.

Grain shape degrades under excessive attrition. Angular grains provide better interlock than rounded grains. Over-attrition rounds the edges, reduces packing density, and forces you to use more binder to achieve the same compressive strength. We've seen foundries run reclaimed sand through three attrition stages when two would have been sufficient — they were solving an LOI problem by destroying grain shape.

The pattern: every out-of-spec parameter creates a different mechanism that inflates binder demand. Fix the parameter, and the binder dosage can drop back to baseline.

Step-by-Step Diagnostic: Map Your Test Results to Equipment Settings

Run a full sand test on your reclaimed output before you touch the mixer. You need five numbers: LOI, GFN, pH, AFS clay content, and compressive strength (on a standard test specimen at your normal binder ratio). Compare them to your baseline spec for virgin sand.

Here's the diagnostic table we use during commissioning:

Parameter Out-of-Spec Condition Root Cause Equipment Adjustment
LOI > 2.0% (mechanical) Incomplete resin removal Attrition intensity too low, residence time too short Increase attrition rotor speed by 10%, extend retention time by 15–20 seconds
LOI > 0.8% (thermal) Incomplete combustion Calcination temperature too low, insufficient air flow Raise calcination zone to 650–750°C, verify secondary air injection
GFN increase > 3 points Grain fracture from over-processing Excessive attrition, improper screen mesh selection Reduce attrition stages from 3 to 2, verify screen mesh matches virgin sand GFN
pH > 7.5 (furan system) Alkaline residue from thermal decomposition Thermal reclamation without pH correction Add 0.05–0.1% phosphoric acid or use acidic catalyst to rebalance
pH < 6.0 (phenolic system) Acidic carryover from furan contamination Cross-contamination or improper cleaning Flush system, verify dedicated phenolic sand handling, check for mixer carryover
Fines > 5% (sub-100 mesh) Dust extraction insufficient Dust collector underperforming, screen blinding Clean or replace dust collector bags, check screen vibration amplitude
Compressive strength low despite normal LOI/GFN Grain shape degradation Mechanical damage from impact or excessive tumbling Reduce attrition intensity, verify pneumatic conveying velocity < 15 m/s

Most reclamation quality problems trace back to one of three settings: attrition intensity (rotor speed and retention time), thermal calcination temperature (for systems with thermal stages), and dust extraction efficiency. The table gives you the starting adjustment. After each change, run another sand test and a trial mix batch before committing to full production.

Diagnostic flowchart linking reclaimed sand test parameters to reclamation equipment adjustments for foundries

Equipment Adjustments: Attrition, Screening, and Thermal Stages

Attrition Intensity Control

Mechanical reclamation uses rotating paddles or pneumatic impact to scrub resin film off sand grains. The trade-off: too little attrition leaves high LOI, too much attrition fractures grains and generates fines.

We set attrition rotor speed based on sand type and resin system. For furan resin on silica sand (AFS 50-60), baseline rotor speed is 1200–1400 RPM with 45–60 second retention time. That typically delivers 1.8–2.2% LOI. If you need lower LOI without adding a thermal stage, you can push rotor speed to 1600 RPM, but you must monitor GFN every shift. A 2-point GFN increase means you're fracturing grains faster than you're removing resin.

The better approach: run two attrition stages in series at moderate intensity rather than one stage at high intensity. First stage at 1200 RPM removes bulk resin. Second stage at 1400 RPM polishes the surface. This gives you 1.5–1.8% LOI with minimal grain damage. (We switched to this configuration in 2018 after seeing too many single-stage systems drift into over-attrition during long production runs.)

Screening and Dust Extraction

Fines are binder thieves. A 1% increase in sub-100-mesh content can raise your effective binder demand by 0.1–0.15% because the fines absorb resin without contributing to mold structure.

Your reclamation plant should have at least two screening stages: a scalping screen after attrition to remove large debris, and a finishing screen to remove fines before the reclaimed sand returns to the mixer. For AFS 50-60 sand, use a 100-mesh finishing screen. For AFS 40-50, use 80-mesh.

Dust extraction happens at three points: after attrition, after thermal treatment (if equipped), and at the finishing screen. Bag-type dust collectors work well if you clean or replace bags every 2–3 months. Cyclone separators are lower maintenance but less efficient at capturing sub-50-micron fines. We typically spec bag collectors for the finishing screen and cyclones for the attrition stage.

If your fines content is climbing despite proper screening, check pneumatic conveying velocity. Sand moving faster than 15 m/s through elbows and transfer points will fracture on impact. Reduce blower speed or increase pipe diameter to drop velocity below 12 m/s.

Thermal Calcination for Low-LOI Applications

Mechanical reclamation alone can't consistently deliver LOI below 1.0%. If your mold system requires tighter resin control — high-precision castings, thin-wall sections, or automated molding lines with narrow process windows — you need thermal polishing.

Thermal reclamation heats sand to 650–800°C in a rotary kiln or fluidized bed to combust residual resin. Residence time at temperature is 8–12 minutes for complete carbon removal. The output LOI depends on three variables: peak temperature, oxygen availability, and residence time.

For furan resin, 700°C with 10-minute retention delivers 0.3–0.5% LOI. For phenolic, you need 750°C because phenolic char is more thermally stable. Sodium silicate systems can run at 650°C since the binder decomposes at lower temperature.

The pH problem shows up here. Thermal decomposition of organic binders leaves alkaline ash (sodium, potassium carbonates). If you're running furan resin, you must either acid-wash the sand after thermal treatment or dose the mixer with extra catalyst to compensate. We've seen foundries add 15% more catalyst to overcome pH drift when a simple 0.08% phosphoric acid addition during cooling would have solved it.

Thermal reclamation adds capital cost and energy cost, but it pays back fast if you're currently compensating for high LOI with extra binder. A 50-ton-per-day line spending $180,000/year on furan resin at 1.5% dosage can drop to 1.1% dosage with thermal reclamation (0.4% LOI vs 2.0% LOI). That's $48,000/year in binder savings. Thermal system operating cost (natural gas, maintenance) runs about $15,000/year, so net savings is $33,000 annually. Payback on the thermal module is typically 18–24 months.

For more detail on when thermal makes sense, see our comparison guide on mechanical vs thermal resin sand reclamation.

Blending Strategy: Optimal Reclaimed-to-New Sand Ratios

You don't have to run 100% reclaimed sand. Blending reclaimed with virgin sand is a practical way to stabilize quality while you tune the reclamation plant — and in some cases, it's the permanent operating mode.

The blending ratio depends on reclaimed sand quality tier:

High-quality reclaimed (LOI < 1.0%, GFN within ±2 of virgin, pH on-spec): Run 90–100% reclaimed. Binder dosage matches virgin sand baseline. This is the target state for a well-tuned thermal reclamation system.

Medium-quality reclaimed (LOI 1.5–2.0%, GFN within ±3, pH acceptable): Blend 70–80% reclaimed with 20–30% virgin. Binder dosage increases 0.05–0.10% to compensate for slightly higher LOI. This is typical for mechanical reclamation without thermal polishing.

Low-quality reclaimed (LOI > 2.5%, GFN drift > 3 points, or pH out of range): Blend 50% reclaimed with 50% virgin, or stop using reclaimed sand until you fix the equipment. At this quality level, the binder penalty erases most of the cost benefit of reclamation.

Blending happens at the mixer feed hopper. Most Resin Sand Production Line systems use separate silos for virgin and reclaimed sand with variable-speed screw feeders to control the ratio. Set the ratio based on your daily sand test results, not on a fixed schedule.

One caution: if you're blending to mask a reclamation quality problem, you're just spreading the cost across a larger sand volume. A 70/30 blend with 2.5% LOI reclaimed sand gives you an effective system LOI of 1.75% — still high enough to require extra binder. Fix the reclamation plant first, then optimize the blend ratio.

Decision matrix showing optimal reclaimed-to-virgin sand blending ratios based on LOI and GFN test results

Worked Cost Example: Annual Binder Savings from LOI Reduction

Let's quantify what a 0.5% LOI reduction is worth on a real production line.

Baseline scenario:

  • Daily sand consumption: 50 tons
  • Operating days: 300 days/year
  • Annual sand volume: 15,000 tons
  • Binder system: Furan resin (two-part)
  • Current reclaimed sand LOI: 2.0%
  • Current binder dosage: 1.4% (resin + catalyst)
  • Furan resin cost: $2.40/kg

Target scenario after reclamation plant tuning:

  • Reclaimed sand LOI: 1.5%
  • Target binder dosage: 1.2%
  • Binder reduction: 0.2 percentage points

Annual binder cost calculation:

Current annual binder consumption: 15,000 tons × 1.4% = 210 tons = 210,000 kg Annual binder cost: 210,000 kg × $2.40/kg = $504,000

Target annual binder consumption: 15,000 tons × 1.2% = 180 tons = 180,000 kg Annual binder cost: 180,000 kg × $2.40/kg = $432,000

Annual savings: $72,000

That's the direct material savings. Indirect benefits include reduced mold gas defects (lower LOI means less volatiles during metal pour), improved dimensional accuracy (less binder shrinkage), and longer core box life (less resin buildup on tooling).

If your reclamation plant needs a thermal polishing module to hit 1.5% LOI, the module costs roughly $85,000–$120,000 depending on capacity and configuration. Operating cost (natural gas, maintenance, labor) adds $18,000–$22,000 annually. Net annual savings after operating cost: $50,000–$54,000. Payback period: 20–24 months.

For a detailed ROI breakdown including equipment financing and energy cost variables, see our sand reclamation ROI analysis.

Validation Checks: How to Confirm the Fix Worked

After you adjust the reclamation plant, don't assume the problem is solved. Run these three validation checks before you commit to full production:

1. Sand quality test on reclaimed output Pull a 5 kg sample from the reclaimed sand discharge. Send it to your lab (or use on-site testing equipment) for LOI, GFN, pH, AFS clay content, and grain shape analysis. Compare results to your baseline spec. If LOI dropped but GFN increased, you over-corrected on attrition intensity.

2. Trial mix batch at baseline binder dosage Mix a 50 kg batch using your original binder dosage (before you started compensating for poor reclaimed sand). Prepare standard test specimens: 50mm cubes for compressive strength, dog-bone specimens for tensile strength. Test at 1-hour, 4-hour, and 24-hour cure intervals. If 24-hour compressive strength matches your historical baseline (typically 2.5–3.5 MPa for furan systems), the reclaimed sand is back on spec.

3. Production trial with scrap rate monitoring Run a 4-hour production shift using the corrected reclaimed sand and baseline binder dosage. Track mold defects: cracks, erosion, gas holes, dimensional drift. If scrap rate stays within your normal range (typically 2–4% for automated lines), you've successfully eliminated the binder compensation.

We run all three checks during commissioning. The sand test confirms the equipment adjustment worked. The trial mix confirms the binder dosage can drop. The production trial confirms the fix holds under real casting conditions. Skip any of these steps and you risk reverting to high binder dosage the first time a mold cracks.

One more check that's often overlooked: mixer binder dosing calibration. If your reclaimed sand is now on-spec but you're still seeing weak molds, the problem might be in the mixer, not the sand. Dosing pumps drift over time. Catalyst-to-resin ratio can shift if one pump wears faster than the other. For guidance on verifying mixer accuracy, see our article on mixer binder dosing calibration.

Common Mistakes That Keep Binder Costs High

Mistake 1: Treating LOI as the only quality parameter Foundries obsess over LOI and ignore GFN, pH, and grain shape. You can hit 1.5% LOI by over-processing the sand, but if you've crushed grains and generated 8% fines, you'll still need extra binder to compensate for poor packing density.

Mistake 2: Skipping pH checks after thermal reclamation Thermal systems for furan resin must include pH monitoring. We've commissioned plants where the foundry ran thermal reclamation for six months without checking pH, then couldn't understand why molds were weak despite 0.4% LOI. The sand was alkaline (pH 8.2), which inhibited acid-catalyzed furan polymerization. A $200 pH meter would have caught it.

Mistake 3: Ignoring fines accumulation Fines build up gradually. Your reclamation plant might deliver good sand for the first three months, then quality drifts as dust collector efficiency drops. Set a monthly maintenance schedule: clean or replace dust collector bags, check screen mesh for blinding, verify pneumatic conveying velocity.

Mistake 4: Using the same reclamation settings for different resin systems Furan, phenolic, and sodium silicate resins have different thermal decomposition profiles and different mechanical adhesion to sand grains. If you switch resin systems, re-validate your reclamation plant settings. Phenolic resin needs higher attrition intensity or higher calcination temperature than furan because the cured polymer is harder and more thermally stable.

Mistake 5: Blending to hide equipment problems instead of fixing them Blending reclaimed with virgin sand is a valid strategy when reclaimed quality is good but not perfect. It's not a substitute for fixing a broken reclamation plant. If your reclaimed sand consistently tests at 3.0% LOI and you're blending 50/50 to bring system LOI down to 1.5%, you're wasting money on virgin sand to compensate for poor reclamation. Fix the plant, then optimize the blend.

When to Upgrade Your Reclamation Plant Configuration

Sometimes the problem isn't tuning — it's capacity or configuration mismatch. Here are the signs your reclamation plant needs additional stages or a different process approach:

Sign 1: LOI won't drop below 2.0% even after maximizing attrition intensity Your mechanical reclamation system is at its limit. Adding more attrition will fracture grains without removing more resin. You need thermal polishing. Budget $85,000–$150,000 for a thermal module depending on throughput (20–60 tons/hour).

Sign 2: GFN increases by 4+ points after reclamation You're over-processing. The plant configuration is too aggressive for your sand type. Options: reduce attrition stages from 3 to 2, switch from high-intensity pneumatic reclamation to lower-intensity mechanical attrition, or reduce rotor speed and accept slightly higher LOI.

Sign 3: Reclaimed sand quality varies by more than 0.3% LOI shift-to-shift Your plant doesn't have enough process control. Single-stage systems with manual adjustments can't hold tight tolerances. Upgrade to a multi-stage system with PLC control, automated temperature monitoring (for thermal systems), and real-time dust extraction feedback.

Sign 4: You're running below 60% reclamation plant capacity Undersized plants force you to run at maximum intensity to keep up with mixer demand, which leads to over-processing and grain damage. If your mixer consumes 50 tons/hour of sand and your reclamation plant is rated for 40 tons/hour, you'll never achieve stable quality. Either upgrade plant capacity or accept a lower reclaimed-to-virgin blend ratio.

Sign 5: Your casting mix includes multiple resin systems and you're cross-contaminating Furan and phenolic resin residues don't play well together. If you're reclaiming both through the same plant without dedicated surge bins and cleaning cycles, pH and cure behavior will be unpredictable. Solution: install separate reclamation lines for each resin system, or dedicate specific days to each system with a full cleanout between changeovers.

For help sizing a reclamation plant to match your production volume and quality targets, see our reclamation plant sizing guide.

Decision tree showing when to upgrade reclamation plant configuration based on LOI results, GFN drift, and capacity utilization

Fix the Sand, Not the Mix

Reclaimed resin sand quality problems don't fix themselves, and they don't get cheaper over time. Every month you run elevated binder dosage to compensate for high LOI or poor grain distribution is a month of permanent cost increase. The foundries that control binder spend long-term are the ones that treat reclamation as a precision process with measurable inputs and outputs, not as a black-box system that "just works."

The diagnostic sequence is straightforward: test the reclaimed sand, map the out-of-spec parameters to equipment settings, adjust attrition intensity or thermal temperature, validate with trial mixes, and monitor production scrap rates. Most quality problems trace back to one of three settings: attrition rotor speed, dust extraction efficiency, or calcination temperature. Fix those, and binder dosage drops back to baseline without risking mold strength.

We validate reclaimed sand quality in our testing lab before every Resin Sand Reclamation Plant ships. The commissioning process includes a full diagnostic cycle: baseline sand testing, equipment tuning, trial production, and operator training on the adjustment sequence. If you're currently compensating for poor reclaimed sand with extra binder, send us your sand test report (LOI, GFN, pH, daily tonnage) and current binder dosage. We'll recommend the reclamation plant configuration that brings your sand back to spec and calculate projected annual binder savings.

Request a quote with your current sand specifications and production volume — we'll send back a reclamation plant recommendation with equipment settings, expected LOI/GFN targets, and a binder cost reduction estimate based on your resin system and dosage.