A 15 kPa vacuum leak doesn't sound like much until you're scrapping 18% of your castings for porosity and incomplete fill. We've seen foundries lose three weeks of production value before they traced the problem back to a degraded door seal that dropped chamber pressure by 8 kPa during the pour. The metal front stalls halfway through the mold cavity, you get cold shuts at thin sections, and the scrap bin fills up while your maintenance team checks everything except the vacuum system.
Vacuum integrity isn't a background concern in lost foam casting — it's the difference between 92% yield and 74% yield. When vacuum pressure drops below your process window, the foam decomposition gases don't evacuate cleanly, you get carbon inclusions at the casting surface, and porosity shows up in sections that should be dense. The casting looks fine coming out of the sand, but it fails leak testing or cracks under load because the internal structure is compromised.
Why Vacuum Leaks Degrade Fill Quality in Lost Foam Casting
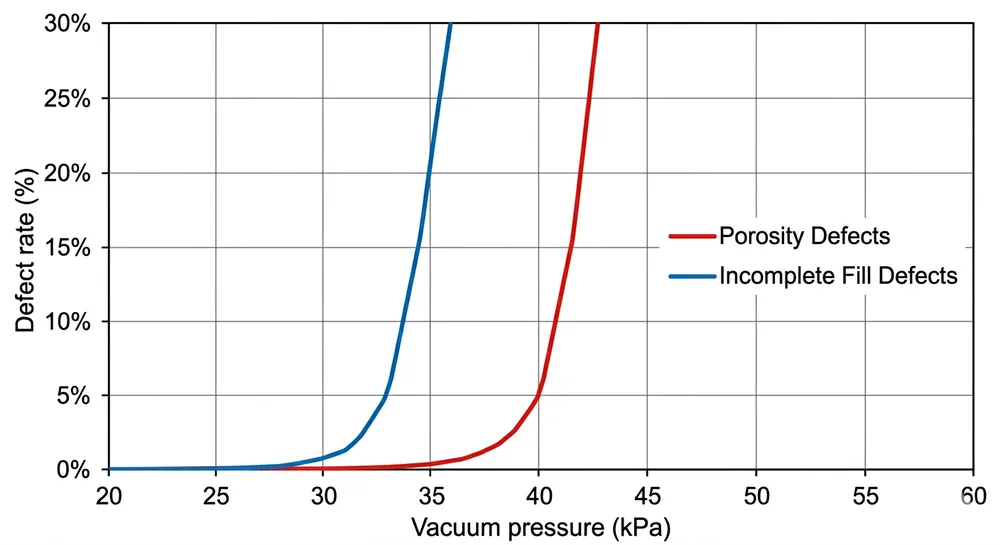
Lost foam casting relies on negative pressure to pull foam decomposition gases out of the mold cavity as molten metal replaces the pattern. Your vacuum system needs to maintain 40-60 kPa (depending on alloy and section thickness) throughout the pour to keep gas evacuation ahead of the metal front. When a leak drops that pressure by even 10-15 kPa, the gas removal rate falls below what's needed for clean metal flow.
Here's what happens at the defect level. The foam pattern vaporizes at 400-500°C as molten metal contacts it, producing styrene gases that must exit through the permeable coating and sand. If vacuum pressure is insufficient, those gases get trapped at the metal-mold interface. You see this as surface porosity on the casting, or worse, as subsurface voids that don't show up until machining or pressure testing. In ductile iron castings with 8-12mm wall sections, we've measured porosity rates jump from 3% to 22% when vacuum pressure drops from 50 kPa to 35 kPa during fill.
Incomplete fill is the other failure mode. Thin sections (under 6mm) and complex geometries with sharp corners need full vacuum pressure to pull metal through before it freezes. A vacuum leak that drops pressure mid-pour causes the metal front to hesitate or stop completely. You get misruns, cold shuts, and castings that are 85% complete but unsalvageable.
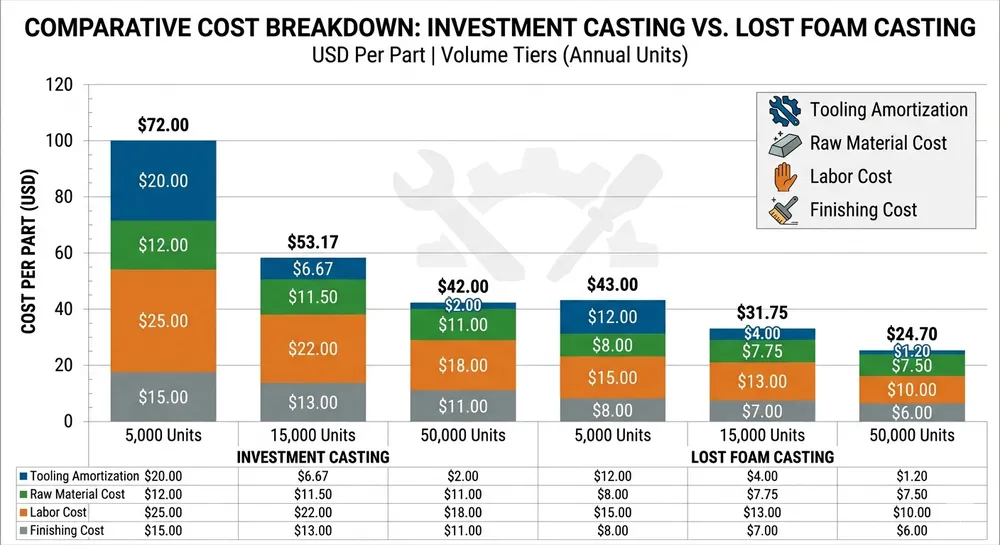
The commercial impact: if your line runs 40 molds per day and vacuum leaks push your scrap rate from 8% to 20%, that's 4.8 additional scrap castings daily. At $45 per casting in material and labor, you're losing $216 per day, or $5,400 per month. Most foundries don't connect the scrap trend to vacuum system degradation until someone runs a pressure decay test and finds the chamber can't hold 50 kPa for more than 90 seconds.

Common Vacuum Leak Sources by Subsystem
Vacuum leaks don't announce themselves. Pressure drops gradually over weeks as seals degrade, gaskets compress, or weld joints develop hairline cracks from thermal cycling. You need to know where leaks typically originate so you can inspect those points systematically.
Chamber door seals are the most frequent leak source. The door closes against a silicone or EPDM gasket that compresses under clamping force to create an airtight seal. After 8,000-12,000 cycles, the gasket loses elasticity from heat exposure (molten metal radiates through the sand flask) and mechanical compression. We've measured seal degradation rates of 15-20% per year in foundries running two shifts. A gasket that sealed at 50 kPa when new might only hold 38 kPa after 18 months of production.
Vacuum chamber welds develop leaks when penetration depth is inconsistent or when porosity exists in the weld bead itself. Manual welding produces variable penetration — one section might have 6mm penetration while another has 3mm. Under repeated thermal cycling (chamber heats during pour, cools between cycles), the shallow-penetration zones crack first. We switched to robotic welding for all vacuum chambers in 2018 specifically to eliminate this failure mode. Robotic welds give us 5-6mm consistent penetration across the entire seam, and we haven't had a weld-related leak failure since.
Piping joints and flange connections between the chamber and vacuum pump leak when bolts loosen from vibration or when gaskets compress unevenly. A 4-inch vacuum line typically has 3-4 flanged connections between chamber and pump. Each connection uses a rubber gasket compressed by 6-8 bolts. If you over-tighten the bolts (common mistake), the gasket crushes and creates leak paths. If you under-tighten, vibration from the pump loosens the joint over time. The correct torque spec for M12 bolts on vacuum flanges is 45-50 Nm — we mark this on every installation drawing because it's the most common assembly error we see during commissioning.
Vacuum pump seals and valves degrade from oil contamination or wear. Rotary vane pumps (most common type for foundry vacuum systems) use oil to seal the vanes against the pump housing. When that oil gets contaminated with fine sand dust or moisture, sealing efficiency drops. You'll see this as a gradual decline in ultimate vacuum — a pump that used to pull 65 kPa now maxes out at 52 kPa even after rebuilding the chamber seals. Oil changes every 500 operating hours prevent this, but many foundries run 1,000+ hours before servicing the pump.
Sensor fittings and instrumentation ports are small leak sources that add up. Each vacuum gauge, pressure transducer, or temperature sensor penetrates the chamber wall through a threaded fitting. If the thread sealant wasn't applied correctly during installation, or if thermal expansion cracks the sealant over time, you get slow leaks that are hard to locate. We use Loctite 567 thread sealant on all vacuum fittings — it stays flexible through thermal cycling and seals tapered threads reliably.
Step-by-Step Vacuum Leak Detection Procedure
You can't fix a leak until you find it. Here's the diagnostic sequence we use when a foundry reports fill quality problems that might be vacuum-related.
Step 1: Pressure decay test — This quantifies leak severity and tells you whether you have a problem worth chasing. Close and clamp the chamber door, start the vacuum pump, and pull the chamber down to your normal operating pressure (typically 50 kPa). Shut off the pump and valve-isolate the chamber. Monitor pressure with a calibrated gauge for 5 minutes. Acceptable decay rate: less than 2 kPa drop over 5 minutes. If pressure drops 5-8 kPa, you have a significant leak. If it drops more than 10 kPa, you have multiple leaks or one large failure.
Record the decay rate because you'll use it to verify your repairs. After you fix what you think is the leak source, run the test again. If decay rate doesn't improve, you haven't found the real leak yet.
Step 2: Isolate the subsystem — Determine whether the leak is in the chamber, the piping, or the pump. Close the isolation valve between chamber and pump (if your system has one), then run the decay test on the chamber alone. If decay rate improves significantly, the leak is downstream in the piping or pump. If decay rate stays the same, the leak is in the chamber or door seal.
For systems without an isolation valve, you can disconnect the vacuum line at the chamber flange and cap the chamber port with a blind flange. Run the decay test. This definitively isolates the chamber from everything downstream.
Step 3: Soap solution test on chamber seals — Mix dish soap with water (1:10 ratio) in a spray bottle. With the chamber under vacuum, spray the soap solution along the door seal perimeter. Leaks show up as bubbles forming at the leak point. Work your way around the entire seal, paying extra attention to corners where the gasket changes direction — these are common failure points.
If you find bubbles at one section of the door seal, mark it with chalk. Don't stop there — continue around the entire perimeter because you might have multiple leak points. We've found foundries with leaks at three different door seal locations, each contributing 3-4 kPa of pressure loss.
Step 4: Ultrasonic leak detection for piping and welds — Soap solution doesn't work well on piping joints or chamber welds because the leak rate might be too slow to produce visible bubbles. Use an ultrasonic leak detector (we use Fluke models, but any 40 kHz detector works). The detector picks up the high-frequency sound that air makes when it rushes through a small opening under pressure differential.
Scan all flange connections, weld seams, and sensor fittings with the chamber under vacuum. The detector will spike when you pass over a leak. This method finds leaks that lose 1-2 kPa over 5 minutes — too small for soap bubbles but large enough to degrade casting quality over a full production shift.
Step 5: Pump performance test — If chamber and piping check out clean but you're still not hitting target vacuum pressure, test the pump. Disconnect the pump from the system and cap the pump inlet. Run the pump and measure ultimate vacuum at the inlet port. A healthy rotary vane pump should pull 70-75 kPa. If it maxes out at 55-60 kPa, the pump needs service (oil change, vane replacement, or seal rebuild).
Check pump oil condition while you're at it. Oil should be clear amber. If it's dark brown or has visible particles, it's contaminated and needs changing. If it's milky or has water droplets, you have moisture intrusion (usually from inadequate sand cooling before the flask enters the chamber).

Preventive Maintenance Schedule for Vacuum System Integrity
Leak prevention is cheaper than leak repair. Here's the maintenance schedule we recommend based on production hours, not calendar time, because wear correlates with cycles.
Door seal inspection: every 2,000 cycles — Remove the door seal gasket and inspect for compression set (permanent deformation), cracking, or hardening. A healthy silicone gasket should still feel pliable. If you press your thumbnail into it, it should leave a temporary mark that recovers. If the gasket feels hard or shows visible cracks, replace it even if it's still sealing. You're 500-1,000 cycles away from failure.
Replacement interval for door seals: 8,000-10,000 cycles for silicone, 6,000-8,000 cycles for EPDM. We ship two spare gaskets with every vacuum chamber because this is the highest-wear consumable in the system.
Flange bolt torque check: every 3,000 cycles — Vibration from the vacuum pump loosens flange bolts over time. Walk through all piping connections with a torque wrench and verify each bolt is at spec (45-50 Nm for M12, 70-80 Nm for M16). If you find bolts that have backed off more than 1/4 turn, apply thread-locking compound when you re-torque them.
Vacuum pump oil change: every 500 operating hours — This is roughly every 6-8 weeks for a two-shift foundry running 40 molds per day. Use the oil grade specified by the pump manufacturer (typically ISO VG 68 or 100 for rotary vane pumps). Drain the old oil while the pump is warm — it flows out faster and carries more contaminants with it. Inspect the drained oil for metal particles (indicates vane wear) or water (indicates moisture intrusion from inadequate flask cooling).
Pump vane and seal inspection: every 2,000 operating hours — Disassemble the pump and measure vane thickness with a micrometer. Vanes wear from contact with the pump housing. When thickness drops below the manufacturer's minimum spec (typically 80% of new thickness), replace the vane set. Inspect shaft seals for oil leakage or scoring. Replace seals if you see any oil weeping past the seal face.
Pressure transducer calibration: annually — The pressure transducer that feeds your PLC control system drifts over time. Calibrate it against a certified reference gauge once per year. We've found transducers that read 50 kPa when actual chamber pressure was 43 kPa — the foundry thought they were running at spec but were actually 7 kPa low, which explained their porosity problems.
Chamber weld inspection: every 12 months — Use dye penetrant testing on all chamber weld seams to check for crack initiation. Apply the penetrant, wait 10 minutes, wipe clean, then apply developer. Cracks show up as red lines in the white developer coating. Catch cracks early (under 5mm length) and you can repair them with a localized weld patch. Miss them and they propagate until the entire seam needs re-welding.
Common Mistakes That Cause Premature Vacuum System Failure
Over-tightening flange bolts — We see this on almost every installation where the foundry's maintenance team assembled the piping without torque specs. They tighten bolts "as tight as possible" thinking it improves the seal. It doesn't. Over-torquing crushes the gasket, squeezes it out of the flange face, and creates leak paths. The gasket should compress 20-30% of its original thickness. More than that and you've destroyed its sealing ability.
Using incorrect seal materials for operating temperature — Standard nitrile rubber (NBR) door seals degrade rapidly above 80°C. If your chamber sees radiant heat from the molten metal pour (common in systems where the flask sits in the chamber during fill), you need silicone or fluorocarbon seals rated for 150°C+. We've replaced door seals that failed after 2,000 cycles because the foundry installed NBR seals in a high-temperature application. Switching to silicone extended seal life to 9,000 cycles.
Ignoring gradual pressure decay trends — Most foundries don't track vacuum pressure over time. They notice a problem only when scrap rate jumps. If you log chamber pressure daily (your PLC already records it — just export the data), you'll see pressure declining at 0.5-1 kPa per month as seals degrade. That's your early warning. Schedule seal replacement during a planned maintenance window instead of scrambling to fix it when you're scrapping 20% of production.
Running the vacuum pump without adequate cooling — Rotary vane pumps generate heat from compression and friction. If the pump runs in an enclosed space without ventilation, oil temperature climbs above 90°C and viscosity drops. Sealing efficiency degrades and ultimate vacuum falls. Install the pump in a ventilated area or add a cooling fan. We spec 200 CFM of ventilation airflow for every 5.5 kW pump motor.
Skipping pump oil changes to save cost — Contaminated oil is the leading cause of premature pump failure. A $40 oil change every 500 hours prevents a $3,500 pump rebuild at 3,000 hours. We've seen foundries run pumps for 18 months without an oil change, then wonder why the pump can't pull below 45 kPa. By that point, the vanes are scored, the housing is worn, and you're looking at a full rebuild or replacement.
How Vacuum Chamber Design Affects Long-Term Leak Resistance
Not all vacuum chambers are built the same. Design and fabrication quality at the OEM level determine whether your system holds pressure for 10 years or starts leaking after 18 months.
Weld quality and penetration depth — We switched to robotic welding for all vacuum chamber fabrication in 2018 after tracking weld-related leak failures across our installed base. Manual welding produced inconsistent penetration depth (3-7mm range) and occasional porosity in the weld bead. Robotic welding gives us 5-6mm consistent penetration across every seam and eliminates porosity. The result: zero weld-related leak failures in chambers built after 2018, compared to 8% failure rate in manually-welded chambers over the same period.
Penetration depth matters because vacuum chambers see thermal cycling every production cycle. The chamber heats from radiant energy during the pour, then cools between cycles. Shallow welds (under 4mm penetration) develop fatigue cracks after 15,000-20,000 cycles. Deep welds (5mm+) distribute thermal stress over a larger cross-section and resist cracking.
Hydraulic pressure testing before shipment — We pressure-test every vacuum chamber at 1.5x rated vacuum capacity before it leaves the factory. A chamber rated for 60 kPa operating vacuum gets tested at 90 kPa for 30 minutes. This catches weld defects, flange seal problems, and fitting leaks before the equipment ships. If a chamber can't hold 90 kPa for 30 minutes in our test bay, it doesn't pass QC.
This test also stress-relieves the welds. The first pressurization cycle causes any weak points to fail in a controlled environment where we can repair them immediately. By the time the chamber reaches your facility, it's already survived the equivalent of 5,000 production cycles in terms of stress exposure.
Door seal design and clamping mechanism — The door seal needs even compression around the entire perimeter to seal reliably. We use a multi-point clamping system (8 clamps on a 1200mm x 800mm door) instead of a single-lever design. Multi-point clamping distributes force evenly and prevents the door from warping under load. Single-lever designs concentrate force at two points, which can bow the door and create leak paths at the corners.
The seal groove depth also matters. A groove that's too shallow (under 8mm) doesn't capture enough gasket material to maintain compression over time. A groove that's too deep (over 15mm) allows the gasket to extrude under pressure. We machine seal grooves to 10-12mm depth with a 2mm undercut to lock the gasket in place.
PLC-controlled pressure monitoring with early leak detection — Our vacuum systems include real-time pressure monitoring through the PLC. The system logs chamber pressure every 2 seconds during the vacuum cycle. If pressure drops below the setpoint threshold (typically 45 kPa for a 50 kPa target), the PLC triggers an alarm and can halt the pour sequence to prevent defective castings.
More importantly, the PLC tracks pressure decay rate between cycles. If the system detects that pressure is dropping 1 kPa faster per cycle than baseline, it flags an early-stage leak. Your maintenance team gets a warning 2-3 weeks before the leak becomes severe enough to affect casting quality. This is the difference between planned maintenance and emergency downtime.
Remote diagnostics via 4G connectivity — We install 4G modules on all export vacuum systems so your maintenance team can pull system logs, pressure trends, and error codes without an on-site visit. When a foundry in Mexico reported inconsistent vacuum pressure, we logged into their system remotely, pulled 30 days of pressure data, and identified a gradual decay pattern consistent with door seal degradation. We shipped replacement seals and walked their team through installation via video call. Total downtime: 4 hours instead of the 3 days it would have taken to fly an engineer to the site.

When to Repair Seals vs. Upgrade Vacuum System Components
Repair the seals when pressure decay testing shows the leak is isolated to the door gasket or a single flange connection, and the rest of the system is performing to spec. If your pump still pulls 70+ kPa ultimate vacuum and chamber welds pass dye penetrant inspection, you're looking at a $200-400 seal replacement that takes 2-4 hours. Do this during a planned maintenance window between production shifts.
Upgrade the pump when oil changes and vane replacement don't restore ultimate vacuum above 65 kPa, or when the pump is over 15,000 operating hours. At that point, you're chasing diminishing returns on repairs. A new rotary vane pump costs $2,500-4,500 depending on capacity, and it gives you another 15,000 hours of reliable service. Calculate the cost of running a degraded pump (higher scrap rate, lower throughput) against the upgrade cost — usually the payback is under 6 months.
Replace the chamber when weld cracks exceed 50mm total length across all seams, or when multiple welds show crack initiation. Localized weld repairs work for small cracks (under 10mm), but once you're patching multiple locations, the chamber has reached end-of-life. A replacement chamber costs $8,000-15,000 depending on size, but it eliminates the leak risk and gives you another 10+ years of production. We've seen foundries spend $3,000 on repeated weld repairs over 18 months when a $12,000 chamber replacement would have solved the problem permanently.
Upgrade to PLC-controlled monitoring if your current system uses manual gauges and you're not tracking pressure trends. Retrofitting a PLC with pressure transducers and data logging costs $3,500-5,000 and pays back in 3-6 months through early leak detection and reduced scrap. The system catches pressure decay before it affects casting quality, so you schedule maintenance instead of reacting to scrap spikes.
Practical Recommendations for Sustained Vacuum System Performance
Track your chamber pressure daily. Export the data from your PLC (or log it manually if you don't have automated monitoring) and plot it weekly. A healthy system shows stable pressure ±2 kPa. If you see a downward trend of 0.5-1 kPa per month, you have seal degradation starting. Schedule inspection and replacement before pressure drops below your process window.
Run pressure decay tests quarterly, not just when you suspect a problem. A 5-minute test every 3 months catches leaks early when they're cheap to fix. Waiting until scrap rate jumps means you've already lost weeks of production value.
Stock critical spare parts on-site: door seal gaskets (2 sets), flange gaskets (4 sets), vacuum pump oil (20 liters), and pump vanes (1 set). Lead time for these parts from overseas suppliers is 4-8 weeks. Having them in your maintenance crib means you can fix a leak the same day instead of waiting for parts while scrap accumulates.
Train your maintenance team on proper flange assembly. Give them torque specs, thread sealant procedures, and gasket installation guidelines. Most vacuum leaks we troubleshoot during commissioning trace back to incorrect assembly — over-torqued bolts, missing thread sealant, or gaskets installed backwards.
If you're specifying a new Vacuum Casting Production Line, ask the OEM about weld quality (robotic vs. manual), pressure testing procedures (do they test at 1.5x rated capacity?), and whether the system includes PLC-based pressure monitoring with trend logging. These design choices determine whether you're replacing seals every 8,000 cycles or every 3,000 cycles, and whether you catch leaks early or discover them through scrap rate spikes.
For foundries running Lost Foam Casting Production Line systems, vacuum integrity is non-negotiable. The process depends on continuous gas evacuation throughout the pour. A leak that would be minor in other casting methods becomes a yield killer in lost foam. Budget for preventive maintenance, track your pressure trends, and replace seals on schedule. The cost of prevention is 5-10% of the cost of running a degraded system.
Need help diagnosing persistent vacuum problems or evaluating whether your current system is worth repairing versus upgrading? Send us your vacuum system specifications, casting alloy, production rate, and current pressure decay test results. Our engineering team will review your data and recommend the most cost-effective path to stable vacuum performance — whether that's seal replacement, pump upgrade, or a complete system refresh. Request Quote with your system details and we'll respond within 24 hours with specific recommendations.

Zhang Peng leads lost foam casting systems at TZFoundry, where he has spent over 12 years engineering vacuum casting lines, coating systems, and foam pattern equipment for export foundries. He specializes in defect prevention and yield optimization across cast iron...