A dripping coating ruins the casting before the metal ever touches the mold. We've seen foundries lose 15-20% of their production to porosity, carbon inclusions, and misruns — all traced back to uneven coating thickness or drip marks that create weak spots in the refractory barrier. The coating is your only defense between molten metal and the foam pattern, so getting it right matters more than most operators realize.
In lost foam, the defect you see in the casting started two steps earlier — at the pattern or the coating. This guide walks through the coating application process with the parameters, checkpoints, and troubleshooting steps we use when commissioning Lost Foam Casting Production Line equipment for export foundries.
Why Coating Defects Cost More Than You Think
Uneven coating thickness creates three expensive problems. Thin spots let metal penetrate the foam too quickly, causing carbon pickup and porosity. Thick spots trap gases during burnout, creating voids and inclusions. Drip marks leave ridges that become stress concentrators or dimensional deviations that push your casting out of tolerance.
We tracked defect rates at a ductile iron foundry in Southeast Asia that was running manual dip coating. Their scrap rate sat at 18% before we adjusted their viscosity control and drying sequence. After implementing measured parameters and rotation timing, scrap dropped to 6% within two weeks. The difference wasn't skill — it was process control.
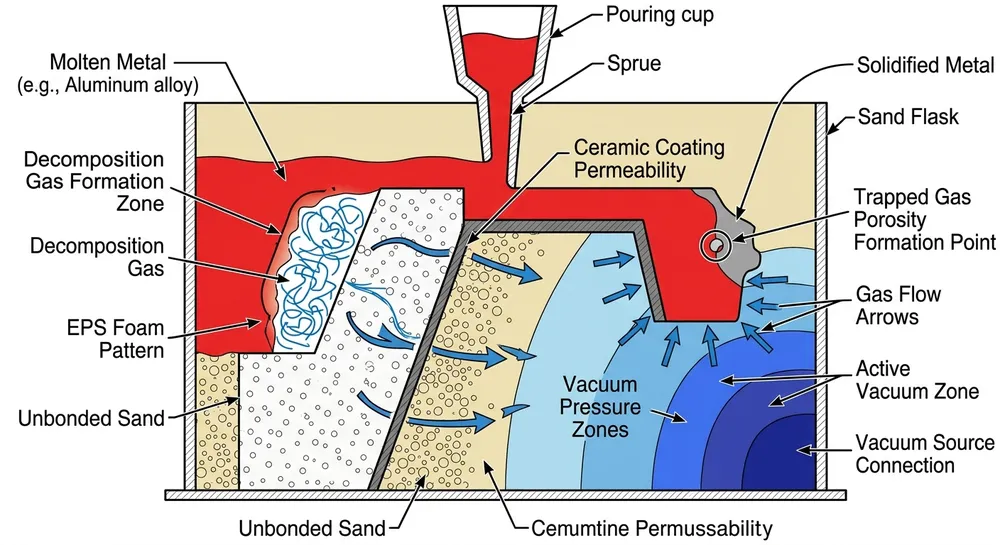
The coating's job is to create a gas-permeable barrier that holds its shape while the foam vaporizes. If the coating drips, cracks, or builds up unevenly, you lose that barrier integrity. Metal finds the weak spot every time.
What Makes Coating Stick or Drip
Coating behavior comes down to three variables: viscosity, EPS surface energy, and drainage time. Refractory coating is a suspension of fine particles (zircon, alumina, or silica) in a water-based binder. When you dip the pattern, the coating needs to wet the foam surface, flow into detail areas, and then stop moving before it drips off the bottom.
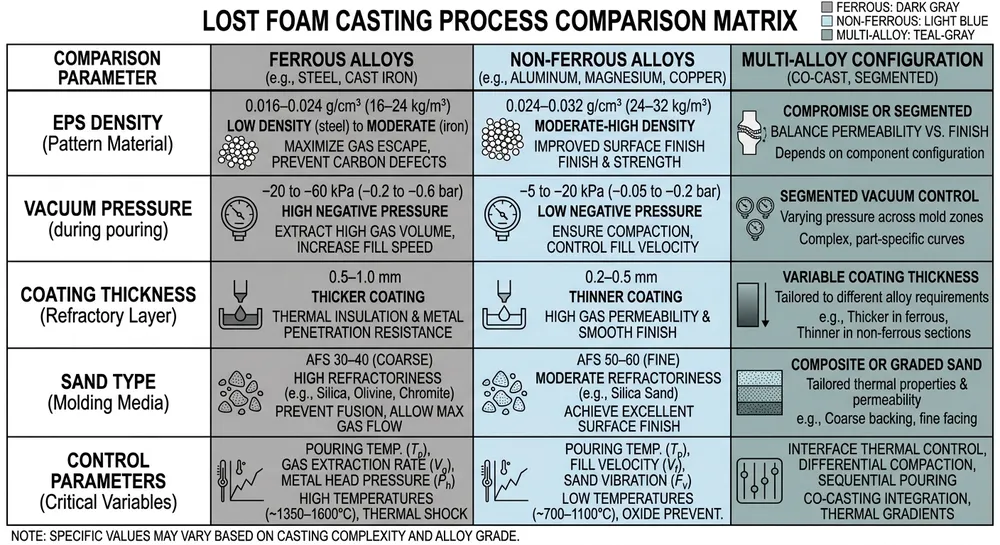
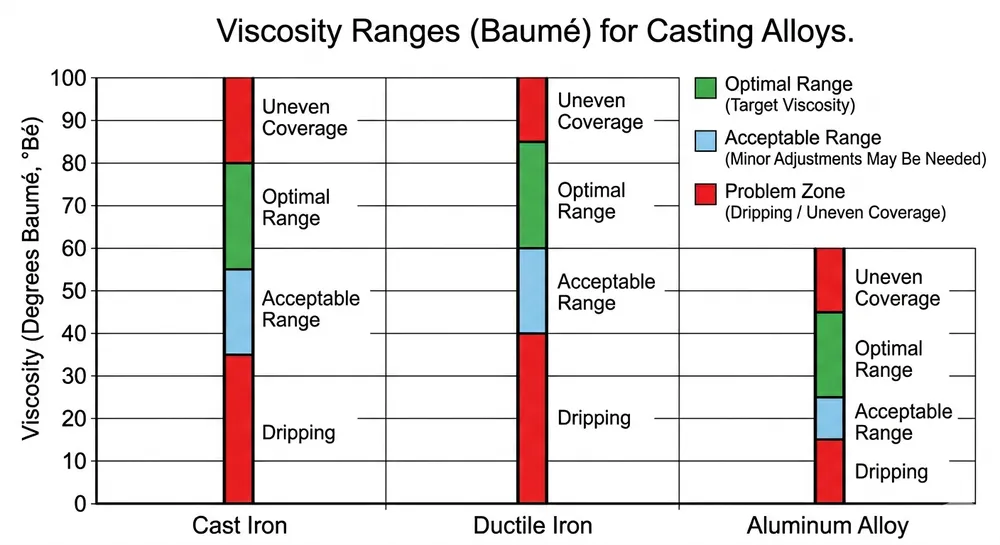
Viscosity controls flow rate. Too thin (below 18 Baumé for most ferrous alloys), and the coating runs off before it builds thickness. Too thick (above 26 Baumé), and you get uneven coverage with thick spots at the bottom and thin spots on vertical walls. The target range depends on your alloy group and pattern geometry, but most cast iron and ductile iron applications land between 20-24 Baumé.
EPS density affects how the coating adheres. Lower-density foam (18-20 kg/m³) has larger bead structure and more surface texture, which helps coating grip but also absorbs more liquid. Higher-density foam (26-28 kg/m³) has a smoother surface that sheds coating faster. We've configured TZFoundry's Lost Foam Casting Foam Coating systems to handle the full 18-28 kg/m³ range by adjusting dip speed and rotation timing based on the pattern density you're running.
Drainage time is the window between pulling the pattern out of the coating tank and rotating it to prevent drips. For standard cast iron coatings at 22 Baumé, you have about 8-12 seconds before gravity pulls enough material to the bottom to create a drip. Aluminum alloy coatings (typically thinner, 18-20 Baumé) drain faster — 5-8 seconds.

Step-by-Step Coating Application Procedure
This procedure assumes you're working with a dip coating system. Spray coating follows different logic and won't be covered here.
1. Pattern Preparation
Inspect the Lost Foam Casting Foam Patterns for surface defects before coating. Look for bead separation, dents, or contamination from handling. Any surface irregularity will show up as a coating defect. Blow off loose beads or dust with compressed air — don't wipe with a cloth, which can leave fibers embedded in the foam.
Check pattern density if you're switching between batches. A density shift from 22 kg/m³ to 26 kg/m³ changes how the coating wets the surface, and you'll need to adjust viscosity or dip time accordingly.
2. Coating Viscosity Adjustment
Measure viscosity with a Baumé hydrometer or Zahn cup before starting each batch. Target ranges:
- Cast iron / ductile iron: 20-24 Baumé (or 25-35 seconds in a Zahn #4 cup)
- Aluminum alloys: 18-20 Baumé (or 20-28 seconds in a Zahn #4 cup)
- Steel castings: 22-26 Baumé (or 30-40 seconds in a Zahn #4 cup)
If viscosity is too low, add dry refractory powder gradually while mixing. If too high, add water in small increments (50-100ml at a time for a 200-liter batch) and re-measure. Don't guess — measure after every adjustment. We've seen operators add water by eye and drop viscosity so far that the coating wouldn't build thickness even after three coats.
Mix the coating thoroughly before dipping. Refractory particles settle quickly, and if you dip into unmixed coating, you'll get inconsistent thickness across the pattern.
3. Dipping Technique
Lower the pattern into the coating tank slowly and steadily. Dip speed should be 50-100 mm/second for most patterns. Too fast creates air bubbles trapped under the coating. Too slow wastes time and doesn't improve coverage.
Submerge the entire pattern. If you're coating a large pattern that won't fit fully into the tank, dip one section, let it dry, then dip the other section with a 20-30mm overlap zone. The overlap prevents a weak seam where the two coated areas meet.
Hold the pattern submerged for 3-5 seconds to let the coating wet all surfaces, then pull it out at the same steady speed you used going in.
4. Drainage and Rotation
This is where most dripping happens. As soon as the pattern clears the coating surface, start a timer. You have 8-12 seconds (for cast iron coatings) before drips form.
Hold the pattern in the dipping orientation for the first 3-4 seconds to let excess coating drain back into the tank. Watch the bottom edge — when you see the coating stop flowing and start to set, rotate the pattern 180 degrees. This redistributes the coating and prevents buildup at the bottom.
For complex geometries with horizontal surfaces or pockets, rotate through multiple orientations during the drainage window: vertical → horizontal → inverted → back to vertical. The goal is to keep the coating moving just enough to prevent drips, but not so much that you thin it out.
Automated coating systems handle this rotation sequence with programmable fixtures. Manual dipping requires an operator who can read the coating behavior and adjust timing on the fly. (We've trained installation teams in 14 countries to do this via video call during commissioning — it's teachable, but it takes practice.)
5. Drying Between Coats
Set the coated pattern in a drying area with controlled airflow. Target drying conditions:
- Temperature: 20-30°C (room temperature works fine; forced heat isn't necessary for most coatings)
- Humidity: below 70% RH
- Airflow: gentle circulation, not direct fan blast
Drying time depends on coating thickness and ambient conditions. For a single coat at 0.5-0.8mm wet thickness, expect 2-4 hours until the surface is dry to the touch. The coating needs to be fully dry before applying the next coat — if you dip a partially dry pattern, the second coat will reactivate the first layer and cause cracking or peeling.
Check dryness by touching a non-critical area with your fingertip. If it leaves a mark or feels tacky, wait longer. If it feels firm and chalky, it's ready for the next coat.
6. Number of Coats and Target Thickness
Most ferrous castings need 2-3 coats to reach the target dry thickness:
- Cast iron / ductile iron: 0.8-1.2mm dry thickness (typically 2-3 coats)
- Aluminum alloys: 0.5-0.8mm dry thickness (typically 2 coats)
- Steel castings: 1.0-1.5mm dry thickness (typically 3 coats)
Measure dry thickness with a coating thickness gauge or a needle micrometer on a test pattern. Don't assume each coat adds the same thickness — the first coat soaks into the foam surface more than subsequent coats, so the buildup rate increases with each layer.
After the final coat, allow 12-24 hours of drying time before pouring. Rushing this step causes steam generation during metal fill, which creates porosity.

Measuring and Verifying Coating Thickness
You can't manage what you don't measure. Coating thickness directly affects casting quality, so verification is not optional.
Wet-film measurement: Use a wet-film thickness gauge immediately after dipping. This is a comb-style tool with graduated teeth that you press into the wet coating. The highest tooth that comes out clean indicates the wet thickness. Target 0.8-1.2mm wet for ferrous alloys, 0.6-0.9mm for aluminum.
Dry-film measurement: After full drying, measure with a needle micrometer or an ultrasonic thickness gauge. Cut a test pattern in half and measure at 5-6 locations (top, sides, bottom, detail areas). Acceptable tolerance is ±0.15mm from your target thickness. If you're seeing variation beyond that, your viscosity control or rotation timing needs adjustment.
Visual inspection: Look for drip marks (ridges running vertically down the pattern), thin spots (where you can see foam texture through the coating), and thick spots (usually at the bottom or in pockets). Any of these will cause defects in the casting.
We document coating thickness data in the factory commissioning reports for every Vacuum Casting Production Line we ship. The report shows actual measurements from test patterns run on your specific equipment, so you know what thickness range to expect when you start production.
Troubleshooting Common Coating Defects
Here's the defect-to-fix table we use during commissioning. Most coating problems trace back to one of these root causes.
| Defect | Root Cause | Corrective Action |
|---|---|---|
| Dripping / runs | Viscosity too low, or drainage time too long before rotation | Increase viscosity by 1-2 Baumé. Rotate pattern within 8 seconds of pulling from tank. |
| Uneven thickness (thick bottom, thin top) | Insufficient rotation during drainage | Rotate pattern 180° during drainage window. For complex shapes, rotate through multiple orientations. |
| Cracking after drying | Coating applied over partially dry previous coat, or drying too fast | Ensure previous coat is fully dry before next dip. Reduce airflow or temperature if cracking persists. |
| Bubbles / pinholes | Air trapped during dipping, or foam surface contamination | Slow dip speed to 50-100 mm/sec. Clean pattern surface before coating. Check for bead separation on foam. |
| Peeling / delamination | Poor adhesion due to high-density foam (26-28 kg/m³) or contaminated surface | Reduce viscosity by 1 Baumé for high-density foam. Ensure pattern is clean and dry before first coat. |
| Thin spots in detail areas | Viscosity too high, preventing flow into recesses | Reduce viscosity by 1-2 Baumé. Increase submersion time to 5-7 seconds. |
| Coating won't build thickness | Viscosity too low, or refractory content too diluted | Measure viscosity — should be 20-24 Baumé for ferrous. Add dry refractory powder if needed. |
Most of these fixes take 10 minutes to implement. The hard part is recognizing the defect early, before you've coated 50 patterns with the same problem.
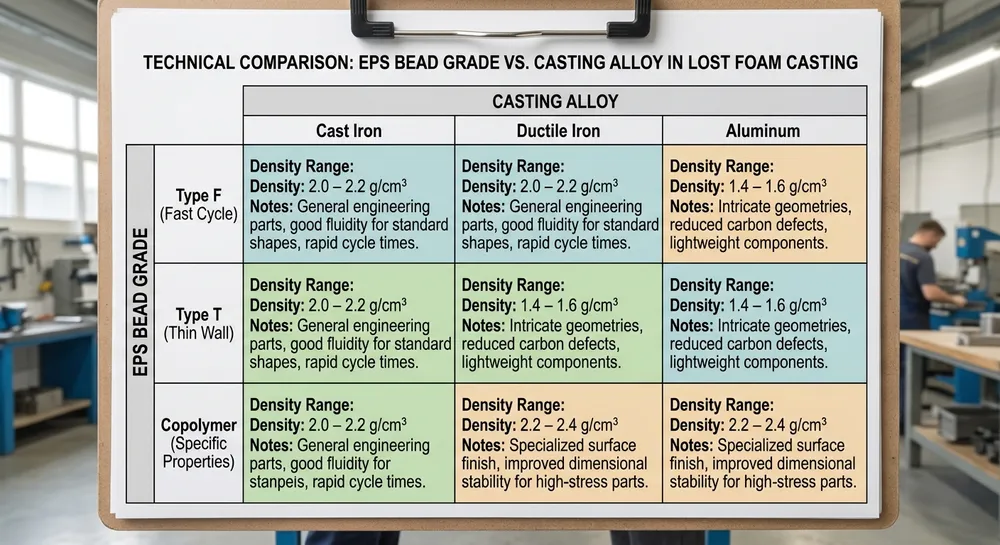
How EPS Density Affects Coating Adhesion
Pattern density is the variable most operators ignore until they switch foam suppliers and suddenly their coating process stops working. EPS density affects surface texture, liquid absorption, and how quickly the coating sets.
Low-density foam (18-20 kg/m³): Larger bead structure creates more surface area and texture. Coating grips well, but the foam absorbs more liquid from the coating, which can thin out the refractory layer. You'll need slightly higher viscosity (add 1-2 Baumé) to compensate for absorption. Drying time increases because the foam holds moisture longer.
Mid-density foam (22-24 kg/m³): This is the standard range most coating systems are designed for. Coating adhesion is predictable, and the parameters in this guide apply directly.
High-density foam (26-28 kg/m³): Smoother surface with tighter bead structure. Coating doesn't grip as well initially, and it drains faster during the drainage window. Reduce viscosity by 1-2 Baumé to improve wetting, and shorten your rotation timing to 6-8 seconds instead of 8-12 seconds. Some high-density foams benefit from a primer coat (very thin, 16-18 Baumé) before applying standard-viscosity coats.
TZFoundry's coating systems handle the full 18-28 kg/m³ range because we configure dip speed, rotation timing, and drying tunnel airflow based on the foam density you specify during equipment commissioning. If you're running manual coating, you'll need to adjust parameters yourself when switching foam batches.
Equipment Features That Automate Thickness Control
Manual dipping works for low-volume production or prototype work, but it's inconsistent. Automated coating systems eliminate operator variability and improve thickness uniformity across every pattern.
Programmable dip speed: Motor-controlled lowering and raising at consistent speeds (typically 50-100 mm/sec, adjustable). This prevents the air entrapment and uneven wetting you get with manual dipping.
Rotation fixtures with timed sequences: Automated rotation through preset angles at specific intervals during drainage. The system rotates the pattern at 8 seconds, 15 seconds, and 22 seconds (for example) to redistribute coating and prevent drips. You program the sequence once based on your coating viscosity and pattern geometry, then it repeats identically for every pattern.
Controlled drying tunnels: Conveyor-fed drying chambers with regulated temperature, humidity, and airflow. Patterns move through the tunnel at a set speed, so every pattern gets the same drying time. This eliminates the guesswork of "is it dry enough for the next coat?"
Viscosity monitoring: Inline sensors measure coating viscosity continuously and alert the operator when it drifts outside the target range. Some systems auto-adjust by adding water or refractory powder, but we usually recommend manual adjustment with operator confirmation — you don't want an automated system correcting a sensor error and ruining a batch.
Remote diagnostics via 4G module: Our coating systems ship with remote access so your maintenance team can pull process logs, adjust parameters, and troubleshoot defects without waiting for an on-site visit. We've diagnosed coating thickness problems from Qingdao while the foundry was running production in Mexico — the 4G module sends real-time data on dip speed, rotation timing, and drying tunnel conditions.
When you're evaluating coating equipment, ask for commissioning data from the supplier's factory. We provide thickness measurements, defect photos, and process logs from test runs on your specific equipment configuration before it ships. That data tells you whether the system can actually hold the tolerances you need, or whether you're buying equipment that requires constant manual adjustment to work.
When to Upgrade from Manual to Automated Coating
Manual coating makes sense when you're running low volumes (under 50 patterns per day), working with simple geometries, or still dialing in your process parameters. Once you cross into higher-volume production or complex part geometries, manual coating becomes the bottleneck.
Volume threshold: If you're coating more than 100 patterns per day, manual dipping costs you more in labor and scrap than an automated system costs in capital and maintenance. We've seen foundries stay on manual coating because "it works," then lose 12-15% of production to thickness variation and drip defects. The payback period on automated coating is typically 8-14 months at that volume.
Quality consistency benchmark: If your scrap rate from coating defects is above 8%, or if you're seeing thickness variation beyond ±0.2mm across patterns, manual coating isn't giving you the control you need. Automated systems hold ±0.1mm thickness variation when properly configured.
Part complexity: Patterns with deep pockets, thin walls, or horizontal surfaces are difficult to coat manually without drips or thin spots. Automated rotation fixtures handle complex geometries more reliably because they can rotate through 4-6 orientations during drainage, which is hard to do by hand without dropping the pattern.
If you're sourcing coating equipment, send your alloy type, pattern dimensions, and target production rate to the supplier. A competent engineering team will recommend system specs based on your actual requirements, not just sell you the largest system in the catalog. We configure coating line parameters during factory commissioning and document the results before shipment — that's the difference between equipment that works when it arrives and equipment that needs six months of troubleshooting to get right.
What to Do Next
Coating thickness control is process discipline, not magic. Measure your viscosity, time your drainage, rotate before drips form, and verify thickness on test patterns before running production. Most coating defects are preventable if you catch them at the parameter level instead of waiting until you see porosity in the casting.
If your current coating process is giving you inconsistent thickness or scrap rates above 8%, the problem is usually viscosity drift, inadequate rotation timing, or foam density mismatch. Start by measuring your actual coating thickness at 5-6 locations on a test pattern, then compare that to your target spec. The gap between actual and target tells you where to adjust.
For foundries evaluating coating equipment or troubleshooting existing systems, Request Quote with your alloy type, pattern dimensions, foam density range, and current scrap rate. TZFoundry's engineering team will recommend coating system specs and provide factory commissioning data showing actual thickness uniformity from your equipment configuration before it ships.

Zhang Peng leads lost foam casting systems at TZFoundry, where he has spent over 12 years engineering vacuum casting lines, coating systems, and foam pattern equipment for export foundries. He specializes in defect prevention and yield optimization across cast iron...