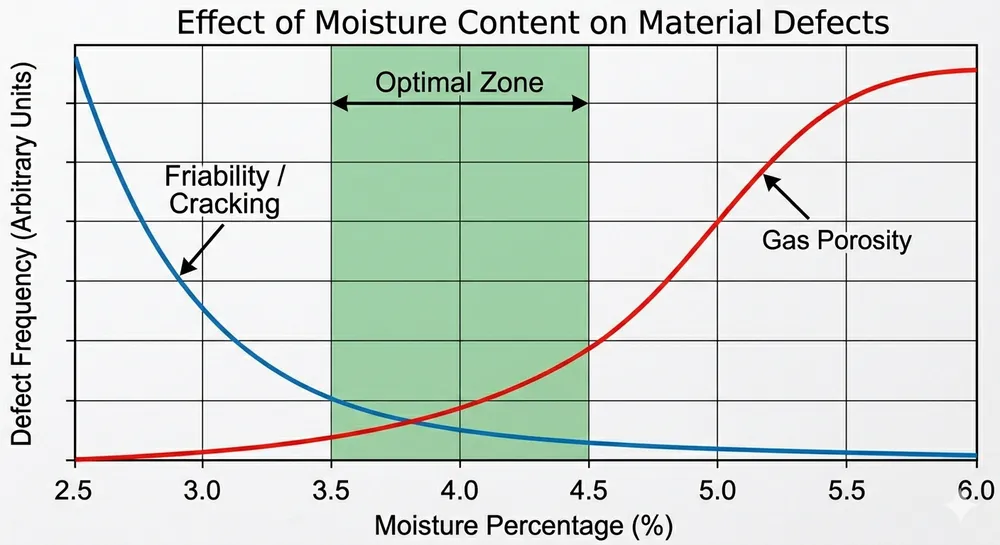
A 2% moisture drift in your clay sand preparation line doesn't sound dramatic until you're staring at 40 molds with surface veining and another 15 with gas porosity. That's 55 castings headed for scrap or rework before lunch. The moisture content in green sand sits between 3.5% and 4.5% for most ferrous casting operations — drift below 3.2% and you get friable molds that crack during handling, drift above 5.0% and you're dealing with steam-related defects that show up after pouring.
I've commissioned clay sand lines across four continents, and moisture control failures account for roughly 60% of the startup problems we troubleshoot remotely. The issue isn't that foundries don't measure moisture — it's that they measure it manually every 2 hours while the sand preparation line drifts continuously between checks. By the time your operator catches the problem, you've already produced 300-400 molds with compromised properties.
Why Moisture Drift Destroys Mold Quality
Clay sand molding depends on water as the activation mechanism for bentonite clay. When you mix dry bentonite with silica sand, nothing happens. Add water, and the clay particles swell and coat the sand grains, creating the plasticity and green strength you need for mold handling. The relationship between moisture content and compactability follows a narrow curve — too little water and the clay doesn't activate fully, too much and you dilute the bonding effect while introducing steam generation risk.
The problem compounds in reclaimed sand systems. Your sand reclamation line removes broken clay and fines, but it also removes moisture. Fresh sand coming out of your crusher and magnetic separator typically sits at 0.5-1.2% moisture depending on your cooling method. When that reclaimed sand hits the mixer, you're adding water to bring it back up to the 3.5-4.5% working range. If your water addition system drifts by 10% (common with manual valve control), you're looking at ±0.4% moisture variation — enough to shift compactability by 15-20%.
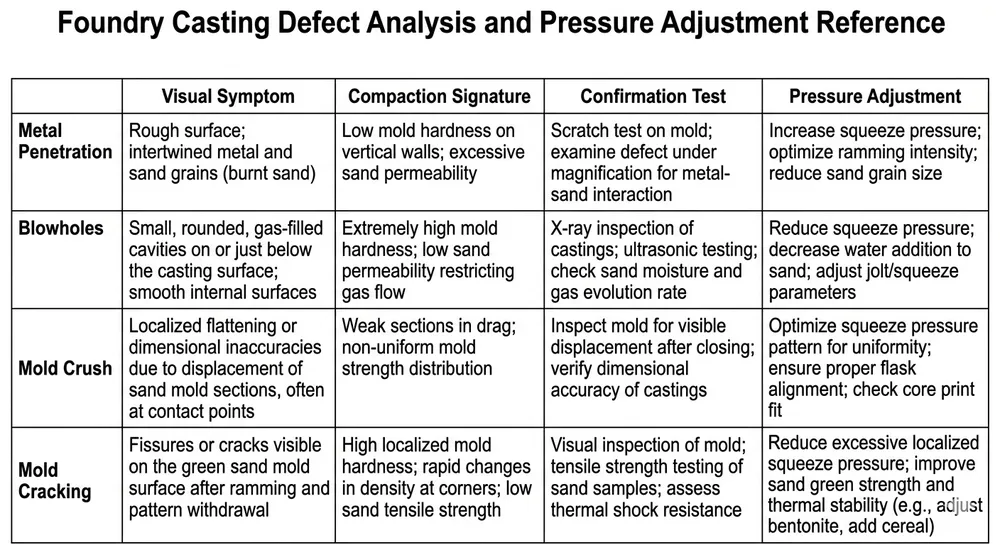
The casting defects show up predictably. Low moisture (below 3.2%) produces molds with insufficient green strength — they crack during stripping or develop surface erosion when molten metal hits the cavity. High moisture (above 5.0%) traps steam in the mold face, creating gas porosity, blowholes, and surface veining. Both conditions increase your scrap rate, but high moisture is worse because the defects don't show up until after pouring, so you've already invested the metal cost.

Step-by-Step Moisture Control Integration
Here's how we configure moisture control on TZFoundry clay sand lines. This assumes you're running a continuous mixer with reclaimed sand input — if you're batch mixing, the sensor placement changes but the control logic stays the same.
Step 1: Install the moisture sensor at the mixer discharge
Mount your capacitance-type moisture sensor 1.5-2.0 meters downstream from the mixer discharge point. Don't mount it inside the mixer — the turbulence gives you unstable readings. Don't mount it too far downstream either — you want feedback delay under 15 seconds so your PLC can adjust water addition before the next batch enters the mixer. We use a through-belt sensor that reads moisture content as sand passes over the conveyor. Calibrate it against lab oven-dry testing (105°C for 2 hours) when you first install it, then verify calibration weekly for the first month.
Step 2: Connect the sensor to your PLC water control valve
Your water addition system needs a proportional control valve, not an on/off solenoid. We typically spec a 0-10V analog output from the PLC to a motorized ball valve with 0-100% flow range. The PLC reads moisture from the sensor, compares it to your setpoint (usually 4.0% for general iron casting), and adjusts the valve position to bring moisture back into range. Set your control deadband at ±0.15% — tighter than that and you get hunting behavior where the valve oscillates, wider than that and you're not controlling anything useful.
Step 3: Program the PID control loop
Your PLC needs a PID (proportional-integral-derivative) control algorithm. Start with conservative tuning parameters: P=2.0, I=0.5, D=0.1. These values work for most continuous mixers running 8-12 tons per hour. If your line runs faster (15+ tons/hour), increase the integral term to I=0.8 to compensate for the shorter residence time in the mixer. The derivative term prevents overshoot — if moisture drops suddenly (common when you switch from one reclaimed sand hopper to another), the D term slows down the water addition rate so you don't overcorrect.
We pre-program these parameters at our Qingdao facility before shipment, but you'll need to fine-tune them during commissioning based on your specific sand composition and mixer retention time.
Step 4: Set up high/low alarms and automatic line stop
Configure two alarm levels in your PLC. Warning alarms at 3.3% (low) and 4.7% (high) — these trigger a visual indicator on your HMI but don't stop the line. Critical alarms at 3.0% (low) and 5.2% (high) — these stop sand flow to the molding line and alert your operator. The critical alarm prevents you from producing 200 bad molds before someone notices the problem. Some buyers disable the automatic stop because they don't want production interruptions, but that's a false economy — you're trading 5 minutes of downtime for 2 hours of scrap sorting later.
Step 5: Integrate compactability testing as a secondary check
Moisture content is your primary control variable, but compactability is what actually matters for mold quality. Install a compactability tester (we use a standard AFS-style pneumatic rammer) at your quality control station and test every 30 minutes during the first week of operation. Your target compactability range depends on your molding machine — flaskless lines typically need 40-45% compactability, flask-based lines run 35-40%. If your moisture control is working correctly, compactability should stay within ±2% of target. If compactability drifts while moisture stays stable, you've got a clay content problem or a mixer retention time issue, not a moisture problem.

Validation and Troubleshooting
Your moisture control system needs regular validation to catch sensor drift and calibration errors before they affect production. Here's the validation protocol we recommend:
Daily checks (operator level): Compare the PLC moisture reading to a manual moisture test using your lab oven or a handheld moisture meter. Pull a sand sample from the mixer discharge (same location as your sensor), run it through your standard test method, and verify the readings match within ±0.2%. If they don't match, recalibrate the sensor before starting production.
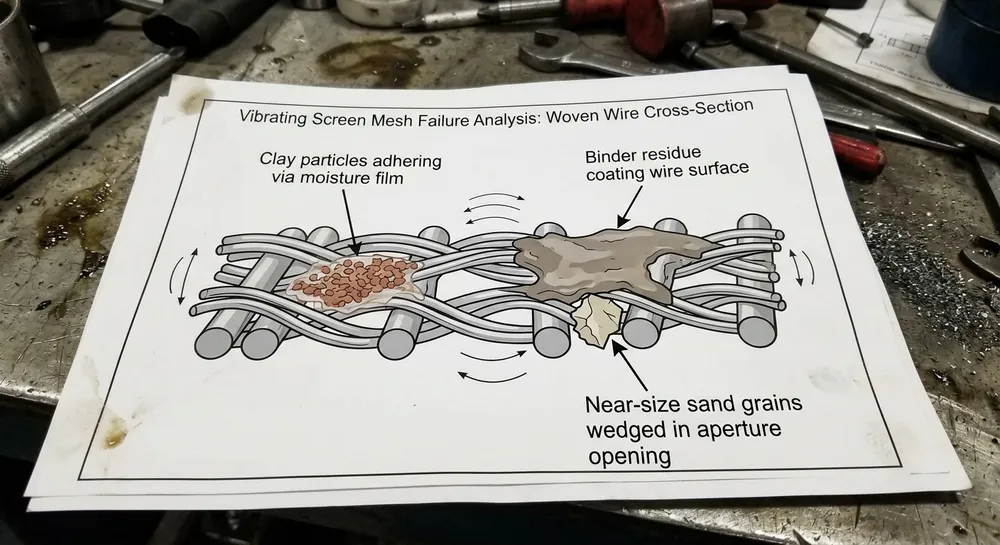
Weekly checks (maintenance level): Inspect the sensor face for clay buildup. Capacitance sensors read moisture by measuring the dielectric constant of the sand, and clay accumulation on the sensor surface throws off the reading. Clean the sensor with compressed air and a soft brush — don't use solvents or abrasive pads because you'll damage the sensor coating. Check the water valve for leaks and verify it's responding correctly to PLC commands by manually adjusting the setpoint and watching the valve position indicator.
Monthly checks (engineering level): Run a full calibration cycle. Set your moisture setpoint to 3.5%, let the system stabilize for 20 minutes, then pull three samples and average the lab results. Repeat at 4.0% and 4.5%. If your sensor reads consistently high or low across all three setpoints, adjust the calibration offset in your PLC. If the error is non-linear (accurate at 4.0% but drifts at the extremes), you need sensor replacement — that's a sign of sensor degradation.
Common troubleshooting scenarios:
If moisture reads stable but molds are still cracking, check your clay content — you might be running below 8% active bentonite, which means even perfect moisture won't give you adequate green strength. If moisture oscillates rapidly (±0.3% every 30 seconds), your PID tuning is too aggressive — reduce the proportional gain from 2.0 to 1.5. If moisture drifts slowly upward over a 4-hour shift, you've got a water valve leak or your reclaimed sand is coming in wetter than expected (check your sand cooler discharge temperature — hot sand holds less moisture, so if your cooler isn't working, you're effectively adding more water than the PLC thinks).
Upstream Prevention: Sand Reclamation and Preparation Quality
Moisture control problems often start before the sand reaches your mixer. Your clay sand processing line includes reclamation, cooling, and screening stages, and each one affects the moisture baseline you're trying to control.
Sand temperature matters. Hot sand (above 60°C) coming out of your shakeout and reclamation system will flash off water faster than your moisture sensor can compensate. We've seen foundries where the morning shift runs fine but the afternoon shift produces dry molds — turns out their sand cooler couldn't keep up with ambient temperature rise, so reclaimed sand temperature climbed from 45°C at 8 AM to 75°C by 2 PM. The moisture control system was working correctly, but the sand was losing water to evaporation between the mixer and the molding machine. Solution: either upgrade your sand cooler capacity or add a secondary moisture sensor at the molding machine hopper to catch the drift.
Fines content affects water demand. Your magnetic separator and vibrating screens remove metal contamination and oversized lumps, but they also remove some clay fines. If your screening is too aggressive (using a finer mesh than necessary), you're stripping out active clay and forcing your system to add more bentonite to maintain green strength. More bentonite means more water demand to activate it, which pushes your moisture setpoint higher. Most iron foundries run 12-16% fines content (material passing 200 mesh) — if you're below 10%, you're probably over-screening.
Bentonite addition consistency. If you're adding fresh bentonite to compensate for clay loss in reclamation, make sure your bentonite feeder is calibrated correctly. We've troubleshot lines where the bentonite screw feeder was delivering 15% less than the setpoint because the screw flights were worn. The foundry kept increasing moisture to compensate for weak molds, not realizing the root cause was insufficient clay. Check your bentonite addition rate monthly by running the feeder for 10 minutes into a collection bucket and weighing the output.
Real-World Performance Data
When we commission a new clay sand line, we run a 72-hour validation test to verify moisture control performance. Here's what the data typically looks like on a properly configured system:
A line running 10 tons per hour with a 4.0% moisture setpoint will hold ±0.12% standard deviation over a 12-hour shift. That translates to compactability variation of ±1.5%, which is tight enough for flaskless molding at 80-100 molds per hour. Scrap rates from moisture-related defects (gas porosity, surface veining, mold cracking) drop from 3-5% on manual control systems to under 0.8% with PLC-integrated moisture feedback.
The payback calculation is straightforward. A 200-mold-per-hour line producing 1,600 molds per shift with 3% moisture-related scrap loses roughly 50 molds daily. At $15-25 per casting in metal and labor cost, that's $750-1,250 per day in avoidable scrap. A PLC moisture control system (sensor, valve, programming) costs $8,000-12,000 installed, so you're looking at 10-15 days to payback on scrap reduction alone. That doesn't count the labor savings from eliminating manual moisture testing every 2 hours.

What to Do Next
If you're running manual moisture control and seeing inconsistent mold quality, start by logging your current moisture variation. Pull samples every 30 minutes for a full shift and plot the results — if you're seeing ±0.4% or more variation, you're losing money to scrap. Calculate your current moisture-related scrap rate (gas porosity + surface veining + mold cracking) and multiply by your daily production volume to get the cost baseline.
For new line installations, specify PLC moisture control from the beginning. The incremental cost is 6-8% of total line cost, but it eliminates the single biggest source of startup problems we see in clay sand operations. If you're evaluating suppliers, ask whether their moisture control system includes automatic calibration verification and remote diagnostics — we've had buyers catch sensor drift problems via our 4G monitoring system before their operators noticed anything wrong on the shop floor.
For retrofit projects on existing lines, the integration depends on your current mixer configuration. Continuous mixers are straightforward — add the sensor, valve, and PLC module, then tune the control loop during a weekend shutdown. Batch mixers need a different approach because you're controlling water addition per batch rather than continuously, but the same sensor and valve hardware works. Send us your current line layout and production rate, and we'll specify the exact sensor placement and control configuration for your setup. You can reach our engineering team through our contact page or request detailed specifications through our RFQ system.
The difference between a clay sand line that holds tolerance and one that drifts comes down to closing the feedback loop. Manual testing gives you data, but it doesn't give you control. Automated moisture management turns that data into corrective action before the problem reaches your molding machine.

Baocun Zhu is the Senior Clay Sand Process Engineer at TZFoundry in Qingdao. With over 14 years commissioning clay sand molding, reclamation, and preparation lines for export foundries, he turns floor-space constraints and throughput targets into working production systems. His...